Fire starting techniques
Friction-based fire-starting requires wood dust to reach 800°F (425°C) before a coal forms — a number that explains why damp tinder, short bow strokes, and soft pressure all fail at the same point. Ignition method is rarely the problem. Tinder preparation and technique consistency are. The methods on this page work across all conditions when executed correctly; most fire failures come from skipping steps during practice, then discovering the gap when conditions are worst.
Educational use only
This page is for educational purposes only. Hands-on skills should be learned and practiced under qualified supervision before relying on them in emergencies. Use this information at your own risk.
Before you start - Skills: Tinder identification (dry birch bark, fatwood shavings, char cloth, dryer lint, cattail fluff, fine grass — finer than your hair and completely dry). Tinder bundle construction (handful-sized, 4–6 in (10–15 cm) diameter when loose, fluffed to a bird's-nest shape). Building a fire structure — see fire structure selection. Recognizing wind direction to orient the fire lay. If your goal is cooking, see cooking over fire and coals. - Materials: Primary ignition source — BIC lighter (inexpensive) or 6 in (15 cm) ferro rod with striker (inexpensive); backup: stormproof matches or magnifying lens. Dry tinder bundle, 1 handful. Kindling — pencil-thick dry twigs, 1–2 large handfuls. Fuel wood — thumb- to wrist-thick dry sticks, one arm-load. Optional: petroleum jelly + cotton ball tinder (burns 3–5 min from a single spark, inexpensive to prepare). - Conditions: Dry fuel available within 50 ft (15 m) — standing-dead wood preferred over ground wood, which absorbs moisture. Wind below ~15 mph (24 kph) for easy ignition; higher winds require a windbreak or shielded site. No active burn bans (check local restrictions before lighting). Cleared mineral soil or stone base — remove leaf litter and pine duff to a 5 ft (1.5 m) radius around the fire site. Water or sand within reach for extinguishment. - Time: 5–15 min from spark to sustained flame in good conditions; 30–60 min in wet, cold, or windy conditions. Establish fire at least 30 min before sunset if warmth is the goal.
Action block
Do this first: Collect and fluff three separate handfuls of dry tinder — fine material finer than your hair for the center, medium shredded inner bark for the middle layer, coarse dead leaves for the outer nest — before you touch any ignition source (10 min) Time required: Active: 10 min tinder prep + 5–15 min spark-to-flame in good conditions; wait: none; recurrence: rebuild tinder supply before each fire attempt; allow 30–60 min in wet or cold conditions Cost range: Inexpensive for a ferrocerium rod and commercial tinder; free for natural tinder and bow drill kit from foraged materials Skill level: Beginner for lighter and stormproof matches; intermediate for ferro rod; advanced for bow drill friction fire Tools and supplies: Tools: ferrocerium rod (3/8 in / 10 mm diameter minimum) and striker, hand drill bow set (fireboard, spindle, bow, handhold), fixed-blade knife, lighter (backup). Supplies: tinder bundle (cotton balls + petroleum jelly OR fine birch bark shavings + dryer lint), kindling sticks (pencil- to thumb-diameter dry wood), fuel wood (thumb- to wrist-diameter dry hardwood). Infrastructure: cleared fire ring (mineral soil or stone base, 5 ft / 1.5 m radius), water or sand within reach for extinguishment, windbreak in exposed sites. Safety warnings: See Striker direction below — the ferro rod striker is sharp, the motion is forceful, and sparks reach approximately 6,000°F (3,315°C); always strike away from the body
What's the most reliable way to start a fire?
The four primary methods span a wide range of skill investment, cost, and reliability in adverse conditions. Carry at least three from different categories — if all three are lighters and matches, one wet bag eliminates them simultaneously.
| Method | Skill | Works wet | Cost |
|---|---|---|---|
| Lighter (BIC) | Low | Partly | Inexpensive |
| Stormproof matches | Low | Yes | Inexpensive |
| Ferro rod | Low–Medium | Yes | Inexpensive |
| Bow drill | High | No | Free |
Layered redundancy rule: A lighter and a BIC in a zipper bag are not two methods — they are one method stored twice. Redundancy means different operating principles. A ferro rod works when a lighter is flooded. A bow drill works when both are lost.
Tinder preparation
Tinder is where most fires fail. The ignition source is rarely the problem. A cold ember from a ferro rod lands on damp, compressed grass and dies. A BIC lighter held under green leaves goes out. The bundle must be right before you touch any ignition source to it.
Natural tinder species and prep
-
Cattail fluff (Typha spp.) — harvest brown flower heads before they fully burst open. Split the head and tease the fluff loose with your fingers. Integrate into a nest with coarser backing material; pure fluff ignites instantly but burns out in two seconds without slower fuel behind it.
-
Inner bark of cedar or birch — strip the dry, papery inner layers (not the outer bark). Cedar inner bark shreds into fine fibers with your fingernails. Birch bark contains volatile oils that ignite even when slightly damp; scrape the outer surface to produce fine shavings. Both are reliable spark-catchers when dry.
-
Dried grass — works when fully dry. Collect standing dead grass, not material lying on damp ground. Wring a handful between your palms: if it springs back to shape, it is dry enough. If it bends and holds a crease, moisture content is too high — keep looking.
-
Punk wood — the powdery, fibrous center of rotted hardwood logs. Good punk wood crumbles to dust when pinched and is bone-dry inside even if the log surface is wet. It smolders for a long time after receiving a spark, which makes it ideal for coal transfer. Avoid punk that is spongy and wet — it will not hold a coal.
Tinder bundle construction
-
Collect material in three grades: coarse (dead leaves, bark strips), medium (shredded inner bark, dry grass stems), and fine (cattail fluff, punk wood dust, scraped birch shavings).
-
Form the coarse material into an outer nest roughly the size of a cupped hand.
-
Nest the medium material inside that, leaving a shallow depression at the center.
-
Pack the fine material loosely into the center depression. This is where the spark or coal will land.
-
Test the bundle: Squeeze a handful firmly. A good bundle crumbles toward dust, collapses lightly, and springs back only partway. A bad bundle bends without breaking, holds its shape under pressure, or feels cold and damp. Bad bundles do not pass the test at home, let alone in the field.
Commercial tinder options
- Petroleum jelly cotton balls — saturate standard cotton balls with petroleum jelly and store in a small tin or bag. Inexpensive, extremely reliable, burns for 3–4 minutes per ball.
- Fatwood shavings — resin-saturated heartwood from old pine stumps. Shave a small pile with a knife. Ignites from a ferro rod and burns hot even in damp conditions.
- WetFire tinder cubes — purpose-built fire-starting tabs that ignite from a single spark and burn in standing water. An inexpensive addition to any kit.
Field note
Most failed fire attempts trace back to the tinder bundle, not the ignition source. If your bundle is damp, not fluffy, or packed too tight, you will fail regardless of how good your lighter is. When you think you have enough fine material at the center, add 50% more.
Lighter and matches
The simplest methods require the least technique. Their failure modes are environmental rather than procedural.
BIC lighter procedure
- Cup both hands around the lighter and tinder to block wind.
- Strike the wheel firmly with the thumb and hold the flame — do not flick and release.
- Hold the flame at the base of the tinder bundle for 3–5 seconds. Move the flame slowly through the bundle rather than holding it at a single point; moving flame catches more fibers.
- Blow gently once small embers appear.
Cold weather limitation: Butane loses volatility below 32°F (0°C). In freezing conditions, carry the lighter in an inner pocket against your body and warm it in your palm for 20 seconds before striking. A BIC warmed this way will fire reliably down to -30°F (-34°C).
Altitude limitation: Standard butane lighters become unreliable above approximately 8,000 ft (2,440 m) in cold conditions. Above this altitude, carry a windproof torch lighter with a pressurized fuel system, which maintains performance to significantly higher elevations.
Stormproof matches (UCO)
- Grip the match near the head — not by the tip — and strike along the full length of the striker strip in one smooth motion.
- The match will catch and sustain a burn for up to 15 seconds (UCO standard) even in driving rain or 60 mph (97 km/h) wind. The Titan version burns for up to 25 seconds.
- If the match extinguishes, it will relight — place the head back against the striker and strike again.
- After submerging the match in water, shake off excess and strike immediately. The chemical reaction resumes on contact with the striker.
Waterproofing your own matches: Dip the heads of strike-anywhere matches in clear nail polish and allow to dry on a wire rack. Store in a waterproof case with a striker strip glued to the inside lid. This significantly reduces the fire risk of the match head during transport.
Match storage
Stormproof matches come 25 per box. At 15 seconds per match, that is over 6 minutes of sustained flame time per box — enough to establish a fire even in difficult conditions. Carry at least two boxes.
Ferro rod
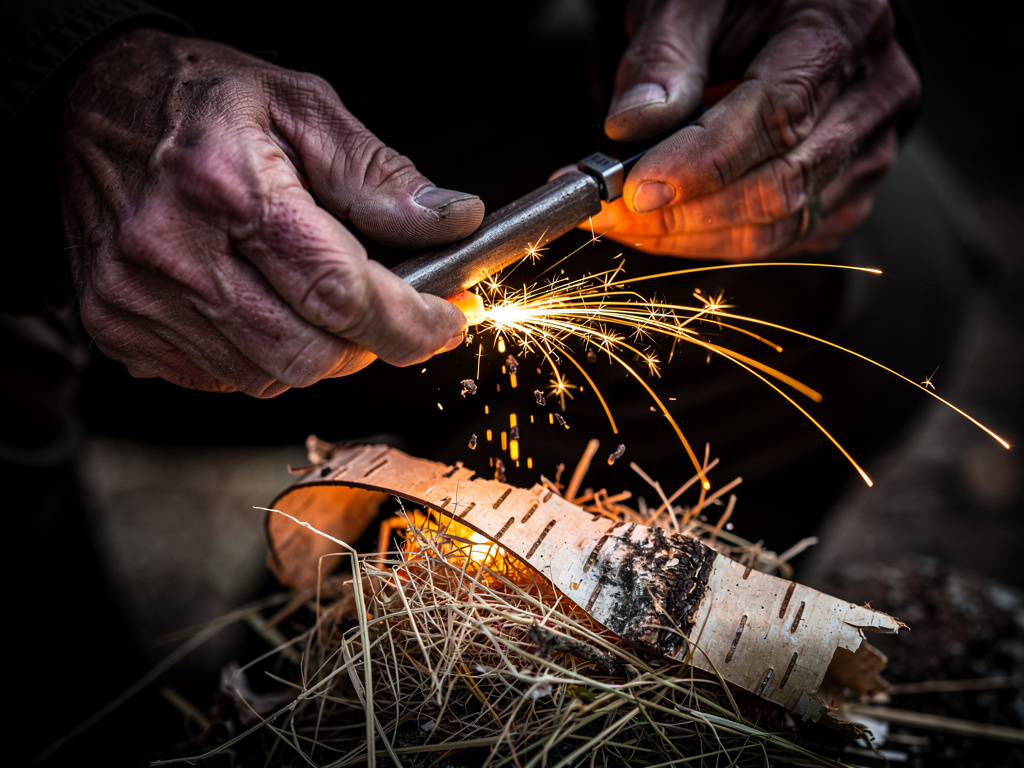
A ferro rod produces sparks reaching approximately 5,500°F (3,000°C) — roughly 10–13 times the autoignition temperature of dry plant tinder (most dry tinders ignite between 450°F and 575°F / 232–302°C). Technique matters more than force. The most common error is scraping toward the tinder and scattering it with the striker's movement.
Ferro rod procedure
-
Select a rod of at least 3/8 in (10 mm) diameter. Smaller rods produce fewer sparks per strike and wear out faster. The standard field-grade rod is 3/8 in × 4 in (10 mm × 100 mm).
-
Position the tinder bundle on a flat surface or held in the palm. The contact point of the rod should sit 1–2 in (2.5–5 cm) above the fine material at the bundle's center.
-
Hold the rod stationary, angled at approximately 45 degrees with the tip resting on or just above the tinder. Press down with moderate force.
-
Move the striker away from your body — not the rod toward the tinder. This technique keeps the rod tip in position while the striker shaves off sparks. Scraping the rod forward scatters the tinder bundle before sparks land.
-
Use firm pressure over speed. A single firm stroke that shaves a wide spark shower is more effective than rapid light tapping. The sparks need to arc downward and land in the fine material.
-
If the tinder does not catch in three strikes, check the bundle for moisture and add fine material at the center before continuing.
Wet conditions: A ferro rod functions completely submerged. Dry the rod surface with your shirt before striking for maximum spark yield — water on the rod face reduces friction slightly — but the rod itself is not damaged by water exposure.
Striker direction
Never scrape the ferro rod toward yourself. The striker is sharp, the motion is forceful, and the sparks reach approximately 6,000°F (3,315°C). Strike away from the body on every use. Keep your off-hand clear of the strike path.
Bow drill
The bow drill is the hardest method on this page and the only one that is entirely free. It fails most predictably at the tinder bundle and at the 20–30 second mark when the operator stops too early, mistaking friction smoke for a coal. A successful coal takes 30–60 seconds of continuous drilling and produces smoke that shifts from thin and light to thick and sustained.
The wood dust must reach 800°F (425°C) through friction before a coal forms. That temperature requires sustained pressure, full bow strokes, and matched wood species between spindle and fireboard.
Pre-drill setup
-
Fireboard material: Select dry softwood — willow (Salix spp.), cottonwood (Populus spp.), basswood (Tilia americana), or cedar (Thuja/Juniperus spp.). Test with a thumbnail: it should leave a dent without the wood crumbling or crushing easily. Bone-dry wood that turns to dust under pressure has degraded past usefulness. Wet wood produces steam instead of coal.
-
Spindle dimensions: Cut a straight-grained, dry spindle 10–12 in (25–30 cm) long and approximately 3/4 in (20 mm) in diameter. The bottom end is carved to a blunt point; the top end is rounded to reduce friction at the handhold. Use the same species as the fireboard — matched species produce coal more reliably than mixed.
-
Burn-in procedure: Before cutting the notch, drill the spindle into the fireboard for 20–30 seconds to seat a char ring. The ring should be circular and dark gray-black, indicating matched contact. An oval ring means the spindle is wobbling; a shallow or light ring means insufficient pressure. The notch is cut after burn-in so it aligns correctly with the seated hole.
-
Notch geometry: Cut a narrow V-notch at approximately 45°, starting from the edge of the fireboard and pointing toward the center of the char ring. The notch tip should stop approximately 1/8 of the hole's diameter short of the hole's center — not touching the center, but close enough to collect dust efficiently. This geometry allows airflow into the coal-forming zone while funneling hot dust into the notch.
-
Bow construction: Cut a bow 24–30 in (60–75 cm) long with a natural slight curve. Paracord or similar cordage for the bowstring, tied with moderate tension — tight enough that the string does not slip off the spindle when looped, but not so tight the bow bends significantly when strung.
-
Handhold socket: Use hardwood or smooth stone with a slight natural depression. The socket contacts the top of the spinning spindle; it should be as smooth and hard as possible to minimize friction at the top while maximizing friction at the bottom (fireboard contact).
Drilling sequence
-
Place the fireboard on flat ground. Position a dry leaf, piece of bark, or flat shaving under the notch to catch the coal that forms.
-
Kneel with your left foot on the fireboard (for right-handed operators), shin vertical, so the board cannot move. Brace your left wrist against your left shin — this locks your arm and transfers body weight into the handhold pressure rather than burning your shoulder muscles.
-
Loop the bowstring once around the spindle. The spindle should fit snugly in the loop and spin smoothly without the string slipping when you draw.
-
Seat the spindle bottom in the fireboard hole and the top in the handhold socket. Apply firm downward pressure through the handhold — the equivalent of pressing down on a car doorframe with your palm.
-
Begin drawing the bow in full, smooth strokes at 45–60 strokes per minute. Use the entire length of the bow on each stroke, not short choppy pulls. Short strokes waste friction and slow the temperature buildup.
-
At 20–30 seconds, thin smoke appears. This is friction heat, not a coal. Do not stop. Increase pressure and maintain cadence.
-
At 30–60 seconds, smoke should thicken noticeably and change character — from thin wisps to a sustained, heavier column that lingers. When smoke is thick and continuous, drill 10 more full strokes then stop deliberately. Do not move the fireboard.
Coal transfer
-
Wait 10 seconds after stopping before touching anything. The coal, if formed, needs a moment to consolidate.
-
Lift the fireboard edge gently away from the notch. The coal should remain sitting in the catcher material — small, dark orange, and glowing. If it smokes on its own, it is viable.
-
Tap the edge of the fireboard lightly to encourage the coal to drop fully onto the catcher. A coal that sticks may break. Use a twig to coax it if needed, but handle it gently — a coal at this stage is fragile.
-
Carry the catcher material with the coal to your tinder bundle. Tip the coal into the fine material at the center.
-
Fold the bundle loosely around the coal. Do not compress it — the coal needs airflow to grow.
-
Hold the bundle with the coal at the bottom and blow long, slow breaths from approximately 6 in (15 cm) away. Short puffs scatter the coal and introduce turbulence. Long, steady exhales feed oxygen without disrupting the coal's position. The bundle will begin to glow, then smoke thickly, then burst into flame. When flames appear, place the bundle under your prepared fire lay immediately.
Field note
The most common bow drill failure is stopping at the 20-second mark when thin smoke appears. That smoke is friction heat evaporating moisture from the wood, not a coal forming. A real coal takes 30–60 seconds and the smoke shifts from light and intermittent to thick and sustained. Drill through the doubt. If you stop at smoke, you will never make a coal.
Wood moisture failure
Bow drill does not work with wet wood. If your fireboard develops a dark, shiny char ring instead of a dry powdery one, the wood has too much moisture. The spindle slides instead of building friction dust. Switch to a different piece or dry the wood for several hours in sunlight before attempting again. Damp wood on a dry day is the single most common reason bow drill fails for experienced practitioners.
Fire lay construction
Getting a coal or flame into tinder is the ignition problem. Getting that flame to grow into a sustainable fire is the lay problem. Three lay types cover most field situations.
Teepee: Stack kindling in a conical shape over the tinder bundle, leaning pieces inward so they meet at the top. Best for wind exposure and quick ignition — the structure feeds itself as outer pieces fall inward onto the coals. Burns fast and hot; useful for signaling, quick warmth, or starting a larger log-cabin fire.
Log cabin: Place two logs parallel, then stack two more across them at 90°, building up like a square frame. Leave significant gaps between logs for airflow. Best for sustained coals and cooking fires — the structure collapses slowly inward rather than burning out in 20 minutes. Needs larger initial fuel than a teepee but produces better coals for cooking over fire and coals.
Lean-to: Drive a stake into the ground at an angle or lay a log as a windbreak. Stack kindling against it, angling toward the wind direction. Best in rain or one-directional wind — the backer creates a protected zone where the flame can establish before catching the outer fuel. Use a lean-to when conditions are actively hostile and you need the fastest path to a sustainable ember.
Failure modes
Even correct technique fails under specific conditions. Recognize the pattern early and redirect — burning daylight on a failing method is more dangerous than switching.
Tinder won't catch despite repeated sparks. Recognition: ferro-rod sparks land on the bundle but no smolder or glow appears after 6–8 strikes, or a smolder dies before flame develops. Remedy: squeeze-test the tinder — it should crumble dry, not bend; if marginally damp, warm it inside your jacket for 10–15 minutes. Break the fibers finer (finer than your hair) and re-fluff the bundle. If still failing, add a petroleum jelly cotton ball as an accelerant and try again. Also check your striker-to-rod angle — holding the striker perpendicular to the rod (90° to the rod surface, not 90° to the tinder) produces hotter sparks than a shallow 45° scrape.
Fire dies after kindling stage — won't sustain to fuel wood. Recognition: tinder burns out in 30–60 seconds, kindling chars black instead of igniting, fuel logs sit on coals without catching. Remedy: tinder bundle was too small (target a loose handful, not a pinch); kindling was too damp (pencil-thick dry sticks only — standing dead, never ground wood); or the fire structure was wrong. Switch to a teepee lay for faster self-feeding ignition, or a log-cabin lay for sustained coals — see fire structure selection. Add more dry kindling layer-by-layer rather than placing all material at once. Keep blowing gently at the base — oxygen is the limiting factor more often than fuel.
Wet or cold conditions defeat normal ignition. Recognition: ambient temperature below 32°F (0°C), recent rain, snow falling, or wind above 15 mph (24 kph); standard attempts stall after multiple tries. Remedy: build a windbreak first — a snow wall, log pile, or downed trunk 3–4 ft (1–1.2 m) upwind. Harvest tinder from protected pockets: the dead branches under a tree's skirt-line, bird nests under rock overhangs, or fatwood from pine stump roots which stays dry even after soaking rain. Run multiple ignition sources simultaneously (cotton-vaseline + ferro rod + lighter backup) rather than serially. Budget 30–60 minutes for fire establishment versus the standard 5–15 minutes — hypothermia risk rises with time in wet cold, so starting early is the only margin. See hypothermia management for the physiological timeline if warmth is delayed.
Cleared area too small — surrounding debris ignites. Recognition: leaf litter or pine duff begins smoking 6–10 ft (2–3 m) from the fire pit, or creeping flame is visible in dry grass beyond the ring. Remedy: stop and extinguish the creep first — water, sand, or dirt smothering. Then re-clear to a minimum 5 ft (1.5 m) radius down to mineral soil or rock; extend to 10 ft (3 m) in dry or windy conditions. Never assume that "no active burn ban" equals safe ignition — judge ground moisture in the moment, not by regulation status.
Magnifier or solar method failing. Recognition: clear sky with sun available, lens focused, but tinder is not smoldering after 30–60 seconds. Remedy: confirm the tightest possible focal point (smallest, brightest dot on tinder surface). Use very fine dark tinder — char cloth or burnt cotton dramatically outperforms raw grass for solar ignition. Pre-warm tinder in a pocket before attempting. Magnifiers require at least 5× power and direct sunlight with the sun at least 30° above the horizon. Switch to ferro rod or lighter at the first sign of failure rather than exhausting daylight on a borderline method.
Field note
Two ignition sources is one. One is none. Carry a BIC lighter AND a ferro rod in separate pockets — not in the same pouch that can be dropped or soaked. Different operating principles; different failure modes. Neither replaces the other.
Readiness checklist
- At least three ignition sources from different method categories are in your kit
- Lighter carried in an inner pocket in cold weather
- Ferro rod minimum 3/8 in (10 mm) diameter; lanyard attached so it cannot be dropped
- Stormproof matches in a waterproof case with striker strip
- Commercial tinder (petroleum jelly cotton balls or fatwood shavings) in a sealed container
- Natural tinder bundle assembled and tested before you need it in the field
- Bow drill set — fireboard, spindle, handhold, bow — stored dry and protected from moisture
- Fire lay materials (kindling graduated from finger- to wrist-diameter) staged before ignition attempt
- Practiced ferro rod technique until reliable ignition in under three strikes on dry tinder
- Practiced bow drill coal at least once in controlled conditions before depending on it
Good tinder preparation and fire lay technique connect directly to the skills foundation — fire is the base skill that unlocks fire cooking, boiling water for purification, signaling, and warmth in extended scenarios. For selecting and stocking the tools that support fire-starting and field cooking, see Gear.
Sources and next steps
Last reviewed: 2026-05-17
Source hierarchy:
- US Army Survival Manual FM 3-05.70 (FM 21-76) (Tier 1, US Army field manual — procedural authority for fire-starting techniques including bow drill, tinder preparation, fire lay construction, and wet-weather methods; public domain)
- USDA Forest Service — Campfire Safety and Regulations (Tier 1, federal agency — fire site preparation requirements, burn ban compliance, and fire safety protocols including clearing radius and extinguishment standards)
Legal/regional caveats: Open fire regulations vary significantly by jurisdiction. Always check current burn bans before lighting — USFS, BLM, state park, and county fire agencies issue seasonal and emergency restrictions that supersede general guidance. Fire starting is prohibited in many designated wilderness areas without a permit. In urban and suburban settings, local ordinances govern open burning and may prohibit fires outside of approved fire pits entirely.
Safety stakes: life-safety topic — verify against current local/professional guidance before acting.
Next 3 links:
- → Fire cooking — after you have a sustained fire, apply it — coal bed timing, Dutch oven technique, and safe internal temperatures
- → Boiling water for purification — fire's most critical survival application — elevation-adjusted boil times and safe container selection
- → Hypothermia management — if fire establishment is delayed — recognize and treat hypothermia before core temperature drops below the critical threshold