Debris Shelters
A debris shelter is an emergency structure built entirely from natural or salvaged materials — leaves, branches, bark, pine needles, and grass. Done correctly, it can maintain a survivable interior temperature even when outside air drops to -20°F (-29°C), provided the debris layer is at least 2–3 feet (60–90 cm) thick and the shelter is sized tightly to the occupant's body. Done wrong, it is a leaky, damp pile of sticks that accelerates heat loss. This guide walks you through every decision and every step, assuming you have never built one before.
When to use a debris shelter: You are on foot, it is getting dark or weather is closing in, and you have no tent or tarp. A debris hut is not comfortable — it is a thermal life-preservation device. Once the immediate emergency passes, move toward more durable options like a Tarp Shelter with a frame, or a permanent Timber Construction structure.
Educational use only
This page is for educational purposes only. Hands-on skills should be learned and practiced under qualified supervision before relying on them in emergencies. Use this information at your own risk.
Before you start - Skills: Site selection — choose high ground, away from drainage paths, with insulation material within 100 ft (30 m). Recognizing usable framework material (long ridgepole + sturdy rib branches). Insulation packing technique — 3 ft (1 m) of compressed leaves or grass minimum for sub-freezing nights. If you plan to use fire as heat backup, review Fire Starting before dark. - Materials: Ridgepole — one straight branch 6–10 ft (1.8–3 m) long, 4–6 in (10–15 cm) diameter, strong enough to support body weight. Ribs — 30–50 branches 4–6 ft (1.2–1.8 m) long, finger-thick. Insulation — 30–50 cubic ft (0.85–1.4 m³) of dry leaves, ferns, grass, or pine boughs (more than you think). Sharp tool (knife or hatchet) helpful but not strictly required. - Conditions: At least 2 hr of daylight remaining. Insulation material available within 100 ft (30 m) of site. Temperature forecast 20°F (-7°C) or warmer for a basic build — colder requires a smaller cavity and greater insulation depth. Avoid starting construction during active rain or snow if possible. - Time: 2–4 hr active construction; add 1 hr if no cutting tools available. Plan to be inside and plugged in at least 1 hr before sunset.
Action block
Do this first: Walk your site and find one ridgepole branch at least 9 ft (2.7 m) long and wrist-thick with no dead overhead canopy above your build spot (15 min) Time required: Active: 2–4 hr construction; add 1 hr without a cutting tool; thermal test 20–30 min before sleeping Cost range: Inexpensive for a natural-materials build; affordable when you add contractor bags, paracord, and an emergency bivy for reliability Skill level: Beginner for a basic debris nest; intermediate for a fully insulated A-frame hut with door plug and ground bed Tools and supplies: Supplies: contractor bags (door plug and vapor barrier); paracord (ridgepole lashing); emergency metalized polyester barrier film bivy (radiant heat retention); foam sit pad (ground insulation supplement). Tools: knife or hatchet (helpful, not required). Safety warnings: See Cold Ground Kills Faster Than Cold Air below — conductive heat loss through bare ground triggers hypothermia in 1–2 hours even in mild conditions
Step 1 — Site Selection (15 minutes)
The best debris construction cannot overcome a bad site. Spend 10–15 minutes evaluating before you start collecting material.
Look for:
- High ground with slight slope — even a 2–3% grade (about 1 in (2.5 cm) per yard) lets rainwater drain away from your sleeping position.
- Natural windbreak — a dense stand of conifers, a boulder, or a hillside to your windward side (usually west or northwest in North America). A solid windbreak cuts your felt temperature by up to 20°F (11°C).
- Available debris within 50 ft (15 m) — you will carry enormous quantities of material. Moving 100 ft (30 m) to collect debris wastes energy and time.
- No overhead hazards — look up. Dead branches ("widow-makers") fall without warning and are deadly. Avoid working under leaning snags or damaged trees.
- No insect or animal sign — avoid obvious ant mounds, wasp nests, and areas with heavy rodent tracks.
Avoid:
- Low-lying areas, dry creek beds, or depressions — cold air and water pool there.
- Ridgelines with no shelter from wind.
- Dense leaf litter near standing water — materials will be wet and useless for insulation.
Cold Ground Kills Faster Than Cold Air
Conductive heat loss into cold ground is a primary kill vector in wilderness hypothermia — experimental studies attribute roughly one-fifth of total body heat loss in outdoor exposure to ground contact alone, and conduction through any solid or liquid medium moves heat far faster than still air (water conducts ~25× faster than air at equivalent contact). Even in moderate 40°F (4°C) conditions, lying directly on bare ground without insulation can trigger hypothermia within 1–2 hours. Build your ground bed first — before the roof.
Step 2 — Choose Your Shelter Type

Three types suit different situations. Choose one before collecting materials.
| Type | Build Time | Materials Needed | Best Scenario |
|---|---|---|---|
| Debris hut (A-frame) | 1.5–2 hours | Very large volume | Overnight, solo, cold, no tarp |
| Lean-to | 30–60 min | Moderate volume | Wind protection, mild temps, group |
| Nest/cocoon | 15–30 min | Large volume of loose debris | Last resort, extreme fatigue |
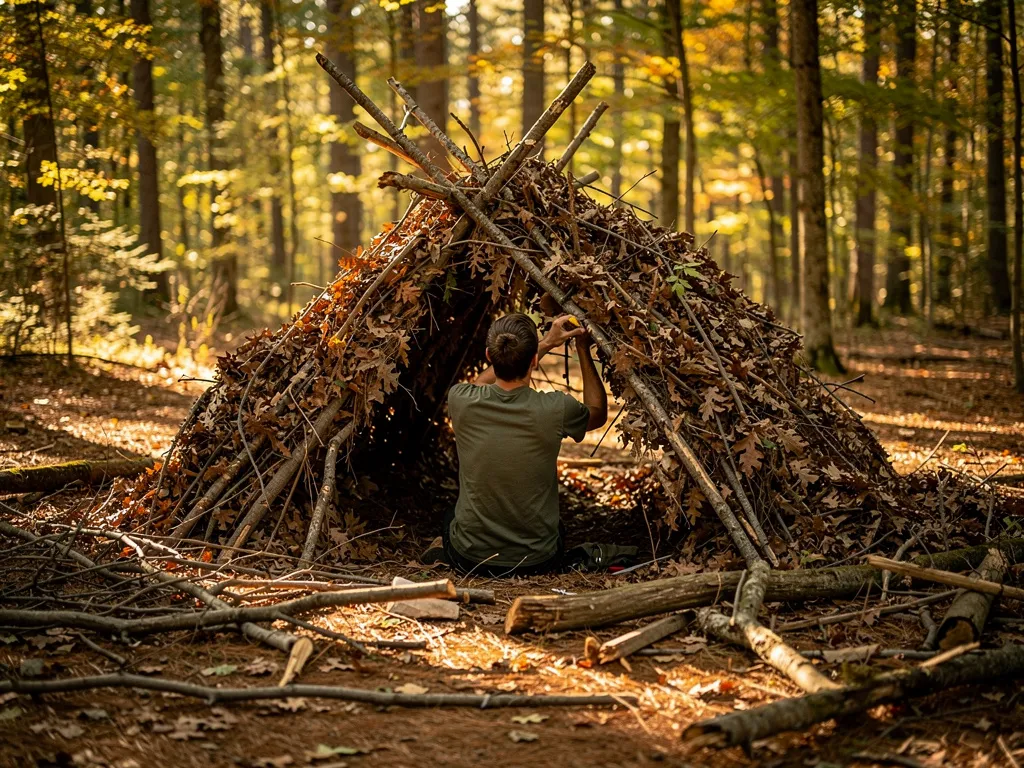
Debris Hut (A-frame) — Best for Cold Survival: Fully enclosed with adequate debris thickness — a minimum of 2–3 feet (60–90 cm) on all sides — body heat alone can keep the interior 30–40°F (17–22°C) warmer than outside air. Reported field tests under ideal conditions (tight fit, dry debris, no wind penetration) show survivable interiors at -20°F (-29°C) external temperatures, though interior temperature will still be well below freezing. This is the recommended type for most cold-weather emergencies.
Lean-to — Best for Wind + Rain: Faster to build, but not thermally efficient. Suitable when you have a fire in front (the lean-to reflects radiant heat back) or temperatures are above 40°F (4°C). Always pair with fire for cold-weather use; see Fire Starting for technique.
Nest/Cocoon — Last Resort Only: Pile leaves in a hollow or against a log and burrow inside. Works when you are too exhausted to build anything else. Minimal structure, maximum speed. Not reliable in rain.
Step 3 — Gather Your Frame Material
For a Debris Hut
You need a ridgepole: a straight, sturdy branch at least 9–10 ft (2.7–3 m) long and 3–4 in (7.5–10 cm) in diameter at the butt end. It must support 60–80 lbs (27–36 kg) without breaking — bounce on it with both hands before committing.
Prop configurations:
- Fork-prop: Find a naturally forked branch 30–36 in (75–90 cm) tall. Drive it into the ground and rest the ridgepole's far end in the crotch. The near end rests on the ground, angled up at about 30 degrees. This is the fastest setup.
- Stump-prop: Lean the ridgepole against a low stump, fallen log, or boulder. Less ideal because the height is fixed, but requires no digging.
- Bipod-prop: Lash two branches in an inverted-V and rest the ridgepole in the crook. Most stable; requires cordage or knowledge of a simple lashing from the Knots and Lashing guide.
Interior size check: Lie down next to the ridgepole before building further. The inside space should be only 6–8 in (15–20 cm) taller than your body and 6–8 in (15–20 cm) wider on each side. A shelter with too much interior air volume will not warm with body heat alone. If it feels cramped, it is the right size.
For a Lean-to
You need two uprights and a crossbeam. Drive two forked sticks 3–4 ft (0.9–1.2 m) tall into the ground, 8–10 ft (2.4–3 m) apart. Lay a sturdy crossbeam in the forks. Then lean a series of branches at 45 degrees from the crossbeam to the ground on the windward side. The open face points away from the wind or toward a fire.
Step 4 — Build the Ribbing
For a debris hut, lean branches every 12–18 in (30–45 cm) along the ridgepole on both sides. These ribs form the skeleton that holds your insulation in place. They do not need to be straight — forked and angled sticks grip the debris better than smooth ones.
Angle the ribs so they lean inward at roughly 45 degrees. This prevents the debris layer from sliding off.
For the entry (head end), build a short section of ribs to create a small porch opening — you will fill this with a debris door plug later.
Step 5 — Add Insulation (The Critical Step)
This is where most first-timers fail. You will need far more debris than you think.
The insulation rule: Pile debris until it is at least 2 ft (60 cm) thick on all sides and top. In temperatures below 20°F (-7°C), aim for 3 ft (90 cm). This provides an approximate R-value of 5–8 per foot of dry loose leaves (compared to R-3.7 per inch for fiberglass batting). The catch: debris settles and compresses as you gather and climb over it.
Best insulation materials (ranked):
- Dry deciduous leaves — oak, maple, beech. Light, trap air well, widely available in fall/winter. Avoid fresh green leaves (too wet, rot quickly).
- Pine needles — excellent. Interlocking structure holds air pockets. Small amounts of sap are acceptable.
- Dry grass and bracken fern — effective but compact quickly; use in thick layers.
- Bark shreds, wood chips — heavier but decent R-value. Good for lower walls where weight is supported by the ground.
- Avoid: fresh green leaves, wet debris, or anything with seeds/thorns. Never use debris from near standing water — moisture wicks into your sleep space.
Application sequence:
- Start at the ground level and work up, overlapping each armload of debris like shingles on a roof — this sheds water.
- Do not pack debris tightly. Loose and fluffy traps more air and provides higher R-value.
- When the ribs are barely visible through the debris, you have the minimum amount. You likely need another 30–40% more.
- Cap the ridge with flat bark pieces or a dense final layer to shed rain.
Time budget: Gathering enough debris for a solo A-frame shelter takes 45–75 minutes for an average adult moving continuously. Do not stop at "good enough" — commit to the full depth.
Field note
A simple field test: shove your arm into the debris wall. If you can feel the stick ribs clearly with your fingers, the wall is too thin. You should feel only soft, springy material for the full depth of your arm. Many first-time builders underestimate volume by 50% — if in doubt, add another armload.
Step 6 — Build the Ground Bed
The ground bed is non-negotiable. Build it to a minimum depth of 6 in (15 cm) of dry debris — 12 in (30 cm) is better. The goal is to achieve R-8 or greater below your body. Compacted grass and leaves provide approximately R-1 per inch (25 mm), so 8 inches (20 cm) gets you to R-8 minimum.
Procedure:
- Scrape or push aside any wet surface layer.
- Pile dry debris — leaves, grass, pine needles — 12–18 in (30–45 cm) deep. It will compress to 6–8 in (15–20 cm) under your body weight.
- Lie down and test. You should feel cushioned and no cold spots on your back or hips.
- If available, add a sheet of bark, a poncho, or a garbage bag under the debris to act as a vapor barrier between you and ground moisture.
If you have a sleeping pad or foam insulation from your Bug-Out Bag, place it directly on the cleared ground before piling debris on top. This doubles your ground insulation with almost no weight penalty.
Step 7 — Make the Door Plug
Without a door, all your thermal work is wasted. The door plug blocks the entry opening and traps body heat inside.
Simple door plug:
- Stuff a large garbage bag, stuff sack, or pillowcase with dry leaves.
- Pack it until it is firm enough to stay in the opening without falling inward.
- From inside, pull the plug into the entrance behind you. It should fit snugly but allow you to push it out quickly in an emergency.
If you have no bag: pile a large armload of debris just outside the opening. Before sleeping, reach outside and pull it in behind you to plug the gap. It is messy and less effective, but works.
Step 8 — Ventilation Check
A fully sealed debris hut with a single occupant generates significant CO₂. You must maintain a small ventilation gap.
- Leave a small gap at the top corner of the door plug, approximately the size of your fist (3–4 in (7.5–10 cm)).
- If the debris walls are loose, they naturally allow some air exchange — this is desirable.
- If you use any heat source inside (candle, small stove), increase the gap substantially and monitor for drowsiness, headache, or nausea — all are signs of CO₂ buildup. At high concentrations, CO₂ causes rapid incapacitation without warning.
Step 9 — Thermal Test Before Sleeping
Before committing to a full night, spend 20–30 minutes inside the shelter while still dressed. If the interior does not begin to feel noticeably warmer than outside within 15 minutes, identify and fix the weak point:
- Cold draft = seal windward gaps
- Cold from below = add more ground insulation
- Cold from above = debris layer too thin, add more
A correctly built debris hut in calm, clear 30°F (-1°C) conditions will reach a felt interior temperature of 50–60°F (10–16°C) from body heat alone within 30–45 minutes.
Materials and Cost
A debris shelter built entirely from natural materials costs nothing. To improve reliability and speed, carry these low-cost items in your kit:
| Item | Purpose | Cost (USD) |
|---|---|---|
| Heavy-duty contractor bags (3-pack) | Door plug, vapor barrier, debris collection | $3–6 |
| 50 ft (15 m) paracord | Ridgepole lashing, gear suspension | $5–10 |
| Emergency mylar bivy ($2–4) or sleeping bag | Retains radiant heat inside shelter | $2–30 |
| Foam sit pad (0.5 in (13 mm) EVA) | Supplemental ground insulation | $5–12 |
A fully equipped debris shelter kit (bags, cord, bivy) is inexpensive, fits in a coat pocket, and is one of the best value-to-weight items in the Bug-Out Bag gear hierarchy.
Failure modes
Most debris shelter failures fit one of five patterns. Knowing them before you build lets you recognize them early — when a fix costs 20 minutes, not a night of dangerous cold.
Field note
Body heat loss in a debris hut is roughly 80% conductive — the insulation under you matters more than the insulation over you. When in doubt about where to add material first, always add it to the floor.
Insufficient insulation depth
Recognition: Shivering uncontrollably 2 hours after entry; cold spots across your back, hips, or shoulders despite the shelter feeling enclosed. Core temperature declining rather than stabilizing.
Remedy: Add a minimum of 12 in (30 cm) more material to the floor first — pack it tight, then loft a fresh loose layer on top. Then address sides, then roof. Do not ration effort here: conductive ground loss is the primary kill vector. If firewood is available and you are near the entry, a small fire in the entry alcove is a viable heat backup; see Fire Starting for technique. If cold is progressing toward shivering that you cannot stop, treat the situation as early hypothermia.
Ridge pole or framework collapse mid-build
Recognition: Cracking sound under load; visible bow greater than 2–3 in (5–8 cm) when you press down on the ridgepole; frame shifts when you place rib material against it.
Remedy: Do not finish a shelter over a weak ridgepole — it will fail at night under accumulated debris weight. Abandon it and find a stronger replacement, or build a 3-stick tripod ridge with the strongest stick at center. Expect to lose 60–90 minutes. Accept the time cost rather than risk the frame collapsing in the dark.
Site picked in a drainage path
Recognition: Damp or saturated ground at the site; water sounds nearby in light rain; small depressions filling visibly during your build.
Remedy: Relocate uphill or to higher ground before finishing the structure. A partial build can often be salvaged — if the frame is light enough, two people can lift it intact to a new site. Prioritize slope and drainage when evaluating a new location; even a 2% grade (about 1 in (2.5 cm) per yard) is enough to shed water away from your sleeping position.
Roof leaks during rain
Recognition: Drips inside; wet patches spreading on the interior insulation; debris smell changing from dry-earthy to musty.
Remedy: Pile additional insulation 6 in (15 cm) or more above the leak point on the outside, overlapping each layer like shingles. In heavy sustained rain, debris alone reliably sheds only the first 20–30 minutes of precipitation. A secondary cover — extra tarp, poncho, or large bark sheets — laid over the apex is the only reliable fix once rain is ongoing.
Entry too large — wind and heat loss
Recognition: Steady cold draft flowing across your face and torso; interior temperature stagnant or dropping despite full insulation and plugged door.
Remedy: Stuff the entry with a dense bagful of dry leaves, your pack, or spare clothing as a tighter plug. The entry opening should be only slightly smaller than your shoulders — just large enough for you to squeeze in on your side — and it must face the leeward (downwind) side. An entry facing the prevailing wind acts as a scoop, pressurizing the interior and forcing cold air through gaps in the debris walls.
Integration with Other Shelter Methods
A debris hut is rarely the final shelter — it is a bridge to something better. Once safe and warm:
- If you have a tarp, a Tarp Shelter set up over a debris bed gives you more interior space and faster build time in future nights.
- In snow conditions, the debris principles apply to a Snow Shelter — with the critical difference that snow's own weight limits debris mass placement.
- For thermal Insulation principles and R-value calculations that apply to all shelter types, see the dedicated insulation page.
Sources and next steps
Last reviewed: 2026-05-17
Source hierarchy:
- U.S. Army FM 3-05.70 Survival (May 2002), Chapter 5 — Shelters (Tier 1, federal military doctrine — debris hut framework, ridgepole proportioning, and insulation depth specification of at least 1 m / 3 ft on all sides)
- Wilderness Medical Society — Practice Guidelines for the Out-of-Hospital Evaluation and Treatment of Accidental Hypothermia (Wilderness & Environmental Medicine, 2019) (Tier 1, medical standards body — hypothermia onset thresholds and ground-insulation guidance cited in the "Cold Ground Kills" warning)
- Tom Brown Jr., Tom Brown's Field Guide to Wilderness Survival (Berkley, 1983) (Tier 2, practitioner reference — debris-hut interior sizing and ground-bed sequencing technique used across modern survival curricula)
Legal/regional caveats: Building a debris shelter on public land (national forests, BLM land) is generally permitted for emergency use and short-term primitive camping; permanent structures are not. Check specific land-management rules for your jurisdiction before using a debris hut for recreational camping. Wilderness survival training areas may have specific regulations. Private land requires landowner permission.
Safety stakes: high-criticality topic — recommended to verify thresholds before acting.
Next 3 links:
- → Tarp shelters — once safe: faster setup, more interior room, pairs with a debris ground bed for the best of both methods
- → Hypothermia staging and rewarming — if warmth measures stall: Swiss HT I–IV recognition and full rewarming protocol for when the shelter isn't enough
- → Fire starting — heat backup for lean-to builds and entry-alcove warming when debris depth alone won't close the gap