Tarp Shelters
A tarp shelter is the fastest full-weather protection you can deploy with a single piece of gear. A well-rigged tarp in an A-frame configuration protects against rain, wind, and light snow; in a lean-to it reflects heat from a fire; in a diamond configuration it sheds a sudden downpour in minutes. Unlike a tent, a tarp is silent, lightweight, versatile, and adaptable to terrain that would make tent stakes useless.
This guide teaches three configurations from scratch, assuming you have never set up a tarp before. Each section walks through every step in order. Read the full site-selection section before picking your spot — site errors cost more time to fix than they save upfront.
Typical setup time: 15–30 minutes for a practiced setup. 30–60 minutes for a first attempt.
Before you start
Skills: Know how to tie a taut-line hitch, trucker's hitch, and bowline before you rig in poor light or rain — these three knots handle ridgeline tension, adjustable guy-lines, and anchor attachment respectively. Practice each 10 times at home. See Knots for illustrated step-outs. Choose your configuration before you start: lean-to for one-sided wind or rain; A-frame for two-sided rain protection; plow-point for storm wind; diamond for the fastest wet-ground cover. Identify wind direction first — it drives every config decision.
Materials: Tarp minimum 8×10 ft (2.4×3 m) for one person, 10×12 ft (3×3.6 m) for two. Sil-nylon is lightweight and packable; polyethylene is less expensive but heavier. 30–50 ft (9–15 m) of 550-strength paracord minimum for ridgeline and guy-lines. Six to eight stakes (aluminum or improvised hardwood). Optional: one footprint or ground tarp prevents wet-through from below.
Conditions: Two anchor points (trees, poles, or a vehicle) spaced 6–10 ft (1.8–3 m) apart. Wind direction known before you begin. Ground slopes slightly away from your sleeping area — uphill ground catches runoff. Check the site for drainage problems before rigging; fixing a bad site costs more time than choosing a good one. See Land Selection for full site evaluation.
Time: Allow at least 1 hour of daylight for a first attempt; 30 minutes for a familiar configuration. Reconfiguring an already-anchored ridgeline takes 5–10 minutes. Avoid pitching by headlamp if daylight is available — mistakes are harder to catch in low light.

Educational use only
This page is for educational purposes only. Hands-on skills should be learned and practiced under qualified supervision before relying on them in emergencies. Use this information at your own risk.
Tarp Selection and Gear Baseline
Before you can rig a tarp, you need to understand what you have.
Tarp Sizes
| Tarp Size | Best Use | Weight Range |
|---|---|---|
| 5×7 ft (1.5×2 m) | Emergency solo bivy, ultra-light | 8–16 oz (225–450 g) |
| 8×10 ft (2.4×3 m) | Standard solo/duo, all configurations | 1–3 lbs (0.45–1.4 kg) |
| 10×12 ft (3×3.6 m) | Duo or small group, high-wind setup | 2–4 lbs (0.9–1.8 kg) |
| 12×16 ft (3.6×4.8 m) | Group shelter, dining fly, base camp | 4–8 lbs (1.8–3.6 kg) |
A standard 8×10 ft (2.4×3 m) tarp covers one to two people in all configurations. For emergency kit purposes, this is the minimum useful size. A silnylon or silpoly tarp in this size costs $30–$80 (USD) and weighs under 1 lb (450 g). Hardware-store poly tarps in the same size cost $8–$20 but weigh 2–3 lbs (0.9–1.4 kg) and are louder in wind.
Cordage
Carry at least 100 ft (30 m) of 3 mm Dyneema cord (DCL) or paracord (550 lb (250 kg) test). Dyneema is stronger and lighter but costs $0.40–$0.80 per foot; paracord is $0.05–$0.15 per foot and widely available. For everyday kits, paracord is the practical choice.
Pre-cut and label your cordage lengths before an emergency:
- Ridgeline: 1 piece, 30–40 ft (9–12 m)
- Guy-lines: 6–8 pieces, 6–8 ft (1.8–2.4 m) each
- Corner ties: 4 pieces, 4–5 ft (1.2–1.5 m) each
Carry 6–10 aluminum or titanium tent stakes, or substitute straight sticks, rocks wrapped in cord, or buried deadman anchors (a stick tied to the cord and buried horizontally in soil). Ground anchors cost $0.50–$2.00 each.
Step 1 — Site Selection
Site selection for a tarp shelter differs from tent selection because a tarp is more weather-sensitive — it channels wind rather than blocking it, and has no floor.
Evaluate these factors in order:
-
Drainage first: Look at the ground slope. Even 5 degrees of slope is enough to channel rain away. If the ground is flat, look for a slight crown. Avoid any hollow or depression; rainfall concentration turns them into puddles within minutes.
-
Anchor points: You need either two trees 10–14 ft (3–4.2 m) apart for a ridgeline, or poles (trekking poles, cut saplings) if trees are unavailable. Check that anchor trees are alive and healthy — lean your full weight on each one before tying.
-
Wind direction: Determine wind direction before picking orientation. For a lean-to, the solid back wall faces windward. For an A-frame, orient the ridge parallel to the wind so wind passes around rather than under the tarp.
-
Overhead clearance: Check for widowmakers (dead branches) and ensure your ridgeline anchor trees are not leaning toward each other. A falling branch can collapse or tear a tarp without warning.
-
Ground cover: Clear a sleeping area 7–8 ft (2.1–2.4 m) long of rocks, roots, and pinecones. These are invisible at night and wreck sleep quality. Move them, do not crush them under your sleeping pad.
Field note
The "bathroom test" is the fastest site quality check: can you walk 50 ft (15 m) in any direction from the shelter and find a natural screen or suitable latrine site per the Sanitation guidelines? If not, you will have to move the shelter later anyway. Check this before you rig anything.
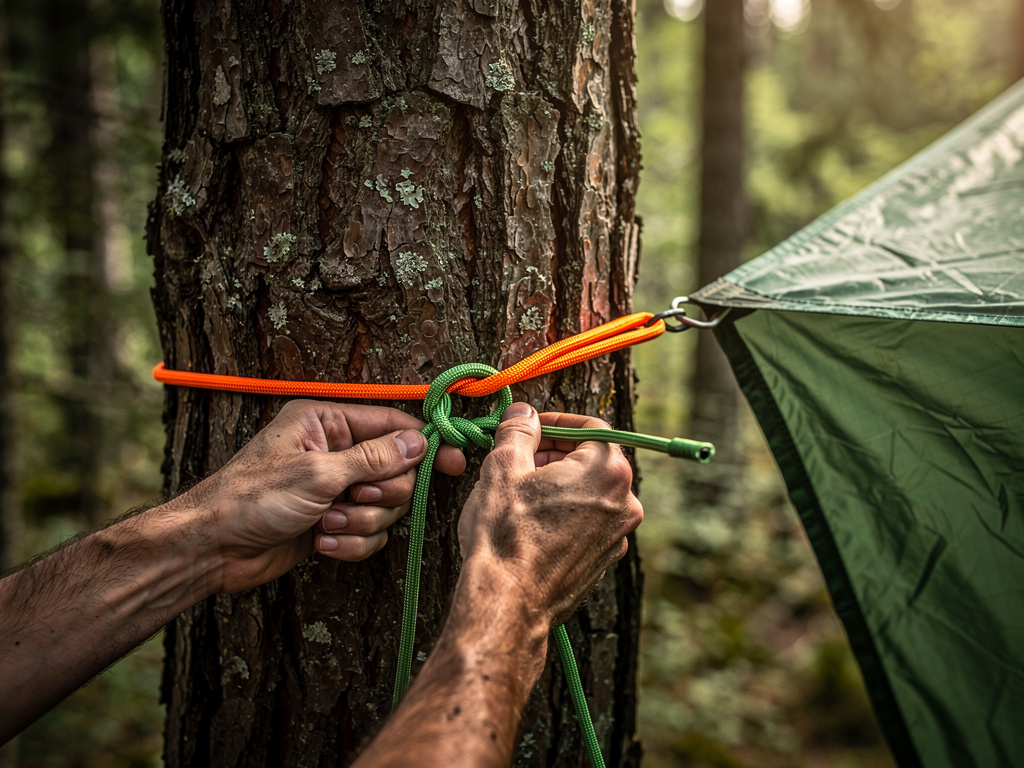
Step 2 — Tie a Ridgeline (All A-Frame Configurations)
A ridgeline is the backbone of A-frame and half-pyramid setups. A good ridgeline is tight, horizontal, and load-tested before you drape the tarp.
The Prusik Ridgeline Method (Recommended)
This method allows you to adjust tension without retying and is the most reliable for beginners. It requires a separate ridgeline cord and a basic prusik knot (or a simple clove hitch at each tree).
Step-by-step:
-
Stand at the first anchor tree. Wrap the ridgeline cord around the trunk at a height of 8–10 ft (2.4–3 m) — high enough that the tarp's ridge hangs at 6–7 ft (1.8–2.1 m) above ground, giving standing headroom inside for an A-frame.
-
Tie a bowline knot around the tree. The bowline does not slip under load and unties easily after tension. To tie it: form a small loop in the standing line, pass the working end up through the loop, around the standing part, and back down through the loop. Pull snug. Practice this knot 10 times before you need it in the field. See Knots for illustrated tie-out instructions.
-
Walk to the second anchor tree, pulling the ridgeline taut. Wrap once around the tree.
-
Tie a trucker's hitch on the standing line 2–3 ft (60–90 cm) from the tree: form a bight (loop) in the line, pass a separate loop through it to create a pulley point, thread the working end through that pulley, and pull down to apply 3:1 mechanical advantage tension. Secure with two half-hitches.
-
Test the ridgeline by pressing down firmly at the midpoint with both hands. It should deflect no more than 2–3 in (5–7.5 cm) under 50 lbs (23 kg) of force. If it sags, retighten.
If trees are too far apart or unavailable: Use trekking poles (extend to full height, approximately 48–54 in (122–137 cm)) as uprights. Guy out the poles' tips at 45 degrees with your corner lines to anchor them. This gives a lower ridgeline (4–4.5 ft (1.2–1.4 m)) but is workable in treeless terrain.
Step 3 — Configuration A: A-Frame (Best All-Weather)
The A-frame is the most weatherproof tarp configuration. Both sides of the tarp slope to the ground, shedding rain and wind equally. Interior headroom is limited (maximum at the ridgeline center), but thermal protection is high.
Setup Procedure
-
Drape the tarp centered over the ridgeline. Equal lengths should hang on each side — adjust until the midpoint of the tarp's length aligns with the ridge.
-
Pull both end corners (the ridge corners of the tarp) outward and downward at 45 degrees. Attach a 4–5 ft (1.2–1.5 m) guy-line to each corner grommet using a lark's head knot (or any non-slip loop).
-
Stake each corner out firmly. Drive stakes at 45 degrees away from the shelter (angled outward), not straight down — angled stakes resist pull-out under wind loading three times better than vertical stakes.
-
Tension the tarp so each side is taut with no pooling sags. A small sag at the center of each panel is acceptable (and actually sheds rain better than extreme tension), but large sags collect water and collapse under snow load.
-
Pull out and stake the two remaining side corners. On a standard rectangular tarp, you will have 4 corner grommets and 2 side grommets per long edge. Stake all 8–10 attachment points for maximum stability.
-
Check that the door opening clearance allows you to enter and exit without crawling through mud. If the sides are too close to the ground, raise the ridgeline 6–8 in (15–20 cm) and re-stake.
Wind protection note: In high wind (above 25 mph (40 kph)), close one end of the A-frame by pulling a corner grommet forward and staking it to the ground. This creates a closed-end A-frame that blocks wind funneling through the interior.
Step 4 — Configuration B: Lean-To (Best with Fire)
The lean-to is faster to rig than an A-frame and ideal when you are pairing the tarp with a fire for heat. The back wall is solid; the open front faces the fire and reflects radiant heat into the sleeping area.
Setup Procedure
-
Tie the ridgeline at the same height as the A-frame (8–10 ft (2.4–3 m) at the trees).
-
Hang one long edge of the tarp over the ridgeline. This is the top edge. Clip, tie, or use tarp straps to attach grommets along the top edge to the ridgeline every 2–3 ft (60–90 cm).
-
Pull the bottom edge forward (away from the ridgeline) and stake it out 5–6 ft (1.5–1.8 m) from directly below the ridgeline. The tarp should angle from ridgeline to ground at roughly 30–45 degrees.
-
Pull the two end side edges outward and stake them down. The ends are the most vulnerable to wind-driven rain — stake them as tight as possible.
-
For better weather protection, lower the ridgeline to 5–6 ft (1.5–1.8 m) and move the bottom stakes out further, creating a steeper angle (50–60 degrees). This sheds rain much better in heavy downpours.
Fire placement: Position the fire 4–6 ft (1.2–1.8 m) in front of the open edge. The back wall of the lean-to reflects heat back toward you. Never position the fire under the tarp overhang — embers, sparks, and rising heat will damage or ignite the tarp. See Fire Starting for fire layout techniques.
Step 5 — Configuration C: Diamond/Plough Point (Emergency Speed Rig)
The diamond rig uses only the center attachment point and two corner stakes. It takes under 5 minutes. It is not ideal for sleeping but excellent as a rain cover while you gather materials or assess the situation.
Setup Procedure
-
Find the center of the tarp. Most tarps have a center attachment point; if not, fold it in half both ways to locate the center and mark it temporarily.
-
Tie a 4–5 ft (1.2–1.5 m) cord to the center attachment point. Tie the other end to a branch, stake, or trekking pole tip at 5–6 ft (1.5–1.8 m) height. This creates the peak.
-
Take two opposite corners and pull them out to the sides, staking each down firmly 6–8 ft (1.8–2.4 m) from the center peak. This creates the diamond shape.
-
The remaining two corners (front and back of the diamond) hang free and create a low-clearance opening on two sides.
Improvement: Pull the front lower corner forward and stake it down to the ground. This closes one opening and creates a full rain shed. Leave the back corner hanging or stake it up to a second anchor at 4 ft (1.2 m) height for a door panel.
Step 6 — Weatherproofing and Maintenance
Before Sleeping
Walk the full perimeter:
- All stakes angled outward at 45 degrees and fully driven.
- No large sags in panels — puddle formation means eventual collapse or soaking.
- Ridgeline tension maintained — press midpoint, should deflect less than 3 in (7.5 cm).
- Door or entry is accessible from inside without crawling under a water-pooling panel.
- If rain is expected, add extra guy-lines from midpoints of the long edges to stakes or trees — prevents ballooning.
In Heavy Rain
If rain is already falling, add a drip line to each anchor tree: tie a short piece of cordage from the ridgeline knot and spiral it down the anchor cord toward the tree. This diverts water running down the ridgeline from entering the shelter.
Rain pooling in a tarp panel (if it forms) can be pushed out with a stick poke from inside. In snow conditions, knock accumulated snow off the panels every few hours — 12 in (30 cm) of wet snow exerts roughly 20 lbs/sq ft (98 kg/sq m) of load and will rip grommets or collapse the shelter.
Sealing Leaks
Factory seam tape on quality tarps is reliable. For hardware-store poly tarps, seams and grommet holes are the primary leak points. Before deploying in rain, apply a bead of silicone seam sealer ($5–$12 for a tube that does 3–4 tarps) to all seams. Allow 4–6 hours to cure.
Complete Gear List
| Item | Approximate Cost (USD) | Weight |
|---|---|---|
| 8×10 ft silnylon tarp | $30–$80 | 12–18 oz (340–510 g) |
| 8×10 ft poly tarp (hardware store) | $8–$20 | 2–3 lbs (0.9–1.4 kg) |
| 100 ft (30 m) paracord | $5–$12 | 8 oz (227 g) |
| 8 aluminum stakes | $8–$16 | 4 oz (113 g) |
| Tarp clips (6-pack, for tarps without grommets) | $5–$10 | 2 oz (57 g) |
| Seam sealer (1 tube) | $5–$12 | 2 oz (57 g) |
Total kit cost: $61–$150 for silnylon, or $31–$70 for poly. This kit fits in a 2-liter stuff sack.
Failure modes
Field note
A taut ridge line is the difference between a tarp that sheds water and a tarp that collects it. Re-tension before you sleep, not after the rain starts.
Ridge line sags — water pooling and tarp damage. Recognition: a visible dip in the ridge greater than 2–3 in (5–7.5 cm), or water pooling visible during rain. Remedy: re-tension with a trucker's hitch (mechanical advantage ~2:1); if the knot won't hold, replace the paracord segment or add a second parallel ridge line. Pooled water can rip tarp grommets within minutes — push up the underside of any pooled panel immediately to drain it. See Knots for the trucker's hitch tie-out.
Stake pulls loose in soft ground or wind. Recognition: a corner of the tarp is flapping, you hear a cracking sound, or a stake has lifted out of the ground. Remedy: replace with a longer stake (12–18 in (30–45 cm)) angled away from the tarp at 60 degrees, or use a deadman anchor — bury a 12 in (30 cm) stick horizontally, perpendicular to the direction of pull, at 12 in (30 cm) depth with the guy-line tied to its midpoint. In sandy or snow-covered ground, deadman and rock anchors are the only reliable options; standard stakes do not hold.
Wrong configuration for the weather. Recognition: a lean-to facing into a wind shift, an A-frame in a sustained crosswind, or a diamond rig too low for prolonged heavy rain. Remedy: re-pitch to match conditions — plow-point or modified hex for storm wind, A-frame for steady rain, lean-to only in fair weather or when paired with a fire. The modified hex is a six-sided pitch where two adjacent corners are staked to the ground and the two opposite corners are raised on poles, creating partial overhead coverage while leaving one side open for ventilation or fire-heat reflection. Re-rigging an already-anchored ridgeline takes 10–15 minutes; a full restart from scratch takes 30 minutes or more. Check conditions and shift before nightfall, not at 2 AM in driving rain.
Tarp rips at grommet. Recognition: a tear visible at a corner attachment point, or a grommet pulled completely through the fabric. Remedy: emergency repair with 2–3 layers of duct tape crossing the tear in both directions, reinforced with a paracord whipping wrap if available. Relocate the ridgeline attachment to an adjacent grommet, or improvise a no-grommet anchor by placing a pebble against the fabric just inboard of the tear and tying a loop of cord around the pebble-plus-fabric — this distributes load across a palm-sized area. Long-term, replace the tarp. Sil-nylon tarps need an annual seam-seal inspection and grommet check before each season.
Hypothermia from ground contact. Recognition: shivering despite being under the tarp, heat loss continuing through the night, waking cold from the ground up. Remedy: an insulating layer between your body and the ground is non-negotiable in shoulder seasons and winter. Pile dry pine boughs, dry leaves, or dry grass 2–4 in (5–10 cm) thick under your sleeping area before lying down — improvised insulation is always available in wooded terrain. A sleeping pad is the lightest packable solution, but never sleep directly on mineral soil or rock in cold weather regardless of air temperature. Ground cold kills faster than air cold. See Hypothermia for recognition and treatment of cold injury.
For advanced weatherproofing techniques, see Weatherproofing. For improving thermal performance by adding a debris bed underneath the tarp, see Debris Shelters. For cold-weather applications and combining a tarp with a Snow Shelter vestibule, see the snow shelter page.