Family Emergency Playbook

A household emergency plan is not a binder full of forms. It is a small set of decisions, made in advance and written down, that allow every adult in the household to act competently when no one is at their best. The household that does this well is not the one with the most supplies — it is the one whose ten-year-old knows where the meeting point is, whose backup caregiver has been briefed, whose insulin has a written start date on the pen, and whose advance directive lives on the refrigerator where paramedics can find it.
This guide walks a family through that work in order. It assumes a household with mixed ages — perhaps an infant, a school-age child, two working adults, and an aging parent in the next bedroom. It does not assume any specialized training. Every chapter ends with a checklist the household can complete before moving on.
Before you start — take the self-assessment
The Preparedness self-assessment is a 10-minute scorecard across the 12 Foundations. It surfaces your household's actual weakest three areas — which may differ from the chapters you expected to need.
If multiple Foundations scored 1, work them in this order: Medical, Water, Energy first. These are the gaps that become life-threatening fastest, on the order of hours to days. Food, Shelter, and Security come second. Skills, Gear, Community, Threats, Mobility, and Mindset come after the life-safety floor is stable. This is the any-1 rule — a single Foundation scored 1 dominates planning regardless of how strong the rest of the profile looks.
Read this guide alongside your scorecard. Chapters map roughly to Foundations; spend more time in the ones where you scored low.
How to use this guide
Read it once cover-to-cover with at least one other adult in the household — this is not a solo exercise. Then assemble the documents and supplies described in each chapter. Then schedule the drills. Most households complete the planning work in two weekends and accumulate supplies over the following two to three months. The drills are forever — once a year minimum, more often if your household composition changes.
The guide is organized in four parts:
- Part 1 — Know your household. Audit who you have, what they need, and what each member's exposure looks like.
- Part 2 — Build the systems. Documentation, communication, medical continuity, financial reserves, food, water, and the kits that hold them together.
- Part 3 — Practice and adapt. Drills, decision-making under pressure, and the special cases (infants, elders, special diets, medical devices).
- Part 4 — When it happens. Acute event response, post-disaster recovery, and the work of getting back to normal.
Part 1 — Know your household

Chapter 1: The household audit
Every household plan starts with a one-page audit. Not a binder, not a spreadsheet — one page that fits on a refrigerator and can be photographed by a paramedic in five seconds.
Each person on the audit needs:
- Full legal name, date of birth, blood type if known
- Current medications (name, dose, schedule, prescribing physician)
- Known allergies — food, medication, environmental — and severity tier (see Chapter 3)
- Chronic conditions in plain English ("type 1 diabetic, insulin pump") and the device or supply that condition depends on
- Primary care physician and one specialist phone, if relevant
- Insurance carrier and policy/member number
- Emergency contacts — one local, one out-of-area
Update the audit any time a member's medications change, after every annual physical, and within 30 days of any new diagnosis. A printed copy laminated and posted inside a kitchen cabinet door, plus one copy in each go-bag, is the minimum distribution.
Why this is the first step: every later decision — what medications to stockpile, how big the go-bag needs to be, who the backup caregiver is, what dietary restrictions the pantry must respect — depends on this sheet existing. Households that skip this step build supplies that don't match their actual people.
Field note
The single most common audit-step failure is the household where one adult knows everything and the other adult knows the broad strokes. When that primary adult is the one injured or evacuated separately, the second adult is left guessing. The audit is not for paramedics first — it is for the second adult in your own house.
Chapter 1 checklist:
- Write a one-page audit listing every household member with the seven fields above
- Laminate it
- Post one copy inside a kitchen cabinet door
- Place one copy in each go-bag
- Schedule an annual review on a fixed date (a birthday, a New Year)
Chapter 2: Identify your vulnerable members
Some household members carry higher exposure during a disruption than others. A healthy 35-year-old can ration water, sleep cold, miss a meal, and recover. A two-month-old cannot. The household plan must explicitly account for whichever members are most exposed.
Categories of higher exposure:
- Infants and toddlers — dehydrate within hours, fever thresholds are life-safety in the first 28 days, formula and diapers are non-substitutable
- Pregnant or lactating members — hydration and caloric needs are elevated; supply disruption affects two people
- Elderly members — medication continuity, fall risk in disrupted spaces, dementia routine continuity, cold tolerance drops below 60°F (16°C)
- Members with chronic conditions — insulin, biologics, oxygen, dialysis, blood thinners, AED-dependent cardiac patients
- Members with mobility limitations — wheelchair users, members with recent surgery, members who cannot walk a staircase
- Members with cognitive limitations — dementia, intellectual disability, severe anxiety disorders, autism spectrum members who cannot tolerate shelter chaos
- Members with severe allergies — anaphylaxis-risk members for whom one bite of the wrong food is an ER visit
The audit you built in Chapter 1 should now be re-read with these categories in mind. Your weakest member's needs set the floor for your entire plan. A household with a healthy adult and a peanut-allergic toddler is not a household with one preparedness profile — it is a household whose pantry, snacks, evacuation gear, and shelter choices are dominated by the toddler's allergy, with the adult's needs as a secondary constraint.
The Preparedness self-assessment explicitly addresses this with its "family-of-one" failure mode: a single adult scoring the household by their own capacity systematically underestimates risk. Retake the assessment thinking about the household member with the highest needs — that member's requirements are your real score for that Foundation.
Chapter 2 checklist:
- Identify which household members fall in any vulnerability category above
- For each, write a one-line note: "Who covers their needs if the primary caregiver is incapacitated?"
- If any answer is "no one," that gap is your first priority
Chapter 3: Map your dietary tiers
The pantry that works for a household of tolerant omnivorous adults does not work for a household with a peanut-allergic child, a celiac spouse, a diabetic grandfather, and a Muslim daughter-in-law observing halal. Generic emergency food lists are a life-safety gap for households with restrictions.
Build a one-page dietary sheet alongside the medical audit. List every restriction, bound to a name and a tier:
- Tier 1 — Anaphylaxis-risk: strict zero-exposure, zero cross-contact. The Big 9 allergens per FDA FALCPA and the FASTER Act 2021 are milk, egg, fish, Crustacean shellfish, tree nuts, peanuts, wheat, soybean, sesame. An epinephrine auto-injector is required equipment. Voluntary precautionary statements ("may contain," "made in a facility with") are treated as positive identification for Tier 1 households — they reflect real cross-contact risk even though FALCPA does not require them.
- Tier 2 — Medical-grade intolerance: strict avoidance for health, but a single trace exposure is not immediately fatal. Celiac disease (gluten enteropathy at exposures above ~20 ppm per FDA 21 CFR §101.91), severe lactose intolerance, FODMAP-sensitive IBS.
- Tier 3 — Medical dietary management: daily and weekly adherence matters more than zero-contact. Carbohydrate-controlled for diabetes, sodium under 1,500–2,300 mg/day for heart and kidney patients, low-phenylalanine for PKU. PKU is a Tier 3 mechanism with Tier 1 discipline — phenylalanine accumulates to neurotoxic levels and substitutions are not permitted.
- Tier 4 — Religious or values-based: kosher, halal, vegan, vegetarian. Emergency overrides exist (Jewish pikuach nefesh, Islamic darura) but should be discussed with the household's religious authority in advance — not improvised at 3 a.m.
Multi-tier members: a peanut-allergic adult with type 2 diabetes carries Tier 1 + Tier 3. The stricter tier always wins on protocol; the looser tier shapes menu composition within the safe set. See Special diets and emergency pantry for the full pantry-by-tier framework.
Chapter 3 checklist:
- List every household member's allergies, intolerances, medical diets, religious restrictions
- Assign a tier (1–4) to each restriction
- Tape the sheet to the inside of the pantry door
- If you have Tier 1 members, identify the dedicated bin or shelf zone where their food lives separately from shared pantry items
- Tier 4 households: schedule the conversation with your rabbi or imam about emergency-override criteria before any event
Part 2 — Build the systems

Chapter 4: Documentation that survives the event
Every household plan rests on documents. The documents have to survive the event that triggered the plan — fire, flood, evacuation, theft — and have to be reachable when phones are dead and offices are closed.
The four-location rule: every critical document exists in four places:
- Original — in a UL-classified fire-rated safe (minimum 30-minute fire rating) at home
- Digital encrypted copy — in a password-protected cloud folder (Google Drive, iCloud, or OneDrive with two-factor authentication)
- Offsite physical copy — at a trusted relative's home or a safe deposit box at a different bank than your primary
- Go-bag copy — laminated reductions or USB drive in every household member's go-bag
Critical documents include:
- Photo IDs (driver's license, passport) — color copies
- Birth certificates, marriage certificate, custody/adoption documents
- Social Security cards (or written numbers if storing cards feels too risky)
- Insurance binder (see Chapter 9) — homeowners or renters, auto, life, health, umbrella
- Property deed or lease, mortgage statement
- Vehicle titles and registration
- Medical: the household audit, advance directives (see Chapter 6), prescription lists, vaccination records
- Financial: account numbers, banking-outage reference sheet (see Chapter 9), recent tax returns
- Photographs of every room in the house (for insurance claims — see Chapter 13)
Why four locations and not three: any single location can be compromised. The home safe can burn at temperatures above its rating in a sustained fire. The cloud account can be locked. The relative may not be reachable. The go-bag may be lost in evacuation. Three is a single point of failure away from zero; four is the redundancy that holds.
For the full framework — fire-rated safe specifications, encryption standards, document scanning protocols — see Documentation and document preservation.
Chapter 4 checklist:
- Inventory every critical document above; confirm you have an original of each
- Purchase or verify a UL-classified fire-rated safe at home (minimum 30-min rating)
- Set up an encrypted cloud folder with two-factor authentication
- Identify a trusted offsite location and confirm with that person
- Scan and place copies in each go-bag
- Schedule an annual update (the same January date as your reserve resize — see Chapter 9)
Chapter 5: Communication plan and meeting points
When an event happens, household members may be in three different places — work, school, daycare — and cellular networks may be congested or down. The plan that works has two characteristics: every member knows their part by heart, and the system does not depend on cell phones working.
The four elements of a working family communication plan:
-
Designated out-of-area contact. Pick one person — an aunt in another state, a college friend in another time zone — who agrees in advance to be the household clearinghouse. During regional events, calls out of the affected area often succeed when calls within it fail. Every household member memorizes that one phone number.
-
Two meeting points. A primary meeting point is somewhere just outside your immediate home that everyone goes to if home is unsafe (a tree, a streetlight, a neighbor's mailbox). A secondary meeting point is somewhere outside your immediate neighborhood that everyone goes to if the area is unsafe (a public library, a community center, a familiar park).
-
A text-first protocol. During congested cellular conditions, SMS often gets through when voice calls don't. Establish the rule: text first, call only if no response within 15 minutes. Texts queue and deliver; voice calls fail silently.
-
A non-cellular backup. Pair of FRS/GMRS radios for in-neighborhood communication. A NOAA weather radio with battery backup for one-way information. For households with the budget, a licensed amateur radio operator or a basic GMRS license (no test required) expands range significantly. See Family communication plan for the full radio framework.
Children's role in the plan: every child old enough to read should know the out-of-area phone number by heart, both meeting points by name, and which adult is responsible for picking them up from school if both parents are unreachable. Practice this with them. A drill that asks "what do you do if you can't reach Mom or Dad after school?" produces honest answers and reveals gaps no checklist can find.
Field note
A household in the Pacific Northwest ran their first comms-plan drill in 2024 by having Dad pretend to be unreachable for one school day. The 7-year-old's plan was solid until the school's front-office staff said they couldn't release her to the listed neighbor without written authorization on file. The drill took two hours; finding that gap before a real event was worth months of binder-writing.
Chapter 5 checklist:
- Designate one out-of-area contact and confirm with them in writing
- Choose primary and secondary meeting points; walk to each with every household member
- Add the out-of-area number to every child's school emergency contact list
- Confirm school release authorizations for any backup adult who might pick up
- Buy or test a pair of FRS/GMRS radios; practice using them
- Schedule one full comms drill per year — make one adult deliberately unreachable
Chapter 6: Advance directives and end-of-life documents
This chapter is the one most households skip. Skip it and an aging parent's care decisions during a crisis fall on whoever is in the room, often without the legal authority to act.
Four legal instruments govern medical decision-making and end-of-life preferences. They are distinct in scope and authority. Every adult in the household — not just the elderly — should have at least the first two.
Living will. A written statement of a person's preferences for specific medical treatments — which interventions they want and which they decline — if they become unable to communicate. It is guidance to providers and family, but physicians retain clinical discretion. Most effective when specific and current.
Healthcare proxy (healthcare power of attorney). A legal document naming a specific person — the proxy or agent — to make medical decisions on the patient's behalf when they cannot do so. The proxy's authority is broad; they do not act from a script but from their understanding of the patient's values. The proxy is distinct from a financial power of attorney, which covers financial matters only.
Do-Not-Resuscitate (DNR) order. A physician-signed medical order directing emergency medical personnel not to perform CPR if the patient's heart and breathing stop. In most states, EMS providers are legally obligated to follow a signed DNR. A DNR is narrow in scope — it governs CPR only, not other interventions.
POLST (Physician Orders for Life-Sustaining Treatment). A POLST is a physician-signed medical order, not a personal preference document, and it carries the same legal weight as any medical order. It covers CPR status, level of medical intervention (comfort care only vs. full intervention), and artificial nutrition, making it broader than a DNR. A POLST is designed to be portable and immediately actionable — it should be stored where emergency responders can find it quickly, often on the refrigerator door.
POLST forms are state-specific legal instruments — names vary by state (MOLST in New York, MOST in South Carolina, DMOST in West Virginia), and execution requirements differ. The substance is consistent across states; the form is not. Confirm your state's current form at the National POLST Coalition (polst.org).
For any elder family member with serious illness or advanced age:
- Confirm which documents exist and are current (executed within the last 3–5 years or after a significant change in health status)
- Ensure the primary caregiver and backup caregiver know where each document is stored
- Keep a copy in the emergency kit and a copy on the refrigerator
- If documents do not exist, this conversation is overdue — consult the elder member's primary care physician or a healthcare attorney; many states have standard forms available at no cost
Hospice during disaster. If an elder family member is already receiving hospice services, the hospice agency has an emergency preparedness obligation under CMS regulations (42 CFR 418.113) and typically has protocols for evacuations and service continuity. Contact the hospice coordinator at the first sign of a threatened event, not after. They can coordinate medication supplies, equipment, and continuity of care in ways that family caregivers cannot do alone.
For the full clinical framework, see Elder care and caregiver preparedness.
Chapter 6 checklist:
- Every adult in the household has a healthcare proxy designated
- Every adult has a basic living will on file with their primary care physician
- Any elder or chronically ill member has a current POLST (or state equivalent)
- POLST is stored where emergency responders can find it (refrigerator door is standard)
- Copies of all four document types are in the fire-rated safe AND in the go-bag
Chapter 7: Medical continuity — medications, devices, and cold chain
Medical continuity is where most household plans fail when the event lasts more than 72 hours. A 7-day prescription supply runs out on day 8. An insulin pen left in a hot car loses potency. A CPAP machine with no battery backup means a sleepless and dangerous night for an obstructive-sleep-apnea patient.
This chapter has three components: stockpile depth, cold-chain management, and device power continuity.
Stockpile depth
The minimum supply for every prescription medication in the household is 30 days, with 60–90 days preferred for life-critical drugs (insulin, anti-seizure medications, blood thinners, biologics, immunosuppressants). Most state pharmacy laws and insurance benefits restrict early refills, but several workarounds exist:
- Ask the prescribing physician for a 90-day prescription with three refills (rather than 30-day with eleven refills) — this gives you a larger float
- Use mail-order pharmacy services for chronic medications — they typically supply 90 days at a time
- After a federally declared disaster, state pharmacy boards typically authorize emergency refills without provider authorization for up to 30 days. Knowing this rule in advance is useful; in-event, your local pharmacy can confirm.
For the full medication stockpiling framework — emergency refill law by state, controlled-substance rules, vacation overrides — see Medication stockpiling.
Cold chain — the temperature window starts the moment power fails
Refrigerator-dependent medication — insulin, biologics, epinephrine formulations (cautions below), prescription eye drops — has a fixed temperature window that starts counting the moment power fails. A household with no cold-chain plan faces a cascade: the refrigerator crosses 40°F (4°C) within two to four hours without power, and food becomes a triage problem inside of four hours.
Four temperature zones every cold-chain decision maps to:

| Zone | Range | What lives here |
|---|---|---|
| Zone 1 — Room temperature | 59–77°F (15–25°C) | In-use insulin and biologics within their labeled window; EpiPen and epinephrine auto-injectors (never refrigerate); most oral medications |
| Zone 2 — Refrigerator | 33–40°F (0.6–4°C) | Unopened insulin reserve; unopened biologics; GLP-1 agonists (Ozempic, Trulicity) before first use; dairy, eggs, leftovers |
| Zone 3 — Freezer | 0°F (-18°C) and below | Long-term food; bulk ice supply |
| Zone 4 — Ultra-cold | -70°C (-94°F) and below | Some mRNA vaccines at clinic level — not relevant to home cold-chain |
Critical — EpiPen and epinephrine auto-injectors
Epinephrine auto-injectors belong in Zone 1 (room temperature) — they should never be stored in a refrigerator or cooler. Temperatures below 59°F (15°C) degrade epinephrine. This contradicts the instinct to protect them with ice during a summer outage. Keep them at room temperature in an insulated carrying case. Epinephrine that has degraded typically appears pink or brown rather than clear and colorless; inspect through the viewing window before relying on it.
Insulin room-temperature windows are brand-specific. All windows below apply at room temperature up to 86°F (30°C) maximum. Above 86°F, the window shortens.
| Brand | Active ingredient | Room-temp window |
|---|---|---|
| Humalog | Insulin lispro | 28 days at ≤86°F (30°C) |
| NovoLog | Insulin aspart | 28 days at ≤86°F (30°C) |
| Lantus | Insulin glargine U-100 (Sanofi) | 28 days at ≤86°F (30°C) |
| Tresiba | Insulin degludec | 56 days at ≤86°F (30°C) |
| Toujeo SoloStar | Insulin glargine U-300 | 56 days at ≤86°F (30°C) |
| Basaglar | Insulin glargine U-100 (Eli Lilly) | 28 days at ≤86°F (30°C) |
Three rules that apply regardless of brand:
- Mark the start date on the pen or vial when you first bring it to room temperature
- Once insulin has reached the end of its room-temperature window, discard it — the clock does not reset when returned to refrigeration
- Freezing destroys insulin irreversibly. A frozen-then-thawed vial may look normal but may be partially or fully inactive. Discard any insulin that has been frozen.
Cooler workflow during a sustained outage:
- Pre-chill the cooler for at least 30 minutes before loading medication
- Layer: one inch (2.5 cm) of loose ice or frozen gel packs on the bottom, then a folded cloth or paper-towel barrier, then medications in original packaging, then another cloth layer, then ice on top. The barrier prevents direct contact between ice and medication — direct contact freezes the medication.
- Target Zone 2: 36–46°F (2–8°C). Verify with a probe thermometer before closing. If below 33°F (0.6°C), the medication may freeze — add insulation between ice and medication.
- Keep the cooler closed. Every opening costs 20–30 minutes of cold retention. Designate one household member to manage cooler access.
- Check temperature every 8–12 hours. Block ice lasts 3–5 days in a quality cooler; bagged cubed ice lasts 1–2 days. Fill empty space with water bottles — a full cooler holds temperature longer.
Frio cooling wallet: an evaporative polymer pouch activated by soaking in water for five minutes maintains insulin at 59–77°F (15–25°C) for approximately 45 hours from a single soak without electricity. Inexpensive, reusable, and effective for short outages without access to ice. Cannot maintain Zone 2 refrigerator temperatures.
Device power continuity
A CPAP machine, oxygen concentrator, nebulizer, or insulin pump that loses power becomes a medical incident immediately for the patient who depends on it. Every household with a medical device should know:
- The exact wattage draw of the device (running watts, plus surge if the device cycles)
- A backup power method sized for at least one full night of use
- The medical-baseline registry status with the local electric utility — most utilities offer prioritized restoration for households with documented medical-device dependency
A portable battery power station in the 500–1,500 watt-hour range covers most consumer-grade CPAP machines for a single night and many oxygen concentrators for several hours. A 2,000 watt-hour station typically covers a CPAP for two to three nights or an oxygen concentrator overnight. See Chronic conditions and disaster preparedness for device-specific power sizing.
Generator load prioritization for cold-chain and devices:
- Refrigerator (or medication cooler, if separate)
- Chest freezer
- Medical devices with immediate life-safety dependency (CPAP, nebulizer, oxygen concentrator)
- Communication (phone charging, weather radio)
- Lighting
- Everything else
Running a window AC or electric kettle alongside cold-chain loads on a limited generator drains the system before the refrigerator has cooled long enough to matter. Cold-chain comes first.
Carbon monoxide — generator placement
Never run a generator inside a garage, shed, or enclosed space. CO accumulates to lethal concentrations within minutes. The generator must be at least 20 feet (6 m) from any window, door, or vent — ideally upwind. This rule is absolute; there are no exceptions.
For the full cold-chain framework, freezer triage, and dry-ice protocols, see Cold chain during power outages.
Field note
Every time you open the medication cooler, the internal temperature climbs 5–8°F (3–4°C) and takes 20–30 minutes to recover even with fresh ice. That math compounds: open the cooler every hour for "just a quick check," and the contents spend more time above the safe zone than inside it. Pull a full day's doses out once in the morning into a small bedside cooler (or insulated lunch bag) and keep the main cooler closed except at one scheduled refill per day. The fewer openings, the more stable the cold chain.
Chapter 7 checklist:
- Confirm 30-day minimum supply of every prescription in the household; 60–90 days for life-critical drugs
- Write the start date on every in-use insulin pen, biologic auto-injector, and GLP-1 medication
- EpiPens stored at room temperature in insulated cases — not in coolers or refrigerators
- One probe thermometer accessible for outage spot-checks
- Pre-chilled cooler workflow documented; block ice or gel packs stored in freezer
- Every medical device has a written wattage and a sized battery or generator backup
- Medical-baseline registry enrollment confirmed with utility for any device-dependent member
- Generator placement plan: 20+ ft (6 m) from windows, doors, vents
Chapter 8: Infant and toddler preparedness
If your household includes an infant under 12 months or a toddler under three years, the standard family plan does not cover their needs. Infants and toddlers are not small adults — they dehydrate faster, develop fever complications earlier, and cannot communicate what is wrong. The preparations that work for a healthy adult fail completely for a two-month-old.
This chapter is the highest-stakes section of the guide for families with very young children. Read every threshold carefully; the numbers differ dramatically between age tiers.
The Infant Emergency Card
Write a one-page card and laminate it. Keep one in the go-bag and one in the kitchen. The card must include:
- Feeding method (formula brand and type, or breastfeeding)
- Pediatrician name and 24-hour phone number
- Baby's current age in weeks
- Current weight in pounds AND kilograms
- Known allergies
- The fever threshold that applies to your baby's current age band — write the actual number and what to do
- Address of the nearest pediatric emergency room
Update the card when the baby ages into the next tier — at 1 month, 3 months, 6 months, and 12 months. Thresholds change at each boundary.
Fever thresholds — age-specific, not interchangeable

Critical — Fever in neonates is always an emergency
In neonates (0–28 days), a rectal temperature of 100.4°F (38°C) or higher is a medical emergency. This is not a "watch and see" situation. It requires an ER visit every time, without exception. Neonates cannot mount an immune response the way older infants can, and fever in this age group carries a 5–10% risk of serious bacterial infection (meningitis, sepsis, urinary tract infection) that can progress within hours. Do not try to treat it at home. Do not wait until morning. Go now.
| Age tier | Threshold | Action |
|---|---|---|
| Neonate (0–28 days) | Any rectal temp ≥100.4°F (38°C) | ER immediately, no exceptions |
| Young infant (1–3 months) | Rectal temp ≥100.4°F (38°C) | Same-day clinician evaluation; call pediatrician immediately; ER if not reachable |
| Infant (3–6 months) | Rectal temp ≥102°F (38.9°C) with symptoms | Same-day evaluation; call pediatrician first |
| Infant (6–12 months) | Rectal temp ≥104°F (40°C) | Monitor at home; contact pediatrician within 24 hours; ER if lethargic, refusing fluids, or rash |
| Toddler (1–3 years) | ≥104°F (40°C) warrants same-day contact; any fever with stiff neck, rash, or altered mental status = ER | Standard pediatric protocols |
How to take a rectal temperature accurately: lubricate a digital rectal thermometer with petroleum jelly; lay the baby face-down across your lap; insert no more than ½ inch (1.3 cm) into the rectum; hold until it beeps. Rectal is the most accurate method for infants under 3 months; axillary readings run 0.5–1°F lower and are not reliable enough for neonate triage.
Dehydration recognition
Infants dehydrate significantly faster than adults — their total body water as a percentage of body weight is higher (75–80% in neonates vs. 60% in adults), and their surface-area-to-weight ratio means they lose fluid more rapidly. Early signs are subtle.
Early signs (act now — call pediatrician):
- Fewer wet diapers than expected for age (see table below)
- Urine dark yellow or amber (very young infants' urine is normally pale — any yellow-amber tint is notable)
- Dry or sticky mouth and lips
- Increased fussiness or unusual sleepiness
- Fewer tears when crying (infant over 4–6 weeks)
Moderate-to-severe signs (go to ER immediately):
- Sunken fontanelle — the soft spot on top of the baby's head should feel flat or slightly firm. A noticeably sunken fontanelle, assessed when the baby is upright, calm, and not crying, is a dehydration sign. Crying temporarily causes the fontanelle to bulge — assess between cries.
- No urine in 6–8 hours
- Sunken eyes
- No tears at all when crying
- Mottled, grayish, or pale skin
- Extreme lethargy — cannot be aroused normally
- Rapid, weak pulse
Sunken fontanelle and sunken eyes are late signs of significant dehydration, not early warnings. If you see them, the infant is already significantly dehydrated and cannot wait.
| Age tier | Expected wet diapers/day | Dehydration warning |
|---|---|---|
| Neonate (after day 5) | 6–8 | Under 6 = contact pediatrician |
| Young infant (1–3 mo) | 6–8 | Under 6 = same-day call |
| Infant (3–12 mo) | 5–8 | Under 3 in 24 hr = concerning; 0 urine in 8 hr = ER |
| Toddler (1–3 yr) | 4–6 | Under 3 in 24 hr = concerning |
Formula stockpiling
Powdered infant formula carries a manufacturer-printed "use by" date — typically 12–18 months from manufacture, but the clock starts at manufacture, not purchase. Store-shelf time eats into the window. Always rotate by use-by date, not purchase date. When you pull a new can, check the use-by gives you at least 6 months of usable time.
Once opened, powdered formula must be used within one month, stored tightly sealed in a cool, dry place — never the refrigerator, as moisture degrades the powder. Prepared liquid formula must be used within 2 hours at room temperature or 24 hours refrigerated at 35–40°F (2–4°C).
Stockpile target: 14 days minimum. For hypoallergenic or amino-acid (elemental) formulas prescribed for confirmed allergies, build a 30-day stockpile and identify a mail-order or specialty pharmacy backup before any event.
Critical — Cronobacter and the 158°F (70°C) rule
For neonates (0–28 days), premature infants, and immunocompromised infants, the CDC and FDA recommend reconstituting powdered formula with water heated to at least 158°F (70°C) — bring water to a full boil, allow to cool for no more than 5 minutes before adding formula powder. This kills Cronobacter sakazakii, a bacterium that can contaminate powdered formula during manufacturing and cause severe infection in newborns.
Then cool the prepared bottle to approximately body temperature (98–100°F / 37–38°C) before feeding by running the bottle under cool water. Test on your wrist — the milk should feel warm, not hot. Never microwave formula — microwaving creates hot spots that burn an infant's mouth even when the bottle feels cool on the outside.
Water rules for infants — tier-specific
Neonates (0–28 days) and young infants (1–3 months): no supplemental water. Plain water, diluted formula, herbal teas, juice — all off-limits. Their kidneys cannot concentrate urine efficiently; a small volume of water dilutes blood sodium to dangerous levels, causing hyponatremia (brain cell swelling, seizures, potentially fatal). This rule does not change during a disaster. If water is scarce, that water goes toward formula reconstitution and maternal hydration — not directly to the infant.
Infants 6–12 months: small amounts of water are appropriate once solids begin — AAP recommends 4–8 oz (120–240 mL) per day maximum as a supplement to breast milk or formula.
Toddlers (1–3 years): normal water intake. Treat water per Water sourcing procedures.
The infant 72-hour go-bag
| Category | Contents |
|---|---|
| Feeding | 3-day formula supply (pre-measured) OR manual breast pump + 10–15 storage bags; 1 bottle + 2 backup nipples |
| Water | 3 liters (3 qt) treated water specifically for formula |
| Diapers | 30+ diapers (3 days × age-tier daily count + buffer) |
| Wipes | 2 travel packs unscented disposable wipes |
| Clothing | 3 changes; 1 warm layer; 1 pair of socks |
| Sleep | Portable bassinet or infant pad; swaddle blanket |
| Medical | Infant Emergency Card; rectal thermometer; petroleum jelly; zinc oxide cream; infant acetaminophen (liquid, label-dose confirmed); pediatrician phone number |
| Comfort | One familiar small toy or pacifier |
| Documentation | Vaccination records; insurance card; photo ID of parent |
Breastfeeding under stress
Breastfeeding does not stop working in a disaster, but it requires active support. The Institute of Medicine recommends lactating mothers target roughly 3.8 liters (128 oz) total daily fluid intake — milk production requires approximately 700–780 mL of additional water per day beyond baseline adult needs. During a disaster, breastfeeding mothers take priority over other healthy adults for water rationing.
Stress interferes with the letdown reflex more than with milk production itself. Skin-to-skin contact reduces cortisol, stimulates oxytocin, and often resolves a stress-triggered letdown problem within one or two feeds. Quiet, privacy, and warmth all help. Every breastfeeding household should keep a manual breast pump in the go-bag — it works in any conditions when electric pumps cannot.
Breast milk storage timeline:
| Storage | Safe duration |
|---|---|
| Room temperature (up to 77°F / 25°C) | 4 hours |
| Insulated cooler with ice packs (≤40°F / 4°C) | Up to 24 hours |
| Refrigerator (35–40°F / 2–4°C) | 4 days |
| Freezer (0°F / -18°C or below) | 6 months optimal; 12 months acceptable |
Infant CPR — hands-on training required
Book knowledge is not sufficient. Take a hands-on infant CPR class through the AAP, the American Red Cross, or the American Heart Association before your infant arrives if possible, and repeat annually.
Key differences from adult CPR (current 2025 AHA/AAP guidelines):
- Two-thumb encircling technique for two rescuers or trained single rescuer (heel of one hand if you cannot encircle alone)
- Compression depth: ~1.5 inches (4 cm), about one-third the chest depth
- Rate: 100–120 per minute
- Ratio: 30:2 for a single lay rescuer; 15:2 for two trained rescuers
- AED: pediatric pads if available; adult pads acceptable with one pad on chest and one on back
For the full clinical framework — choking response (back blows + chest thrusts for infants under 1 year; abdominal thrusts for toddlers over 1 year), donor milk options, shelter challenges, and the five most dangerous failure modes — see Infant and toddler emergency preparedness.
Chapter 8 checklist:
- Infant Emergency Card laminated; one in go-bag, one in kitchen
- 14-day formula supply with use-by dates verified and FIFO rotation
- Manual breast pump in go-bag (breastfeeding households)
- Rectal digital thermometer in the medical kit; you have used it accurately
- Current weight-appropriate acetaminophen dose written on Emergency Card
- 72-hour infant go-bag packed with the contents above
- Car seat installed correctly (NHTSA inspection if not verified)
- Hands-on infant CPR class scheduled or completed
- Nearest pediatric ER address in the go-bag
Chapter 9: Financial resilience
Financial preparedness for normal disruptions — job loss, banking outages, insurance events, and inflation spikes — is the household layer most plans skip. Physical supplies matter. So does cash, documentation, and a protocol that still works when card networks are down and your bank's website is unreachable.
The four-tier reserve framework

Every financial-resilience decision in this chapter maps to one of four tiers:
- Tier 1 — Immediate cash (0–72 hours): physical small-denomination bills at home. Covers the window when card networks are down, ATMs are empty, or power is out. Zero reliance on any external system.
- Tier 2 — Liquid reserves (3–30 days): savings accounts, money-market, credit union shares. Accessible within one business day under normal conditions, but subject to the same outage risk as any digital payment system.
- Tier 3 — Recovery reserves (30 days – 6 months): emergency fund, low-penalty savings bonds, accessible brokerage. Covers extended income disruption — job loss, disability, prolonged insurance claim.
- Tier 4 — Asset conversion (6+ months): retirement accounts, home equity, real estate. Accessible but with penalties, delays, or tax consequences. Not a first-resort liquidity source.
A Tier 1 action (cash on hand) cannot substitute for a Tier 3 emergency fund, and vice versa.
Sizing your Tier 1 reserve
The right cash reserve is a function of your actual expenses, not a percentage of savings or a universal dollar threshold:
- Identify your 72-hour non-discretionary spend — fuel, medication, groceries, possibly a motel if forced to evacuate. Scale to your reality.
- Extend to 30 days for Tier 1+2 continuity — one to four weeks of non-discretionary spending is a practical target for most households.
- Account for regional factors — dense urban areas have more cash-acceptance infrastructure; rural households may depend on cash at local feed suppliers and hardware stores that never accept cards.
Denomination mix: small bills matter. Retailers cannot make change for a $100 bill in cash-only mode with a depleted till.
- 40–50% in $1 and $5 bills
- 30–40% in $10 and $20 bills
- 10–20% in $50 bills
Avoid keeping the entire reserve in $100 bills.
Storage: divide across two or three locations — bulk in the fire-rated safe, smaller amount in the go-bag, minimal amount in a hidden home location. This prevents a single loss event from wiping out the reserve.
The banking-outage reference sheet
When your bank or card network has an outage, "contact your bank" produces hold music, chatbot loops, or silence in the first 12–24 hours. Write a one-sheet reference, laminate it, and store it in the fire-rated safe alongside cash. Include:
- Bank name, phone, and branch address for each account
- Account numbers (partial or full — your call based on security posture)
- Credit union name and phone — if you do not have a credit union account, open one. Credit unions typically restore service faster after system-wide disruptions than large national banks (NCUA insures credit unions up to $250,000 per share owner; FDIC covers banks at the same level)
- Every auto-pay biller, their phone number, and their manual-payment URL
- Credit card customer-service numbers (printed on cards, but you may not have the card if your wallet was lost)
Auto-pay continuity: auto-pay is a convenience feature, not a resilience feature. When your bank's outgoing payment system fails, scheduled auto-payments fail silently. Two actions prevent this:
- Annual manual-pay drill. Once per year, disable auto-pay for one bill and pay it manually using only your reference sheet. This surfaces gaps (changed URLs, disconnected phones, billers who require check-by-mail). Fix every gap before the next drill.
- Pre-authorization buffer. Set auto-pay accounts to draw from two months of bill-pay amounts, not one — if an outage prevents one cycle, the buffer covers it.
Insurance binder
An insurance binder is a single organized record of all active policies — not full policy documents, but the essential reference data you need within the first hours of a claim event. For each policy (homeowners or renters, auto, life, health, umbrella), document:
| Field | Why |
|---|---|
| Policy number | Required to open any claim |
| Insurer name and claims phone | Direct line to claims team |
| Agent name and direct phone | Your agent can expedite claims |
| Coverage limits | Know these before a claim |
| Deductible | Affects out-of-pocket math |
| Renewal date | Prevents inadvertent lapses |
| ACV vs. RCV designation | See below |
ACV vs. RCV — the field you must know. Actual cash value pays the depreciated value of what was lost. Replacement cost value pays what it costs to buy a new equivalent today. A 10-year-old laptop originally $3,000 may yield ~$600 ACV vs. ~$2,000–$2,800 RCV. On a partial-house contents claim with 50 items at similar depreciation, the gap between ACV and RCV settlement is commonly $30,000–$80,000. The premium difference to upgrade from ACV to RCV is typically a small fraction of that gap per year. Read your declarations page now.
Standard homeowners policies (HO-3) cover the dwelling on an "open perils" basis but personal property on narrower "named perils" basis (typically 16 named causes — fire, theft, vandalism, certain weather events). HO-5 extends open-perils to personal property. Verify which you have.
Home inventory: the NAIC Home Inventory app (free, iOS and Android) documents belongings by room with photos, barcode scanning, purchase dates, and approximate values. Record once. Store in three places: fire-rated safe, offsite (relative's home or safe-deposit box), and an encrypted cloud folder.
Emergency budget tightening
When income drops, cut categorically, not across the board. Map every expense into four buckets before an income disruption:
- Bucket 1 — Non-negotiable fixed: mortgage/rent, property taxes, health insurance premium, minimum loan payments, critical utilities. Protect these.
- Bucket 2 — Negotiable fixed: subscriptions, club memberships, recurring services, non-critical insurance riders. Often pausable with a phone call.
- Bucket 3 — Discretionary recurring: dining out, entertainment services, gym, hobby spending. Reversible cuts; restore when income returns.
- Bucket 4 — Discretionary variable: clothing beyond replacement, travel, gifts, home upgrades. Cut immediately on the first sign of income disruption.
Categorical cuts target the highest-flexibility buckets first. A 20% cut to your mortgage creates a deficiency; a 20% cut to dining out saves modestly. Households that eliminate Bucket 4 entirely and suspend half of Bucket 3 often save more than households cutting everything by 15% — with less legal and financial risk.
Call your creditors early. Banks, mortgage servicers, utilities, and credit card issuers all have hardship programs. Calling before a missed payment puts you in a stronger negotiating position than calling after you are in arrears.
For the full financial-resilience framework — FDIC vs. NCUA insurance limits, NAIC home inventory protocol, IRS Publication 547 casualty-loss deduction rules, and the relationship between household and community financial resilience — see Financial resilience.
Chapter 9 checklist:
- Tier 1 cash reserve sized for 30-day non-discretionary spend; denomination mix achieved
- Cash divided across home safe, go-bag, and one secondary location
- Banking-outage reference sheet completed and laminated
- Credit union account opened if you don't have one
- Annual manual-pay drill scheduled
- Insurance binder assembled with ACV/RCV notation for every policy
- Home inventory completed via NAIC Home Inventory app or written room-by-room
- Expenses mapped into the four buckets
- January calendar reminder for annual reserve resize and binder update
Chapter 10: Water, food, and the household pantry
Most family-emergency plans over-rotate on supplies and under-rotate on the systems described in the prior chapters. Water and food matter — but a household with two weeks of food, no medication plan, no comms plan, and no advance directive is one bad day from a worse one. Treat this chapter as foundational, not central.
Water — 1 gallon (3.8 liters) per person per day for a minimum two-week supply. This covers drinking, cooking, and minimal hygiene. Plus a primary purification method (filter or boiling) plus at least one backup (chemical treatment tablets). Plus the location of at least one natural water source within walking distance.
For households with infants under 6 months, formula reconstitution water is in addition to the per-person target; for breastfeeding mothers, maternal hydration adds roughly 1 quart (1 liter) per day. See Emergency water storage for the full framework.
Food — two-week minimum shelf-stable supply for every household member, including enough to cover special diets (infant formula, diabetic diet, religious restrictions, Tier 1 allergens). Approximate calorie counts known. A pantry rotation practice — oldest stock first. Off-grid cooking capacity (camp stove, propane, wood). See Pantry depth and rotation.
For households with dietary restrictions, the pantry-by-tier framework from Chapter 3 applies. Tier 1 households need a dedicated sealed bin separate from shared pantry. Tier 2 (celiac) households need a dedicated toaster. Tier 4 (kosher, halal) households need 14+ days of certified shelf-stable items because emergency food distribution does not guarantee certified product. See Special diets and emergency pantry for substitution tables, the "do not substitute" list, and pre-engagement guidance with religious authorities.
The 4-hour rule for refrigerator food
USDA FoodSafety.gov is direct: discard perishable refrigerated food that has been above 40°F (4°C) for 4 or more cumulative hours. This is not a soft guideline — it reflects the temperature at which bacterial growth (Salmonella, E. coli, Staph aureus) accelerates to unsafe levels.
Perishable: raw or cooked meat, poultry, fish, shellfish; eggs and egg dishes; dairy (milk, soft cheeses, yogurt, sour cream); opened condiments with dairy bases; cooked grains, beans, pasta; leftovers of any kind.
The smell test is not a safety test. Spoilage bacteria that cause off-odors are different organisms from the pathogens that cause illness. Salmonella, Listeria, E. coli O157:H7, and Staph aureus toxin often produce no detectable smell or color change. Use a thermometer, not your nose. When in doubt, throw it out.
Freezer triage
A full freezer holds 0°F (-18°C) for approximately 48 hours with the door closed; half-full holds for about 24 hours.
- At 12 hours with the door closed: no action needed.
- At 24 hours: check the freezer thermometer (open once, briefly). Food at 40°F (4°C) or below with ice crystals is safe to refreeze or cook.
- At 48 hours: critical decision window — obtain dry ice, transfer highest-value items to a generator-powered freezer, or accept the loss.
Food that still contains ice crystals throughout is safe to refreeze per USDA FSIS. Food that has fully thawed and reached above 40°F (4°C) must be cooked and eaten immediately or discarded. Ice cream past 40°F (4°C) must be discarded regardless of appearance.
Chapter 10 checklist:
- Two-week water supply: 1 gallon (3.8 L) per person per day, plus infant formula and lactating-mother allowances
- Primary purification method and one backup
- Two-week shelf-stable food supply respecting all household dietary tiers
- Off-grid cooking capacity tested
- Appliance thermometer in refrigerator (should read 35–40°F / 2–4°C)
- Appliance thermometer in freezer (should read 0°F / -18°C or below)
- USDA Meat and Poultry Hotline (1-888-674-6854) noted in the binder
Part 3 — Practice and adapt

Chapter 11: Drills, decisions, and roles
A plan that has never been tested is a guess. Drills surface gaps that no amount of planning reveals — the school release authorization that was never on file, the radio that no one remembers how to turn on, the cooler that leaks, the pediatrician's after-hours number that changed two years ago.
Three drill cadences:
- Quarterly skills drill (one hour) — pick one capability and exercise it. Fire-start without a lighter. Cook one meal entirely on the camp stove. Filter water from a non-storage source. Pump breast milk with the manual pump.
- Annual full comms drill (one day) — one adult is deliberately unreachable for a full day. Every other household member runs the comms plan. Children execute their part with school-day variables.
- Annual evacuation drill (one afternoon) — go-bags are loaded, vehicle is loaded, the family drives one of the two evacuation routes to a designated destination. Time it. Note what you forgot.
Roles under pressure. Sustained events expose decision-making weaknesses that calm planning hides. The household needs explicit agreement on:
- Who has authority to call the evacuation decision? Not "we'll discuss it" — one named person, with a named backup.
- Who manages medical? Specifically: cold-chain, medication scheduling, infant feeding, elder coordination.
- Who manages comms? Phones, radios, neighbors, the out-of-area contact.
- Who manages food and water? Rationing, cooking, sanitation.
- Who watches the most vulnerable member at all times? Dementia wandering risk, toddler movement, oxygen-dependent member — none can be assumed safe by default.
These role assignments are written on the household audit. They are not for the household members who already know — they are for the substitute caregiver, the visiting in-law, the neighbor who arrives to help.
Caregiver burnout — the failure mode the plan must prevent
A caregiver who reaches physical and cognitive collapse is a medical emergency for the household member they care for, not only for themselves. In a sustained event — extended power outage, multi-week displacement, protracted illness — caregiver collapse is a predictable failure mode, not a personal weakness.
Warning signs (per Johns Hopkins Medicine and Cleveland Clinic behavioral health guidance):
- Fatigue that does not improve with sleep
- Irritability and mood swings out of character
- Forgetting medication schedules, appointments, or changes in condition
- Withdrawal from personal contacts
- Neglecting your own food, hydration, or medical needs
- Feeling that you must handle everything alone
Sleep discipline. Sleep deprivation below six hours per night in a sustained event produces measurable cognitive impairment equivalent to alcohol intoxication by day three. Establish a rotation schedule with your backup caregiver. This is not optional in events lasting more than 48 hours.
Respite backup. Identify at least one trusted person — a neighbor, a family member, a faith-community contact — who can provide four to eight hours of supervised care so you can sleep. Have this conversation before an event. People asked in advance almost always say yes; people asked mid-crisis are harder to reach and slower to mobilize.
When you notice three or more burnout warning signs simultaneously, treat it as a flag to act, not a reason to push through. The specific action: contact your backup caregiver and arrange a sleep block within 24 hours.
Field note
Backup-caregiver arrangements rot if they're only made on paper. The conversation needs to be a real one — name them in your written plan, tell them they're on it, and ask them what their constraints would look like (kids in school, mobility limitations, distance, time of day). The flip side is what every caregiver eventually learns: people asked in advance almost always say yes; people asked mid-crisis are harder to reach and slower to mobilize. A 10-minute coffee conversation today is the difference between a working safety net and a list of names that don't pick up the phone at 2 AM.
Chapter 11 checklist:
- Quarterly skills drill scheduled on the calendar
- Annual full comms drill scheduled
- Annual evacuation drill scheduled
- Decision-authority roles written on the household audit
- Primary caregiver and at least one named backup caregiver — briefed and in possession of the household audit
- Respite caregiver identified and asked in advance
Chapter 12: Elder care specifics
If your household includes an elder member — particularly one with chronic conditions, dementia, or mobility limitations — this chapter is non-negotiable. Older adults in the United States are hospitalized at higher rates during and immediately after disasters than any other age group, not because disasters are harder on older bodies alone, but because the infrastructure older adults depend on (pharmacy access, power grids for medical equipment, routine, caregiver availability) is exactly what disasters disrupt first.
Medication management for cognitively impaired members
The structural fix is to make medication management caregiver-operated, not patient-dependent, before an event.
- Laminated daily medication sheet listing every medication, dose, time of day, and what it treats. This is for any substitute caregiver who may need to take over on short notice. One copy in the emergency kit, one on the refrigerator.
- Weekly pill organizer with labeled AM/PM and day-of-week compartments. Lock-top versions reduce accidental double-dosing.
- Alarm continuity without grid power. Smartphone pill alarms fail when the phone dies. A battery-powered travel alarm clock or windup mechanical alarm holds two daily settings.
- Backup administrator protocol. Write out: where the medications are, what the schedule is, what to watch for as a missed-dose signal for each condition, who to call if the patient deteriorates. Give the backup a physical copy.
Fall prevention during outages
Falls are the leading cause of injury in older adults in normal circumstances. During a power outage, three conditions that make falls worse arrive simultaneously: darkness, disrupted sleep patterns, and unfamiliar movement through a space that no longer looks familiar.
- Clear the path — walk the most-traveled nighttime routes during the day; identify every throw rug, extension cord, and low table. Remove or tape down. Keep these "fall corridors" permanently clear.
- Battery-operated LED motion-sensor nightlights in bathroom, hallway, and near the bed.
- Fall-detector device backup. Personal emergency response systems typically have 24–72 hours of internal battery, but they still require the base station to have power or cellular connectivity. Connect the base station to a portable power station or UPS, or switch to a cellular-only PERS device.
- Non-slip footwear at bedside — more falls happen in bare feet or socks than in slippers, because socks provide no lateral support.
- Cold floors and fall risk. Below 60°F (16°C), leg muscle function in older adults begins to impair measurably. NIA guidance recommends keeping primary activity and sleep spaces at at least 68°F (20°C) for older adults during cold-weather outages.
Dementia routine continuity and wandering risk
Sundowning is exacerbated by anything that disrupts routine, light exposure, or sleep schedule — exactly what a power outage causes. Per Alzheimer's Association guidance, the practical response is to aggressively maintain controllable elements of routine:
- Mealtime anchors — keep meals at the same times even if content is simplified
- Familiar objects — pack the elder member's most familiar comfort items (a specific blanket, a photo, a favorite mug) in the emergency kit
- One consistent caregiver voice — assign one person as the primary voice during high-stress periods
- Reduce ambient stimulation — shelter environments with radios, crowds, and overhead lighting can overwhelm rapidly
Wandering risk during evacuations. The Alzheimer's Association estimates that 6 in 10 people living with dementia will wander at least once, and many do so repeatedly. Before any threatened event:
- Medical identification bracelet with name, condition, emergency contact number
- Recent clear photograph stored digitally and in print; update annually
- Registration with the Alzheimer's Association Safe Return program or local sheriff's GPS-monitoring program
- A designated buddy whose only role during movement is physical proximity to the wandering-risk member
Orientation anchors during disruption. Do not argue with confused statements. Redirect calmly: use their name, your name, and a single calm orienting phrase ("You are with [name], we are somewhere safe, we are together"). Repeat the same phrase rather than elaborating.
Field note
The single most stabilizing element in any dementia care routine during an outage is mealtime. Even if the meal is a cold sandwich at the regular time instead of the regular dinner, the clock-anchor matters more than the contents — eating breakfast at 7:30, lunch at noon, and dinner at 6:00 keeps the day shaped the way the elder's brain expects it. Lighting matters next: a battery-powered lamp at the regular reading spot at the regular evening hour does more for sundowning prevention than any pharmaceutical intervention available to you in an outage. Anchor the day around the meals; the meals anchor the brain.
Assisted-living evacuation coordination
If your elder family member lives in a nursing facility, assisted-living community, or skilled nursing facility, federal law governs what that facility must do. Under the CMS Emergency Preparedness Rule, 42 CFR 483.73, all CMS-certified long-term care facilities are required to maintain an emergency preparedness program with annual review, communication plan, subsistence provisions, emergency power plan, and training including annual tabletop and full-scale exercises.
Confirm before an event, not during one:
- Ask the facility director: "Where will residents be transferred if this facility evacuates, and how will families be notified?" Get the answer in writing.
- Confirm you are on the facility's notification list for your family member.
- Identify the facility's primary receiving site. Know the route.
- Ask what medications and supplies the facility transports vs. what you provide.
- Confirm your name (and a backup) is on the authorized-release list — many facilities do not release residents to family without documented authorization on file.
Mobility-aid power continuity
Power wheelchairs and motorized scooters typically run on two 12-volt deep-cycle SLA batteries (24-volt system); charge time is 6–8 hours for a full cycle; range is 8–16 miles (13–26 km).
- Charge before the event when anticipated
- Portable power station backup — a 500–1,000 Wh station can deliver 1–2 full wheelchair charges; verify charger wattage against the station's output
- Car charging — many modern wheelchair chargers accept 12V DC adapters; confirm compatibility in advance
- Manual backup — keep a lightweight manual transport wheelchair or rollator on the property; this is the no-power fallback
Hearing-aid battery stockpiling. Zinc-air batteries shelf-life 2–3 years sealed. Common sizes 312 (brown tab) and 13 (orange tab) are most prevalent. Stock a minimum of 20 batteries per size used. Store in original sealed packaging at room temperature.
For the full elder-care framework — nutrition for elderly members, scheduled-hydration discipline (older adults experience age-related decline in thirst sensation, so thirst is a late signal not an early one), and all six failure modes with recognition and remediation — see Elder care and caregiver preparedness.
Chapter 12 checklist:
- Laminated daily medication sheet for any cognitively impaired member; copy in kit and on refrigerator
- Backup administrator briefed and in possession of medication sheet and audit
- Fall corridors cleared; LED motion-sensor nightlights installed
- PERS base-station backup power plan confirmed
- Cold-weather plan keeps activity and sleep spaces at ≥68°F (20°C) for elder member
- Dementia wandering plan: medical ID bracelet, current photo, Safe Return registration, designated buddy
- Assisted-living facility evacuation destination and notification list confirmed in writing
- Mobility device charging plan and manual backup available
- Hearing-aid battery stockpile (20+ per size used)
Part 4 — When it happens
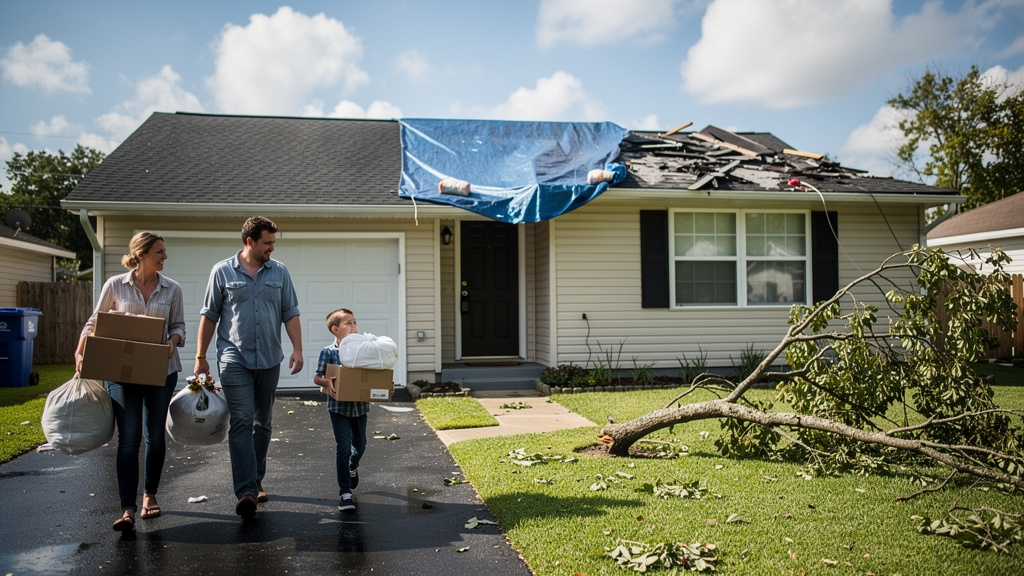
Chapter 13: Acute response and post-disaster recovery
The plan you spent months building has one job: get the household through the first 72 hours of an event, then through the first 30 days. This chapter walks the timeline.
The first hour
The first hour determines the cost of the next 30 days. The decisions:
- Is the immediate threat over? Tornado passed, fire moving away, water receded. If not — shelter, do not act.
- Is everyone accounted for? Run the comms plan. Out-of-area contact gets the first call.
- Does anyone need immediate medical attention? Bleeding control, airway, CPR — see Bleeding control and Emergency medical assessment — CPR by age.
- Is the structure safe? Gas smell? Smoke? Structural damage visible? If any, evacuate immediately.
- What are the next 24 hours likely to look like? Power restored quickly, or sustained outage? Shelter-in-place, or evacuation? Decide based on what is happening, not what you hoped would happen.
Post-disaster recovery: four phases
Recovery is structured. Every threshold below is bound to a specific phase. Do not skip ahead — Phase 1 life-safety checks are prerequisites for Phase 2 assessment.
- Phase 1 — Immediate safety (0–24 hours after event): Official all-clear, re-entry decision, utility checks, life-safety hazards
- Phase 2 — Damage assessment (24–72 hours): Photo documentation, structural triage, the 48-hour drying clock to prevent mold colonization
- Phase 3 — Claims and assistance (72 hours to 30 days): Insurance claim filing, FEMA application, initial contractor vetting
- Phase 4 — Long-term recovery (30+ days): Repairs, temporary housing, financial rebalancing, mental health

Phase 1 — Re-entry hazards
Re-entry hazards
- Gas leaks: smell at the threshold before opening doors. Sulfur/rotten-egg odor means stop. Do not operate electrical switches. Move upwind and call your gas utility from a safe distance.
- Structural collapse: a building that survived an event may be unstable. Foundation shifts, load-bearing wall damage, compromised roof members can cause sudden partial collapse. Do not enter a structure showing visible lean, foundation separation, or major wall displacement without professional inspection first.
- Electrical hazards: do not touch electrical panels, outlets, or appliances if the structure was flooded. Do not restore power until a licensed electrician has inspected all wiring. Submerged electrical panels require replacement, not just drying.
- Contaminated floodwater: CDC classifies floodwater as Category 3 (black water) — assume everything it touched is contaminated. Wear rubber boots, N95 respirator, and gloves.
- Carbon monoxide: generator operation inside or near the home causes rapid CO poisoning. At least 20 feet (6 m) from any door, window, or vent.
Photograph the exterior before entering. Walk the full perimeter if accessible. Photograph all four sides, the roof from ground level, and any visible foundation. Timestamp matters — take photos before you open a door.
Utility clearance sequence:
| Utility | Who clears | Do not restore until |
|---|---|---|
| Natural gas | Gas utility | Gas company technician inspects meter and shutoff |
| Electricity | Licensed electrician | All wiring inspected; panel dry; no submersion evidence |
| Water | Municipality | Boil-water advisory lifted; pressure restored |
| Propane | Propane supplier | Supplier inspects tank and regulator |
Phase 2 — Documentation and the 48-hour mold window
The single most expensive mistake in post-disaster recovery is cleaning up before photographing. Insurance adjusters and FEMA inspectors work from evidence, not your description.
Documentation protocol, in order:
- Video walkthrough first — walk every room with your phone camera rolling, narrating as you go ("This is the living room, northeast corner. Carpet has standing water, baseboards buckled, drywall waterline approximately 18 inches (46 cm) above the floor.")
- Individual item photos — for each significant damaged item, photograph the item, any visible serial number, and the item in context
- Written room-by-room inventory — description, approximate age, approximate purchase price, condition before the event
- High-water marks, debris lines, damage patterns — these establish causation
- Send photos to yourself via email immediately — if your phone is then damaged or stolen, you still have timestamped cloud documentation
- Do not discard anything until the insurance adjuster has visited — if health requires removal (raw sewage contamination), photograph first and retain samples where possible
Mold colonizes wet building materials within 24 to 48 hours of water intrusion, per EPA guidance. In warm humid conditions the window can close faster.
Phase 2 mold prevention:
- Remove standing water — wet-dry vacuum, mop, pump. Do not wait for a restoration contractor.
- Remove soaked carpet, padding, and saturated drywall sections that cannot dry in 48 hours per EPA guidance
- Move wet furniture outdoors or to a dry area with airflow
- Run dehumidifiers and fans — but only if mold has not yet started growing. If you see fuzzy or discolored surface growth, do not run fans — running fans in a mold-active environment distributes spores
- Target indoor humidity below 50%
- Leave interior doors and cabinet doors open for airflow
EPA DIY mold remediation threshold:
- Under 10 sq ft (0.9 m²) of contiguous mold: homeowner remediation appropriate. N95 respirator, goggles, gloves.
- 10–100 sq ft (0.9–9.3 m²): consult or hire a professional. Single-layer polyethylene containment with negative pressure required.
- Over 100 sq ft (9.3 m²): full professional remediation. Double-layer containment, dedicated decontamination chamber, HEPA-filtered negative air machines.
Do not run HVAC after a flood event until the system has been inspected — running a contaminated HVAC system distributes spores throughout every room.
Phase 3 — FEMA Individual Assistance and insurance
FEMA's Individuals and Households Program (IHP) provides financial assistance to disaster survivors after a Presidential Major Disaster Declaration.
Before you apply:
- Confirm your location is within a county covered by the declaration (DisasterAssistance.gov)
- Pull together: Social Security numbers for every household member, pre-disaster address, current temporary address, phone and email, insurance policy number, bank routing and account number for direct deposit, a one-paragraph description of losses, proof of occupancy or ownership
Apply at DisasterAssistance.gov, download the FEMA App, or call 1-800-621-3362 (TTY 1-800-462-7585), 6 a.m.–10 p.m. CT.
Application deadline: 60 days from the disaster declaration, with an additional 60-day late-application window (a 2024 reform). Apply as early as possible — incomplete applications require follow-up and extend timelines.
Program maximums (FY 2025): Housing Assistance maximum $43,600 per household; Other Needs Assistance maximum $43,600 per household. These are program maximums — your award is based on documented need, not the ceiling. Most applicants receive less than the maximum. FEMA is meant to bridge gaps, not fund full reconstruction.
Renters note: renters apply for ONA, not the dwelling-repair portion of HA (the structural claim belongs to your landlord, who files separately). HA can still cover temporary rental assistance for renters whose unit is uninhabitable. Proof of occupancy (lease, utility bill, pay stub) replaces proof of ownership.
For major reconstruction, the SBA Disaster Loan program provides low-interest loans to homeowners up to $500,000 for real property. Apply through DisasterLoan.sba.gov.
Insurance claim steps:
- Call your insurer's claims number same day. Get a claim number and the adjuster's name.
- Do not sign any paperwork at the initial visit without reading it. Adjusters represent the insurer's interests, not yours.
- Submit a complete written inventory before the adjuster arrives — room-by-room with descriptions, ages, estimated values.
- Get your own estimates — at least two independent contractor estimates for structural work. Adjuster estimates are often lower than actual costs.
- Do not accept a final settlement if you believe the amount is wrong — dispute, request re-inspection, or hire a licensed public adjuster (who works for you, not the insurer).

Flood insurance: standard homeowners does not cover flood damage. Flood requires a separate policy through NFIP or a private flood insurer. If you have NFIP, the claims process runs separately. Without flood insurance, recovery options are limited to FEMA IA and SBA loans.
Phase 3 — Contractor vetting (the post-disaster fraud window)
The FTC, DOJ, and CFPB jointly warned in October 2024 that disaster-related fraud jumps significantly in the weeks after major events. The pattern is consistent: door-to-door contractors arrive within days, offer immediate repair at a reasonable price, require full or large up-front payment, then deliver substandard work or disappear.
Predatory contractor red flags
- Arrives unsolicited at your door (the "storm chaser" model)
- Cannot provide a local physical address or local license number
- Asks for full payment — or more than one-third — before work begins
- Pressures you to sign quickly ("I can only hold this price today")
- Offers to handle your insurance claim for you, including signing your insurance check over to them
- Wants cash, wire transfer, gift cards, cryptocurrency, or payment-app payment
- No written contract, or contract with no start/completion dates
Verification steps before signing anything:
- Verify the license at your state's contractor licensing board website — do not rely on a card or verbal statement
- Verify insurance — certificate of insurance showing general liability and workers' compensation; call the issuing agency to confirm currency
- Get at least two competing estimates for any significant work
- Never pay more than one-third up front. Reasonable schedule: one-third at signing, one-third at a defined milestone, one-third at completion
- Get a written contract specifying scope, materials, start date, projected completion, payment schedule, delay terms
- Check standing with your state attorney general and BBB
Payment rule: never pay with cash, wire transfer, gift card, or cryptocurrency. Pay by check (to the company name, not an individual) or credit card. These methods create a paper trail and provide recourse.
For the full post-disaster recovery framework — earthquake ATC-20 rapid evaluation, HUD housing counselor referrals, mental health resources, and the four detailed failure-mode scenarios — see Post-disaster recovery.
Mental health is part of recovery
Physical reconstruction is the visible part of disaster recovery. Financial and psychological recovery often take longer and receive less support.
FEMA's Disaster Distress Helpline (1-800-985-5990 or text "TalkWithUs" to 66746) provides 24/7 crisis counseling for disaster survivors. Post-disaster stress responses — intrusive thoughts, hypervigilance, sleep disruption, irritability — are normal reactions to abnormal events. They become a clinical problem when they persist beyond a few weeks without improvement; that is the point to seek professional support.
Surviving a major disaster changes your relationship to your home, your community, and your sense of safety. See Mindset foundation for psychological resilience and managing stress in extended disruption.
Chapter 13 checklist:
- First-hour decision sequence reviewed with all household adults
- Pre-entry photography routine practiced (exterior, all four sides, timestamps on)
- Utility clearance sequence understood — gas, electric, water, propane
- 48-hour mold-prevention protocol understood; dehumidifier or wet-dry vacuum accessible
- FEMA application materials pre-assembled (SSNs, addresses, policy numbers, bank routing)
- Insurance binder ready for adjuster visit
- Contractor red-flag list in the binder
- FEMA Disaster Distress Helpline noted in the binder
Appendix A: Master household audit template
Print this template and fill it in. One sheet per household member. Laminate. Keep one in the kitchen and one in each go-bag.
Household member:
| Field | Value |
|---|---|
| Full legal name | |
| Date of birth | |
| Blood type (if known) | |
| Current medications (name, dose, schedule) | |
| Prescribing physicians | |
| Known allergies (Tier 1–4) | |
| Chronic conditions | |
| Devices depended on | |
| Primary care physician (name, phone) | |
| Specialist (name, phone) | |
| Insurance carrier and policy number | |
| Emergency contact 1 (local) | |
| Emergency contact 2 (out-of-area) | |
| Caregiver role assignments | |
| Advance directive location |
Appendix B: Master checklists, consolidated
Household setup (one-time work)
- One-page household audit per member, laminated, in cabinet + go-bags
- Vulnerability category review completed
- Dietary tier sheet posted inside pantry door
- Four-location document system (safe + cloud + offsite + go-bags)
- Comms plan: out-of-area contact, two meeting points, text-first protocol, radio backup
- Every adult has healthcare proxy and living will
- Elder/chronically-ill members have current POLST
- 30-day medication stockpile (60–90 for life-critical)
- Cold-chain plan: cooler, ice, probe thermometer, EpiPen at room temp
- Medical-device power continuity sized and tested
- Infant Emergency Card (if applicable) with current fever thresholds
- 14-day formula supply (if applicable) with use-by FIFO
- Tier 1 cash reserve sized and staged across two-three locations
- Banking-outage reference sheet completed
- Insurance binder assembled with ACV/RCV notation
- Home inventory completed (NAIC app or written)
- Two-week water and food supply respecting dietary tiers
- Off-grid cooking capacity tested
- Hands-on CPR class (infant CPR if applicable)
- Decision-authority roles written into household audit
- Backup caregiver briefed; respite caregiver asked
Annual maintenance (scheduled date: ____)
- Household audit reviewed and updated
- Medication stockpile rotated; insulin start dates verified
- EpiPen expiration dates checked
- Tier 1 specialty pantry items rotated (every 6 months for specialty allergen-free)
- Water rotated and containers inspected
- Cash reserve resized for current monthly non-discretionary spend
- Insurance binder updated for renewed or changed policies
- Home inventory updated for major purchases
- Comms drill conducted; comms reference sheet refreshed
- Quarterly skills drills conducted (4 over the year)
- Annual evacuation drill completed
- Self-assessment scorecard retaken
When an event happens
- Comms plan activated; out-of-area contact called first
- Cold-chain transfer to pre-chilled cooler if power loss exceeds 4 hours
- Generator placement confirmed: ≥20 ft (6 m) from windows, doors, vents
- Vulnerable members supervised; medication schedule maintained
- Pre-entry photographs taken before returning home
- Utility clearance sequence followed before restoring service
- 48-hour mold-prevention clock started if water intrusion occurred
- Insurance carrier called same day; FEMA application within 60 days
Appendix C: Recommended reading
These wiki pages are the source material for this guide. Each one goes deeper into a specific topic.
- Preparedness self-assessment — 10-minute scorecard across 12 Foundations
- Elder care and caregiver preparedness — full elder-care framework
- Infant and toddler emergency preparedness — life-safety thresholds and stockpile guidance
- Cold chain during power outages — insulin, biologics, food safety
- Chronic conditions and disaster preparedness — device-specific power sizing
- Medication stockpiling — 30/60/90-day prescription strategy
- Financial resilience — cash, banking, insurance, budget tightening
- Post-disaster recovery — re-entry, FEMA, insurance, contractor vetting
- Special diets and emergency pantry — Tier 1–4 pantry framework
- Vulnerable household members — community coordination
- Family communication plan — comms framework
- Documentation and document preservation — four-location document system