First 30 Days Off-Grid Survival Guide
Download the print-ready version
Download PDF — US Letter, print-ready, 231 KB, includes all checklists and appendices.
Thirty days is long enough that you cannot run on adrenaline. It is short enough that a household with reasonable supplies and a clear plan can get through it without permanent loss. The difference between those two outcomes — manageable hardship versus genuine crisis — almost always comes down to decisions made in the first 72 hours. What you do on Day 1 determines how hard Day 15 is.
This guide is not about camping. It is not about comfortable living, either. It is about building and running a household as a sustained operation without reliable power, municipal water, or functioning supply chains for one calendar month. You will be working harder than usual, sleeping less comfortably, and making daily decisions that normally happen automatically. The guide walks you through that month in sequence: what to do, in what order, and why the order matters.
Three phases
Phase 1 — Triage (Days 1–3): The first 72 hours run on adrenaline and the clarity that comes from acute stress. The goal of this phase is not to build systems. It is to stop the immediate bleeding: make the stay-or-go decision, secure water before municipal pressure drops, assess your shelter's heat situation, and brief every person in the household on their role. Chapters 1 through 3.
Phase 2 — Stabilize (Days 4–14): The adrenaline has worn off, and you are now managing a household as a sustained operation. This phase builds the five systems that have to run in parallel: water, food, energy, medical and hygiene, and security. Each system needs to become self-sustaining enough that it doesn't require your full attention every day. Chapters 4 through 8.
Phase 3 — Adapt (Days 15–30): The systems you built in Phase 2 are either working or they are not, and you know which. This phase is about the second-order problems that emerge once the immediate crisis is stabilized: food variety and nutrition, longer-range security, beginning food production for the period beyond 30 days, and the psychological challenge of sustained isolation. Chapters 9 through 12.
How to use this guide
Read it straight through once before anything else. The chapters are designed to be read in sequence, and later decisions build on earlier ones. After that first read, use the chapter checklists as your daily operational reference — they are designed to be actionable without re-reading the full chapter.
What this guide assumes
You are in your current home or a property you have access to. You have some food on hand, access to at least one water source, a shelter you can control, and the ability to make fire. You do not have a fully built-out preparedness system, which is why you are reading this.
What this guide does not cover
Bugging out — planned departure to a pre-arranged destination — is covered in the Bug Out guide. Extended medical care beyond field management is covered in When Help Isn't Coming. Long-term food production beyond 30 days is covered in the Food Independence guide.
The three settings
Every chapter addresses three physical realities, because the constraints are genuinely different:
- Urban apartment: No outdoor space. Limited storage. Neighbors within earshot. Water collection surface is zero. Proximity to community resources and risk are both higher.
- Suburban house: Garage and yard. A water heater with 40 to 80 gallons (150 to 300 L). Some outdoor cooking options. A car. Neighbor relationships that may become important.
- Rural or homestead: Well pump with electrical dependency you may not have solved. Distance from neighbors. Wood supply that may or may not be adequate. Self-sufficiency infrastructure that may or may not be functional.
Read the section that applies to you. Skim the others — understanding the constraints your neighbors face will matter by Week 3.

Phase 1: Triage (Days 1–3)
The first 72 hours have one job: stop the bleeding. Not build systems — stop the immediate bleeding. Secure water. Assess heat. Make the stay-or-go decision before conditions close it. Brief the household. By the end of Day 3, you should have 72 hours of secured water, a functioning heat plan, and every person in the household assigned a role.
Chapter 1: The Stay-or-Go Decision
The first decision of any extended emergency is also the most consequential. Stay in place, or leave for somewhere else. Get it right and every subsequent decision has a stable platform. Get it wrong and you may find yourself making the same decision again in worse conditions, with fewer options and less time.
The mistake most people make is treating this as a decision to be made when things get bad enough. That is exactly backwards. By the time things are obviously bad enough to leave, leaving has gotten significantly more dangerous. The household that decides to evacuate when floodwater reaches the front door is competing with everyone else on the same road, with the same dwindling fuel supply, in the same deteriorating conditions. The household that left two days earlier had options.
Make this decision now — before any event — by writing down the specific conditions under which you will leave. Not "if things get bad," but "if floodwater rises to within one block of this address" or "if a mandatory evacuation order is issued for this zone" or "if the power has been out for more than 72 hours with no restoration estimate." The card goes in a cabinet where everyone can find it. The decision has been pre-made under calm conditions, which means it will be executed faster and more accurately under stress.

The 30-minute household assessment
Before you make the stay-or-go decision, you need facts. Run this assessment systematically. Total time: 30 minutes. Do not skip it and do not do it from memory — physically walk each category.
Water (5 minutes): Is municipal pressure still running? Turn on a faucet. If yes, start filling everything you have right now — this step cannot be deferred. While filling begins, check: How much stored water do you have? Where is your water heater and can you drain it if needed?
Heat (5 minutes): What is the current indoor temperature? What is the outdoor temperature and the forecast? What heat sources do you have and which ones require power? Is there enough fuel for 72 hours at any of them? If the answer to the heat question is "electric space heater, no generator," you have a problem that needs immediate solving.
Food (5 minutes): How many days of food are actually in the house — not what you think, but what is there if you count it? What refrigerated food will go bad first and in what order? Is the freezer still cold?
Security (5 minutes): What is the nature of the event? Is it localized or widespread? What are your entry points and which ones are vulnerable? What do you know and what don't you know?
Communications (5 minutes): Do you have cell service? Is it degraded? Do you have a battery or hand-crank radio? Have you established contact with your out-of-area contact — someone outside the affected region who can relay information?
Write down what you find. Not on your phone — on paper. Your phone may lose battery, get lost, or lose signal. Paper survives all three.
Five conditions that mean stay
Stay when at least three of these are true:
- The threat does not directly endanger the structure (a power outage is not a structural threat; a rising river is)
- You have at least 72 hours of water and food on hand
- Your heat situation is manageable for the next 72 hours without grid power
- Road conditions make travel more dangerous than staying
- A household member has a medical condition or physical limitation that makes movement risky
Hurricanes and rising water violate condition one. The research is unambiguous: of those who died in Hurricane Katrina's Louisiana flooding, the majority were found at home, trapped by water they expected to escape at the last moment. "I'll leave when it gets bad" is a sentence that has cost lives.
Five conditions that mean leave
Leave when any one of these is true:
- A mandatory evacuation order has been issued for your zone
- Water is rising toward or into the structure and the rate is not slowing
- A utility failure makes the structure physically uninhabitable (gas leak, structural damage, CO buildup)
- Security cannot be maintained against a direct, credible threat
- A medical emergency requires resources that cannot be reached from where you are
The bug-out decision and bug-in decision are mirror images of each other, and neither is permanently right. For the full departure framework — including routes, load discipline, and timing — see Bug-Out Planning. For the complete criteria for when staying is the safer call, see Bug-In Planning.
Setting-specific first-hour threats
The most urgent problem you face in the first hour depends heavily on where you live.
Your most likely first-hour problem is water, and the window to solve it is short. Municipal water systems typically maintain pressure for hours to days after power fails, depending on the system and the elevation of your unit. High-floor residents lose pressure before low-floor residents. This is not a problem you can defer — fill every container you have from any running tap the moment the situation becomes apparent.
Your second problem is information. Cell towers fail under the load of an emergency: when everyone in a dense area is calling simultaneously, the network saturates. Text messages often go through when voice calls do not. If you have a battery-powered or hand-crank AM/FM/NOAA radio, this is when it becomes critical — local emergency broadcasts continue when the internet and cell network are overloaded.
Your third consideration is neighbors. Urban density means you are affected by what your neighbors do, and they by what you do. The smell of a propane heater running in a neighboring unit means carbon monoxide risk for the building. Your generator, if you had one, would violate building codes and create the same risk. Urban shelter-in-place is a collective situation whether you treat it that way or not.
Your most likely first-hour problem is cold storage failure. A full freezer maintains safe temperature for approximately 48 hours without power. A half-full freezer: about 24 hours. A refrigerator without power: 4 hours. This means you have a 4-hour window to decide what to do with perishables before the question answers itself. If it is winter, an unheated garage or porch below 40°F (4°C) becomes a natural refrigerator. If it is not, you need to consume or preserve in priority order.
Your second question is neighbors and community. Suburban neighborhoods are networks of resources and risk. A neighbor with a generator may be creating noise and attracting attention. A neighbor with well-stocked supplies may become a resource. A neighbor who has not thought about any of this may become a liability. You do not need to knock on doors in the first hour, but you should be developing a mental map of what your immediate neighbors have and what they know.
Your most likely first-hour problem is communications blackout. Rural areas lose power first and longest in grid outages. Cell coverage is often marginal or nonexistent without towers. Internet fails with power. The information isolation that comes with rural grid-down can feel complete within the first hour — you may not know whether this is a local problem or a regional one, a short outage or something longer.
Your second problem is well pump status. Most residential drilled wells use a submersible electric pump. When the power goes out, the pump stops, and you have only what is in your pressure tank — typically 20 to 40 gallons (75 to 150 L) if full, less if it was partially depleted. If you have a generator, connect it to the pump circuit now. If you do not, you are on stored water and any alternative source from this moment forward. This is a critical condition to know immediately, not after you have been drawing down the pressure tank for three hours.
The household briefing
Once you have your assessment and your stay-or-go decision, brief every household member who is old enough to act on the information. "Old enough" means roughly age eight and above, though you know your household. The briefing covers four things:
The situation: What happened and what you know. Keep it factual, not catastrophizing. "The power is out, we don't know for how long, here's what we're doing."
The plan: Are you staying or going? For how long? What happens if the decision changes?
Roles: Who is responsible for what, starting now. Assign specific tasks, not general areas. "You are tracking the water containers — you fill and count" is a role. "You handle water" is not.
Meeting points: If members are separated when conditions change — if someone is at school or work and needs to reunite — they need to know two meeting points: one close (a specific neighbor's address) and one distant (a location everyone can reach independently if the close one is inaccessible).
For children specifically: they do not need complete information, but they need accurate, calm, age-appropriate information. Children who are not told anything fill the gap with imagination, which is almost always worse than the facts. A simple, honest "we don't have power for a while and we're taking care of it, here's your job" is far more effective than either false reassurance or no explanation at all.
Field note
The most dangerous attitude in the first hour is "let's wait and see." Waiting is a decision — it is deciding to defer action while conditions may be closing around you. The households that come through extended emergencies with the least disruption are not the ones that got lucky; they are the ones that treated "wait and see" as a phrase that meant "we have not assessed the situation yet." Once you have assessed, you act on what you found.
Document your triggers
Before this chapter ends, write down your specific leave triggers on paper and post them where every adult can see them. Not as a general policy — as specific conditions with observable thresholds.
Bad trigger: "If things get dangerous." Good trigger: "If floodwater reaches the intersection of [street and street]."
Bad trigger: "If we run out of supplies." Good trigger: "If any critical supply drops below 72-hour depth."
The specificity matters under stress. When you are tired and under pressure, your brain is biased toward the familiar — toward staying where you are, toward waiting for certainty that will not come. A specific, pre-written trigger bypasses that bias. When the condition is met, the decision has already been made. You are not deciding; you are acting on a prior decision made under better conditions.
For the complete framework on situational assessment — including the Cooper Color Code, baseline calibration, and threat recognition under stress — see Situational Awareness.
Chapter 1 checklist
- Complete 30-minute household assessment: water, heat, food, security, comms — write findings on paper
- Document your specific leave triggers on paper (not phone) and post where everyone can see
- Make and commit to the stay-or-go decision based on assessment findings
- Brief every household member: the situation, the plan, their role, and two meeting points
- Identify the household's most vulnerable member and their specific needs (medical, mobility, medication)
- Fill all available food-grade containers from any running municipal supply immediately
- Locate and test all communications devices: phone, radio, check battery levels
- Verify you have 72 hours of water and food for every person before moving to Chapter 2
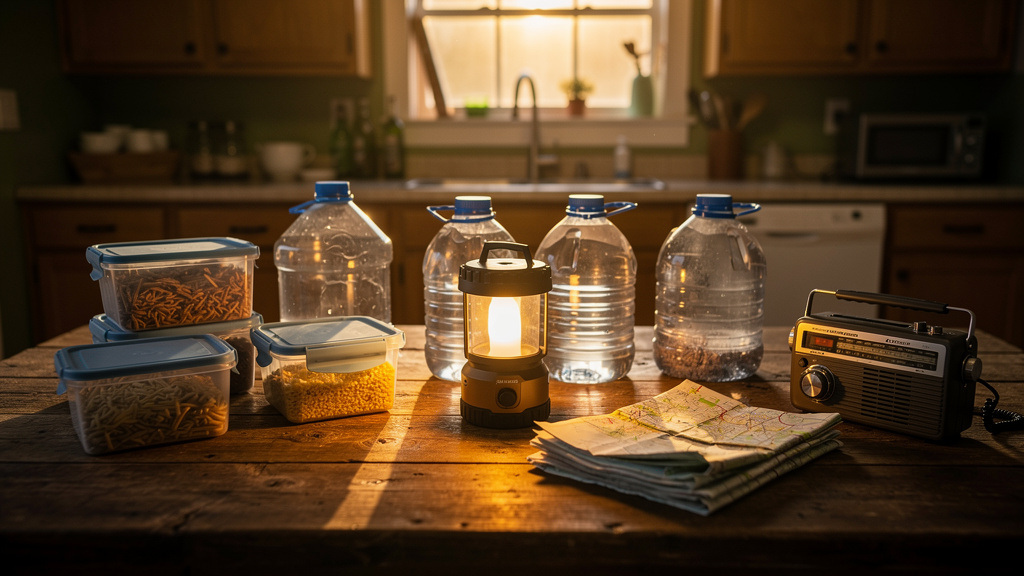
Chapter 2: Water in the First 72 Hours
You have made the stay decision and briefed your household. Now — before anything else — you address water.
Water is not the second thing on the list because it is second in importance. It is second on this list because the stay-or-go decision could change everything about your water strategy. Now that you know you are staying, you know where you are solving the water problem. This chapter focuses entirely on the first 72 hours: collecting as much clean water as possible while you still can, identifying where your water will come from after that, and getting a purification method operational before you need it.
The urgency is real. At three days without water, organ function begins to fail. In hot climates or with physical exertion, that timeline compresses to 24 to 48 hours. You cannot compensate for missed water with more water later — dehydration does cumulative damage that cannot be undone by catching up. Water has no grace period.

Fill everything now
If your municipal water is still running, this is your first physical action — not later, not after you finish reading. Start filling.
Every food-grade container in the house. Every pot, every pitcher, every water bottle. If you have a WaterBOB bathtub bladder (a BPA-free liner that fills a standard bathtub with up to 100 gallons / 378 L in about 20 minutes), deploy it now. Every bathtub you can use. Every bucket.
Municipal water may continue running for hours or days after grid power fails, depending on the height of your water tower relative to your elevation and how quickly pumping stations lose backup power. You do not know how long you have. The marginal cost of filling an extra container now is nothing. The cost of not doing it, if the pressure drops tonight, is high.
Do not fill anything that is not food-grade. This is not the time to improvise with paint buckets or storage bins of unknown provenance. Food-grade plastic is HDPE (plastic code #2, stamped on the bottom), opaque, and designed to hold food or beverage contact without leaching. If you are not sure, do not use it. For the complete container selection guide including resin codes, capacity tables, and what makes a container food-grade, see Water Containers.
The water heater: your emergency reservoir
Most households have between 40 and 80 gallons (150 to 300 L) of potable water sitting in their water heater right now. This is one of the most useful pieces of emergency information that most people do not know.
To access it:
- Turn off the heating element or gas supply to the water heater first
- Open a hot-water faucet somewhere in the house — this breaks the vacuum and allows drainage
- Connect a hose to the drain valve at the base of the water heater, or place clean containers beneath it
- Open the drain valve
The water that comes out is clean and potable — it has been treated and stored at temperature. The first quart or so may carry some sediment from the tank bottom; let that drain before collecting into drinking containers.
Do not let this water sit in the water heater if municipal water has been cut and you cannot replenish it. Drain and collect it now, when you can control the process, rather than scrambling later.
Daily water math
Work out your household's daily water requirement before you go further. This is not a planning exercise — it is operational information you need to know.
The survival minimum is 1 gallon (3.8 L) per person per day. That keeps a sedentary person alive, but leaves nothing for cooking and almost nothing for hygiene. The practical planning minimum is 2 gallons (7.6 L) per person per day.
A family of four needs 8 gallons (30 L) per day at the practical minimum. That is 56 gallons (212 L) per week, and 240 gallons (908 L) over 30 days.
If adults in the household are doing physical labor — hauling water, splitting firewood, doing construction — the requirement rises to 3 to 4 gallons (11 to 15 L) per person per day. Physical work in heat, especially, creates water demand that will surprise you if you are not accounting for it.
Calculate your household's daily need now and write it down. This number will govern every water-related decision for the next 30 days. If your stored supply runs out in 6 days at that rate, you have 6 days to establish a sustainable source — not 6 days to start thinking about it.
Setting-specific water realities
The water challenge looks very different depending on your physical situation.
The good news: Municipal water typically lasts longer in urban high-density areas than in suburbs, because large urban systems have more redundant pumping capacity and larger tower reserves.
The constraint: You have almost no collection surface and limited storage space. There is no roof you can route, no yard for a rain barrel. Your water plan is fundamentally about storage and purification — not collection.
Before the pressure drops, fill everything. Beyond the bathtub (with a WaterBOB if you have one), fill your largest pots, all water bottles, and any clean food-grade containers you can find. Toilet tanks (not bowls) in your unit hold 1.6 to 3.5 gallons (6 to 13 L) of clean water each.
Your Day 4 to 30 sourcing question is harder. Identify the nearest potential source before you need it: a pool in the building or nearby? A stream, lake, or park fountain within walking distance? Map it on paper now, with a walking route and an estimated round-trip time carrying a load. Eight gallons (30 L) of water weighs 67 pounds (30 kg). That is the upper limit of what most adults can carry comfortably for any distance, and it represents less than one day's supply for a family of four.
Purification is your binding constraint, not collection. See the purification section below.
Your immediate reservoir: The water heater (40 to 80 gallons / 150 to 300 L) plus bathtub fills plus any containers already stored. A family of four can secure 4 to 10 days of supply at the practical rate from these sources alone before needing to go further.
Your Day 4 to 30 source: If you have rain gutters and any collection container — even a standard garbage can — you have a collection surface. A 1,000 square foot (93 m²) roof area produces approximately 623 gallons (2,358 L) of water per inch (25 mm) of rainfall. One moderate rain event can fill a 55-gallon (208 L) drum completely. The constraint shifts from "finding water" to "treating it."
A neighbor's pool is a purifiable source in extremity — it holds thousands of gallons, but pool water is not drinking water. The chlorine levels are different from drinking water treatment, and it requires filtration and chemical re-treatment before consumption. Know whether it exists and whether you have the relationship to access it.
Identify the nearest surface water source on foot. Measure the actual walking distance — not by car — and estimate the time to make a round trip while carrying weight. Put that on your assessment sheet.
The critical question you need to answer right now is whether your well pump still works. Most residential drilled wells use a submersible electric pump. If you have grid power or a generator, you have water. If you do not, you have only what is in your pressure tank — typically 20 to 40 gallons (75 to 150 L).
If you have a hand pump installed as a backup, test it now. If you do not, your options are: a generator connected to the pump circuit, a tank truck delivery (unlikely in a widespread emergency), or a surface or spring source treated before use.
Rural properties often have springs, creeks, ponds, or other surface sources that urban and suburban households do not. The advantage is real — you have more potential water than they do. The constraint is that all of it requires treatment before drinking. Know where your surface sources are, what they look like under normal conditions (so you can identify contamination), and what your treatment plan is.
The critical blind spot: filter flow rate
This is the most common water system failure in the first week, and it happens to prepared people who thought they had a plan.
You have 60 gallons (227 L) of stored water. You also have a gravity filter. You calculated that the stored water will last 7 days, and you planned to switch to the filter after that.
Then on Day 4, you discover that your gravity filter produces 1 gallon (3.8 L) per hour. Your household needs 8 gallons (30 L) per day. Your filter needs to run continuously for 8 hours per day just to meet basic needs, and it needs a source — it does not create water, it only treats it. You have now entered a problem that should have been solved on Day 1.
Test your primary purification method today. Run it. Find out how many gallons per hour it produces. Calculate whether that rate meets your household's daily need. If it does not, you need either a second method, a longer operating window, or a different primary source.
Two-method purification
This guide recommends that you own and understand at least two purification methods. Not because any single method is unreliable, but because each has specific constraints that the other handles.
Boiling is the most universally reliable method. It kills every pathogen capable of making you sick — bacteria, protozoa, and viruses — without requiring any consumable beyond fuel. Its constraint is fuel. A family of four boiling 2 liters per person per day burns approximately 24 oz (680 g) of dry wood just for drinking water. Over two weeks, that is about 21 lb (9.5 kg) of firewood used for nothing but water treatment. Fuel is not free, and in a heating scenario, water-boiling and space heating are competing for the same resource. For the complete boiling procedure including altitude adjustments and fuel consumption by heat source, see Boiling Water for Safety.
Chemical treatment (household bleach at 8 drops per gallon / 2 drops per liter for clear water) is inexpensive, requires no fuel, and weighs almost nothing. Its constraints are shelf life (liquid bleach degrades to roughly 50% potency at one year) and Cryptosporidium — this parasite, common in surface water, is chlorine-resistant at standard doses and requires boiling or a 0.2-micron filter to address reliably. For the complete EPA dosing table, contact times, and the calcium hypochlorite advantage for long-term storage, see Chemical Water Treatment.
Filtration — ceramic or hollow-fiber membrane filters — handles sediment and biological threats down to bacteria without fuel. It cannot remove viruses (though viral risk in most domestic water scenarios is lower than bacterial risk), and it clogs rapidly with turbid water. For filter selection by pore size and threat type, see Water Filtration Methods.
The most practical two-method combination for most households in a grid-down scenario: a hollow-fiber filter (such as a Sawyer Squeeze) for biological removal, plus chemical treatment as a backup and viral coverage. If you are dealing with surface water from a flood event — where sewage contamination is likely — combine filtration with boiling rather than relying on chemical treatment alone.
Building your Day 1 water plan
Before you close out this chapter, write down your water system chain:
Source: Where is your water coming from for the next 72 hours? (Municipal, water heater, stored.)
Day 4 source: Where will it come from after that? (Named source, route to it, round-trip time on foot.)
Treatment method: What is your primary purification method? Have you tested it today? Do you have sufficient supplies (fuel, bleach, filter)?
Storage: Where is treated water being held? Are containers labeled with fill date?
Daily rate: How many gallons per day does your household need? How many days does your current supply last?
This chain does not need to be complicated. It needs to exist, be written down, and be known to at least two adults in the household.
Never drink untreated water from an unknown source
This includes flood water, water from a neighbor's pool, water from a stream you know well, and municipal water from an unfamiliar system. Biological contamination is invisible, odorless at dangerous concentrations, and causes illness that will compound every other problem you are managing. The rule has no exceptions: source, then treat, then store, then drink.
For the complete decision framework for source selection — including topographic indicators, urban emergency sources, and a layered sourcing plan — see Finding Water: Decision Guide.
Chapter 2 checklist
- Fill every food-grade container from running municipal supply or stored reserves — do this first
- Drain water heater into clean containers if municipal supply is cut or suspect
- Calculate household daily water need: number of people × 2 gal (7.6 L) = _____ gal/day
- Identify your Day 4 to 30 primary water source and the route to it on foot — write it down
- Test your primary purification method: confirm it works, you have supplies, flow rate meets daily demand
- Verify you own at least two purification methods and that both are operational
- Establish a water use log — track intake and output daily starting today
- Identify your greywater reuse plan: where does dishwashing and hygiene water go?
Chapter 3: Shelter and Warmth
You have secured your water. You know where it is coming from for the next 72 hours and you have a plan for what comes after. This chapter builds the second layer of the triage phase: making sure your shelter can maintain a livable temperature, that everyone can see after dark, and that the entry points you identified in the Chapter 1 assessment are addressed.
Cold is a faster killer than most people realize. Hypothermia can set in at temperatures far above freezing if the person is wet, sedentary, or elderly. A house that was a comfortable 68°F (20°C) this morning will drop to outdoor ambient temperature within 12 to 24 hours without a heat source, depending on insulation quality. In a January grid-down scenario in a northern climate, that means you have less than a day before the house becomes dangerous for vulnerable members of the household.
If it is August in the Deep South, the problem is reversed — the house heats above safe limits, not below. The principles of thermal management apply in both directions. This chapter addresses heat management primarily from the cold side, because cold moves faster and kills more reliably in an unheated house. If your primary threat is heat, the warm room concept applies with the same logic — consolidate into the coolest room, manage ventilation, restrict direct solar gain.
The warm room concept
The fastest, most fuel-efficient shelter hardening move available to any household is also the simplest: consolidate everyone into the smallest interior room with the best insulation and the fewest exterior walls and windows.
This is called the warm room. It is the thermal management principle that makes the difference between a heat source that can keep up and one that cannot.
Consider the math. A 2,000 square foot (186 m²) house with average insulation and single-pane windows on a 20°F (-7°C) night might require 60,000 to 80,000 BTU per hour to maintain 65°F (18°C) throughout. The same house, with all interior doors sealed and occupants consolidated into a 200 square foot (19 m²) interior room, might need 10,000 to 15,000 BTU per hour to keep that room at 65°F (18°C). You have reduced the heating demand by 75 to 85% through consolidation alone, without changing the heat source or adding insulation.
The warm room works because: - Interior rooms have fewer exterior wall surfaces radiating heat outward - Windows are the primary path for heat loss; an interior room typically has no windows or only interior-facing ones - Human body heat (approximately 250 BTU per hour per person at rest) contributes meaningfully to a small space - Pets contribute body heat and benefit from the same warmth
The warm room is also where you sleep. Move sleeping there tonight if temperatures are dropping.

Emergency window insulation
Windows are the weakest point in any building's thermal envelope. A single-pane window has an R-value of approximately R-1. A well-insulated exterior wall might be R-13 to R-20. Every window is a hole in your thermal barrier.
In the first 72 hours, you are not doing a permanent insulation upgrade. You are reducing heat loss at the points where it is bleeding out fastest, using what you have right now.
The technique is simple: create a dead air layer over the window surface. A dead air layer is an unventilated gap between the cold glass and the room interior. Even a small gap reduces heat loss dramatically, because it is the air movement — convection — that carries heat away from the glass into the room, not conduction alone.
Materials you can use right now: - Heavy blankets or sleeping bags draped and sealed at the top with tape or pins — this works immediately and is entirely reversible - Heavy curtains pushed against the window frame (not hanging free, but pressed against the frame to seal the edges) - Cardboard cut to fit the window opening and held in place with tape — not beautiful, but effective at blocking both conduction and convection - Plastic sheeting (painter's drop cloth, even trash bags sealed together) taped over the frame with a sealed perimeter — the classic emergency window insulation technique; creates a near-airtight dead air layer
For the warm room specifically, spend 20 minutes on window insulation before you go to sleep. The warm room's windows are the most important ones to address. The rest of the house can stay cold — you are not heating it.
For the complete insulation framework — R-value targets, vapor barrier placement, and permanent insulation upgrade decision criteria — see Insulation.
Sleeping system warmth
Your sleeping system is the last thermal envelope between you and hypothermia. Even in a warm room, overnight temperatures in an unheated house can drop below 40°F (4°C) — low enough that a summer-weight sleeping bag leaves you shivering by 3 a.m.
Bag selection by temperature: Sleeping bags tested under ISO 23537-1 carry a comfort rating (standard woman, relaxed position) and a lower limit (standard man, curled position). A 20°F (-7°C) lower-limit bag is a reasonable three-season choice; a 0°F (-18°C) bag is necessary for sustained cold. Cold sleepers and calorie-deficient individuals should buy to the comfort rating, not the lower limit.
Ground insulation is not optional: A sleeping bag provides almost no insulation on its compressed underside. A closed-cell foam pad (R-2.0) is the minimum; for cold floors, stack it beneath an insulated inflatable (R-4.0+) to exceed R-6.0 combined.
Body heat conservation sequence: In sustained cold, layer from inside out — vapor barrier liner (VBL) next to skin below 20°F (-7°C), insulation layer (bag) over that, shell layer (bivy or emergency blanket) outside. A VBL prevents moisture from freezing inside insulation over multiple nights — critical during extended grid-down winters. Above 25°F (-4°C), skip the VBL; trapped moisture makes things worse.
Lighting hierarchy
Lighting is life-safety during a grid-down event. The cooking burn, the medication-dispensing error, the fall on the stairs — these happen in low light. Establish your lighting hierarchy before the sun goes down on Day 1.
Layer 1 — Personal (task lighting): One headlamp per person. This is non-negotiable. A headlamp keeps both hands free for cooking, first aid, childcare, and repair work. The minimum useful headlamp has a high mode of 100 lumens, a low mode for extended battery life, and a red night-vision mode. Confirm that batteries are fresh or fully charged. An AA headlamp drawing 2 to 3 watts on low mode can run for 40 to 150 hours on a single set of batteries — weeks of daily use.
Layer 2 — Area lighting: One 300-lumen or better LED lantern for each primary occupied space. The cooking and eating area needs lighting at 300 to 500 lux for safe food preparation — this requires a 300-lumen lantern positioned directly over the work surface, not across the room. Battery-powered LED lanterns at this output can run 50 to 100 hours on their batteries at medium brightness. Know how many batteries your lantern uses and confirm you have spares.
Layer 3 — Emergency fallback: Candles or chemical light sticks as a last resort. Candles provide real light (a single taper candle produces about 10 to 12 lumens) but require active fire management, cannot be left unattended, and create CO2 in poorly ventilated spaces. Never leave a burning candle in a room where people are sleeping. Chemical light sticks are single-use, produce 8 to 12 hours of low-level light, and require no batteries or fire, but cannot be turned off once activated — use them only when both primary layers have failed.
For the complete lumen and lux requirements by task, battery runtime calculations, and solar lantern selection, see Shelter Lighting.
Heat source triage
Before you can operate your warm room, you need to know what heat source is available and what its fuel situation is.
Work through this triage:
What heat sources do I actually have?
Candidate sources, in order of grid-independence: - Wood stove (no grid dependency, highest fuel requirement) - Propane heater (no grid dependency, but fuel storage limits apply; CO risk in enclosed spaces) - Kerosene heater (no grid dependency, similar CO considerations) - Electric space heater (requires grid or generator — if you have neither, this is unavailable) - Pellet stove (requires electricity for auger and blower — grid-down vulnerable unless battery backup) - Central HVAC (requires grid — unavailable) - Body heat (always available; diminishing returns in very cold conditions)
For each available source: how much fuel do I have?
This is the question that has no substitute for actually checking. Open the propane valve and look at the gauge. Count the wood that is split, dry, and accessible (not the rounds that are still green in the back of the stack). Look at what is in the kerosene can.
Be honest about what you have. Optimism about fuel supply is one of the most reliable predictors of trouble in the second week.
Setting-specific heat management
The hard truth about urban apartments and combustion heat is that they are largely incompatible without adequate ventilation. Propane and kerosene heaters in a sealed apartment will build carbon monoxide to dangerous levels within hours. CO is odorless and colorless — you will not smell it until you are already incapacitated.
Your heat strategy in an urban apartment is almost entirely insulation, consolidation, and body heat management:
- Implement the warm room concept: everyone in the smallest interior room with the fewest exterior walls
- Sleeping bags rated to the expected low temperature provide substantial thermal management — a -10°F (-23°C) rated sleeping bag at 30°F (-1°C) will keep you warm through the night with minimal supplemental heat
- Wool blankets layered over sleeping bags provide additional insulation
- Multiple people in a small room contribute meaningful body heat — 250 BTU per hour per person means four adults in a 200 square foot (19 m²) room are producing 1,000 BTU per hour of heat
If you have access to a rooftop or balcony with adequate ventilation and local codes permit it, a portable propane heater used briefly for warming and then shut off while the space retains heat is possible — but CO risk management is your responsibility. If you are not certain your ventilation is adequate, do not do it.
If you have a wood stove, this is when it becomes your primary asset. The startup procedure matters: a cold chimney creates poor draft and allows smoke to enter the room. Start with a small fire of dry kindling and let it burn for 10 to 15 minutes to warm the flue before loading a full charge. Full air intake for the first 20 to 30 minutes brings the system to operating temperature.
If you do not have a wood stove but have a propane heater rated for indoor use (Mr. Heater Big Buddy and similar models with low-oxygen shutoff), the safe operating procedure is critical: crack a window or door a quarter inch (6 mm) to maintain oxygen levels, install and test a CO detector with fresh batteries before operation, and do not run the heater while sleeping.
Sealing off unused rooms is a high-value immediate action. Close every interior door to rooms you are not actively using. Push rolled towels against door gaps. The volume you are heating shrinks dramatically, and the heat source that struggled to warm a 2,000 square foot (186 m²) house may handle a sealed 400 square foot (37 m²) warm room comfortably.
A properly sized wood stove is your most important grid-independent asset. A non-catalytic wood stove rated at 40,000 to 80,000 BTU per hour will heat 800 to 2,000 square feet (74 to 186 m²) in a moderately insulated home.
Your first questions: Is the stove properly installed with correct clearances and a functioning flue? Is the chimney clean? When did it last get swept? Stage III creosote — thick, glazed tar inside the flue — burns at up to 2,000°F (1,093°C) if ignited; it is one of the most preventable causes of house fires, and it becomes a problem when green wood or damped-down fires have been used.
Firewood inventory is a concrete number you need right now. Walk to your wood supply and count. Not loosely — count what is dry, split, and accessible. A 1,500 square foot (139 m²) home in a moderate-cold climate (5,000 to 7,000 heating degree days) burns approximately 1.5 to 2.5 cords of hardwood per heating season. One full cord is a stacked pile measuring 4 feet by 4 feet by 8 feet (1.2 m by 1.2 m by 2.4 m). What is your current inventory, and how many weeks does it represent at your expected burn rate?
For species-by-species BTU output, annual quantity calculations, and the two-season wood management system, see Firewood. For wood stove sizing, flue clearances, the startup procedure, and creosote prevention, see Wood Heat.
The CO briefing
Carbon monoxide is the most critical safety briefing of Day 1 and it belongs in this chapter because every combustion heat source produces it.
CO is a colorless, odorless gas produced when carbon-containing fuels — wood, propane, kerosene, natural gas, charcoal — combust with insufficient oxygen. At low concentrations it causes headache and nausea. At higher concentrations it causes disorientation, unconsciousness, and death, sometimes before the victim is aware anything is wrong.
Every combustion appliance — your wood stove, your propane heater, your kerosene lamp — produces CO. The difference between safe and dangerous use is ventilation. A wood stove installed with a proper chimney and operating with adequate draft moves CO outside the structure. A propane heater in a sealed room does not.
The non-negotiable rules:
- Never use a charcoal grill, camp stove, or generator inside any structure or enclosed garage — even with doors open. This kills people every year, often in emergencies exactly like the one you are managing.
- Install a CO detector with fresh batteries in every sleeping area before the first night of using any combustion heat or cooking source indoors.
- Never go to sleep with an active combustion appliance running in an enclosed space unless that appliance is properly vented to the exterior (as a wood stove with a functioning chimney is).
- If anyone reports a headache, nausea, or confusion and a combustion source is operating — get everyone outside immediately and don't go back in until you know it is safe.
CO from cooking
This includes your camp stove used for cooking. Propane and butane camp stoves are designed for outdoor use. If you cook indoors during a grid-down period — which you will — crack a window, even in cold weather. The ventilation is not optional. A gas range on a modern kitchen stove is a different situation (it vents through your range hood to the exterior), but a camp stove in a bedroom or living room is not.
Day 1 security and entry point walk
The final task of this chapter is a security walk of your entry points — not to solve all security problems (that is Phase 2 work), but to note what exists and what the immediate vulnerabilities are.
Walk every exterior door and window. For each one, note: - Does it lock? Does the lock actually hold if pressure is applied? - Is the door frame intact, or does the strike plate have only short screws? - Is the window on the ground floor or easily accessible?
Most door kicks exploit weak strike plates, not the door itself. The strike plate is the metal fitting that receives the latch bolt and deadbolt. If it is attached with the standard 3/4-inch (19 mm) screws, it can be kicked out with a single blow. Replacing them with 3-inch (7.6 cm) screws — a 10-minute job — adds substantial resistance without replacing the door. Note which doors have this vulnerability and whether you want to address it today.
You are not building a fortress this evening. You are knowing what you have and what is weak so you can make informed decisions in Phase 2. Write it down, add it to the assessment sheet, and move on.
For the complete situational awareness framework — including maintaining a calm, calibrated baseline state and recognizing threats before they develop — see Situational Awareness.
Chapter 3 checklist
- Designate your warm room — the smallest interior room with fewest exterior walls and windows
- Move sleeping to the warm room tonight if temperatures are dropping
- Seal warm room windows with plastic film, blankets, or cardboard — 20-minute task
- Confirm CO detector is installed and working near any combustion heat source or sleeping area
- Test your primary heat source: startup procedure, does it function, how much fuel do you have?
- Assign one headlamp per person — confirm batteries are fresh or fully charged
- Set up one 300+ lumen area light in your primary cooking and working space
- Close all interior doors to unused rooms to reduce the heated volume
- Walk all exterior entry points — note which doors have short strike plate screws and which windows are accessible
- Brief every household member on CO safety: what produces it, why it is dangerous, what to do if anyone feels symptoms
Phase 1 consolidated reference checklist
This checklist collects all action items from Chapters 1 through 3 into a single printable page. Use it as your Day 1 through Day 3 operating reference.
Before anything else
- Start filling all food-grade containers from running municipal supply immediately
- Drain water heater into clean containers if municipal supply is cut
- Confirm CO detector is installed and functional before using any combustion heat source
Assessment and decision
- Complete 30-minute household assessment: water, heat, food, security, comms
- Write findings on paper — not phone
- Make and commit to the stay-or-go decision
- Document specific leave triggers and post where everyone can see them
Household organization
- Brief every member: situation, plan, role, two meeting points
- Identify the household's most vulnerable member and their specific needs
- Assign supply-tracking role to one person starting today
Water — first 72 hours
- Calculate daily water need: people × 2 gal (7.6 L) = _____ gal/day
- Count current supply and determine how many days it lasts
- Identify Day 4 primary source and route to it on foot — write it down
- Test primary purification method — verify flow rate meets daily demand
- Confirm two purification methods are on hand and operational
- Start water use log — track intake daily from Day 1
Shelter and warmth
- Designate and set up the warm room — move sleeping there tonight
- Seal warm room windows with available materials
- Count actual fuel supply for heat source — be precise
- Test heat source startup procedure
- Assign one headlamp per person with fresh batteries
- Set up 300+ lumen area light in cooking space
Security baseline
- Walk all exterior entry points — note vulnerabilities on assessment sheet
- Confirm communications devices are functional and batteries are charged
- Establish contact with out-of-area relay person
Phase 1 is complete when every item on this checklist is done and every adult in the household has been briefed. You are not finished with water, shelter, or security — you are finished with the triage phase. Phase 2 begins on Day 4, when the task shifts from stopping the bleeding to building the systems that will run for weeks.
Source pages
This section of the guide draws from the following Foundation pages:
- Bug-In Planning — stay criteria, supply depth, home hardening
- Bug-Out Planning — departure triggers, destination requirements, route planning
- Situational Awareness — threat assessment, Cooper Color Code, pre-attack indicators
- Mindset — the heroic phase, psychological framing, stress and decision-making
- Water Hub — three-layer model, daily requirements
- Water Containers — container types, food-grade requirements, capacity math
- Finding Water: Decision Guide — source priority order, urban sources, layered sourcing
- Boiling Water for Safety — complete procedure, fuel cost per day
- Chemical Water Treatment — bleach dosing, contact time, calcium hypochlorite
- Water Filtration Methods — filter selection by threat type, pore size reference
- Insulation — R-value basics, warm room thermal principles
- Shelter Lighting — lumen requirements, headlamp selection, area lighting
- Wood Heat — stove types, startup procedure, clearance rules, CO safety
- Firewood — BTU by species, cord sizing, quantity planning

Phase 2: Stabilize (Days 4–14)
The adrenaline has worn off. Your immediate survival is secured, but you are now managing a household as a sustained operation. This phase builds the five systems that have to run in parallel: water, food, energy, medical and hygiene, and security. Each system needs to become self-sustaining enough that it doesn't require your full attention every day. Chapters 4 through 9.
Chapter 4: Building a Sustainable Water System
The first 72 hours secured emergency water. You filled containers from whatever was running, you drained the water heater, and you established that your purification method works. What you built was a buffer — enough to survive the initial shock. What you need now is a system: a repeatable daily operation that produces safe water without full attention and can run for weeks before any supply is exhausted.
The difference between a buffer and a system is structure. A buffer runs out. A system replenishes. By the end of this chapter, you will have a complete water chain — collection to purification to storage to daily use to greywater reuse — mapped specifically for your setting and operational for the next 30 days.
From Ad Hoc to Systematic
Most households come out of the first 72 hours with a water situation that looks like this: a mix of containers in various states, some treated and some not, a purification method that worked yesterday but wasn't designed for daily production, and a rough sense of how long their supply will last. That's fine for Day 3. It's a liability by Day 7.
The core of a sustainable water system is a production rate that equals or exceeds daily consumption. Your household's number is straightforward: 2 gallons (7.6 L) per person per day covers drinking, cooking, and basic hygiene. That's 8 gallons (30 L) per day for a family of four. Active physical labor — hauling water, splitting wood, working a garden — pushes that to 3–4 gallons (11–15 L) per person per day. Use the higher number for planning; conservation is easier than scrambling.
Where that water comes from, and how it gets purified, depends on your setting and your primary threat.
Choosing Your Filter by Threat Type
Your purification method must match what your water source actually contains — not what seems intuitively safest.
Biological threat (bacteria and protozoa): This is the baseline threat for virtually all non-municipal sources in North America — streams, ponds, rainwater, and most shallow wells. A hollow-fiber membrane filter rated at 0.1 microns (the Sawyer Squeeze at an affordable price point) or a ceramic gravity filter rated at 0.2 microns removes all protozoa and all bacteria in its category. Either is sufficient for sources with a purely biological threat. The Sawyer Squeeze has a rated lifetime of 100,000 gallons (378,000 L) — effectively indefinite for household use — and weighs 3 oz (85 g), making it the highest-value-per-dollar biological filter available.
Viral threat (sewage contamination, flood water): No mechanical filter reliably removes viruses. Viruses range from 0.02–0.3 microns — smaller than the pores of any practical field filter. If your source is flood water, water downstream of a sewage failure, or water from an area with documented viral contamination, you must pair mechanical filtration with chemical treatment or boiling. The standard sequence: pre-filter through cloth to remove turbidity, run through your mechanical filter to remove bacteria and protozoa, then apply bleach or boil. This two-step process covers all biological threats. For the complete dosing procedure, see Chemical Treatment.
Chemical or heavy metal contamination: Neither filtering nor boiling removes chemical contamination. If your source is downstream of agriculture, near industrial sites, or drawn from a potentially compromised well, the only reliable method is distillation. Mechanical filtering with chemical follow-up still leaves agricultural runoff in the water. If chemical contamination is your threat, you need to identify a different source before anything else.
For a full treatment on matching source to method, see Filtration and Finding Water — Decision Guide.
The Calcium Hypochlorite Advantage
If you used liquid bleach in the first 72 hours, you already understand chemical treatment. For a sustained 30-day operation, liquid bleach has a significant weakness: it degrades. A bottle of 6% sodium hypochlorite bleach purchased six months ago has dropped to approximately 5.5% potency. A bottle a year old is at 4.8% — still usable, but you need to increase the dose by 25–30% and rely on the smell test to confirm effectiveness.
Calcium hypochlorite pool shock solves this problem. A 1 lb (450 g) bag of 68–78% calcium hypochlorite — an inexpensive purchase at any pool supply store — treats approximately 10,000 gallons (37,850 L) of water and retains full potency for 5–10 years when stored cool and dry. For a 30-day scenario at 8 gallons (30 L) per day for a family of four, you will use roughly 240 gallons (908 L) of treated water. One pound of pool shock covers that 41 times over.
Critical storage rule: calcium hypochlorite is a powerful oxidizer. Store it in a cool, dark location in its original sealed container, away from organic materials, fuel, wood, and flammables. A damp granule contacting organic material can ignite spontaneously. This is not a product to store in the same space as your firewood or fuel cans.
The procedure requires one extra step versus liquid bleach. Do not add the granules directly to drinking water. Dissolve 1/8 teaspoon (0.6 g) of granules in 1 gallon (3.8 L) of water first, creating a concentrated stock solution of approximately 500 ppm available chlorine. Then use 1/8 teaspoon (0.6 mL) of that stock solution per gallon (3.8 L) of clear water you want to treat. Wait 30 minutes, verify with the chlorine smell test, and aerate by pouring between two containers before drinking. The stock solution degrades quickly — discard it after 24 hours and make fresh.
Rainwater as a Sustainable Collection Source
For most settings with any roof area, rainwater collection is the most logical long-term water source: it requires no infrastructure beyond gutters, storage, and purification; it is independent of grid power; and a single moderate rain event can produce more water than a family uses in a week.
The collection math is straightforward. Multiply your roof collection area in square feet by the rainfall in inches, then by 0.623 to get gallons collected:
Gallons = Roof area (sq ft) × Rainfall (in) × 0.623
A 1,000 sq ft (93 m²) collection surface during a 1-inch (25 mm) rain event produces 623 gallons (2,358 L). A suburban house with a 2,000 sq ft (186 m²) roof and a 1-inch rain collects 1,246 gallons (4,716 L) — roughly two weeks' supply for a family of four, from one rain event.
The first-flush diverter is the single most important component in any rainwater system. The first 15 minutes of rain after a dry period carries concentrated bird droppings, pollen, dust, roof particulates, and atmospheric fallout that accumulated since the last rain. A first-flush diverter automatically discards this contaminated initial flow — directing it to a vertical PVC chamber that fills and holds while subsequent, cleaner water routes to your storage container. The chamber drains slowly through a 1/8-inch (3 mm) hole over the next 24–48 hours, resetting itself before the next rain.
Construction takes about 15 minutes with PVC parts: a tee fitting on the downspout, a vertical chamber pipe sized to hold the first flush, and a slow-drain cap at the bottom. Size the chamber to divert 1 liter (0.26 gal) per 10 square meters (108 sq ft) of roof area. For complete construction steps, see Rainwater Harvesting.
Even with a first-flush diverter, collected rainwater requires treatment before drinking. The standard treatment sequence is sediment pre-filter (a coarse mesh screen at the cistern inlet) followed by your mechanical filter (ceramic or hollow-fiber) followed by chemical treatment or boiling. Treat rainwater the same as any surface water — it is cleaner than most, but not clean enough to drink untreated.
Urban collection surfaces are constrained. A balcony catchment, even a small one, can collect meaningful quantities. A 10 × 8 ft (3 × 2.4 m) balcony collects approximately 50 gallons (189 L) from a 1-inch (25 mm) rain — not a primary supply, but useful as a supplement. More practically, urban rainwater strategy focuses on containers: storing water while municipal supply still flows, and identifying the nearest surface water source on foot (a park pond, river, or fountain) as your backup collection point. That source requires filtration and chemical treatment for biological threats, plus a clear-eyed assessment of chemical contamination risk based on what's upstream of it. Gravity-fed systems (a Berkey or similar ceramic filter) are well-suited to urban apartments because they require no electricity and produce a steady supply without attention.
A suburban house with standard gutters can connect to IBC totes (275–330 gal / 1,041–1,249 L each) or a food-grade rain barrel array at the downspout. A first-flush diverter on each active downspout brings collection quality up significantly. Two IBC totes in series provide 550–660 gallons (2,082–2,498 L) of capacity — roughly 10 days' supply at 2 gallons/person/day for a family of four, from a single good rain event. A neighbor's pool is a large-volume backup source if needed, but it requires treatment for bacterial threats and possible algaecide/chlorine balancing — test it before relying on it. For the full filtration decision tree, see Filtration.
Rural properties typically have the largest collection surface, the most storage space, and the most options. A well with a hand pump is the gold standard — grid-independent, high-volume, and low-treatment-requirement once tested. If your well pump is electrically dependent and grid power is down, confirm now whether your pressure tank holds enough for immediate use, and whether you have a hand pump or transfer pump option. A 1,500-gallon (5,678 L) poly cistern fed by gutters from a barn or house roof provides weeks of storage from one or two good rains. For rural properties on wells, annual testing is non-negotiable — you need to know what your water actually contains before deciding what treatment it requires.
The Rotation System
A sustainable water system is not just production — it is also management of what you store. The three-container rolling cycle is the practical tool for this.
Label three containers A, B, and C. Fill and treat them on a staggered schedule — two months apart is ideal, but in a grid-down scenario you're filling all three at once from your current source. The principle is first-in, first-out: Container A gets used first; when it's empty, move to B; when B is empty, move to C; refill A before you deplete B. At any point, you have two full containers in service and one being refilled.
The labeling is non-negotiable. Write the fill date, treatment method, and use-by date (6 months for tap water plus bleach treatment; 12 months in ideal storage conditions) directly on the container with a permanent marker. Not a paper label that falls off in a damp garage. The container itself, in large text. In an emergency six months from now, you will not remember which container you treated and which you forgot.
For the full rotation procedure including container cleaning, inspection, and refill steps, see Water Rotation.
Greywater Reuse
Greywater — water from handwashing, dishwashing, and light cleaning — is not potable, but it is not useless. Channeling greywater to toilet flushing, garden irrigation (non-edible plants, or at soil level for root-zone irrigation of edibles), or outdoor cleaning extends your effective clean water supply by 20–30%.
The setup is simple: a dedicated collection basin under your dishwashing station, separate from your potable water system. Keep the lines between potable and grey water clear — label both sides, use different container colors if possible, and never let them mix. During a 30-day scenario, greywater reuse can be the difference between making your supply last and running dry on Day 22.
Field note
The most common water system failure in the first month isn't contamination — it's fuel. Boiling 8 gallons (30 L) per day for a family of four requires roughly 24 oz (680 g) of dry wood just for drinking water. Over two weeks, that's 21 lb (9.5 kg) of firewood consumed purely on water treatment. If you're also using wood for cooking and heat, those demands stack. Every time you switch to a filter-plus-chemical method for water treatment instead of boiling, you're banking fuel. Calcium hypochlorite and a quality filter are the most fuel-efficient combined treatment system available.
Water Rationing as a Strategic Tool
You have two operating modes: practical mode at 2 gallons (7.6 L) per person per day, and survival mode at 1 gallon (3.8 L) per person per day. Survival mode is the Federal Emergency Management Agency (FEMA) minimum — drinking only, minimal cooking, no hygiene. It is physically sustainable for a few days; it is not livable for 30.
Practical mode is your default. If you're producing enough water daily, stay in practical mode — the physical and psychological cost of survival mode is real, and it creates secondary problems (hygiene failures, increased illness, morale collapse) that cost more than the water they save.
The trigger for tightening to survival mode is a supply threat: your primary source is compromised or unavailable, your backup purification is failing, or your storage is depleted faster than expected. Know your trigger conditions before you're in them. "We go to survival mode when our storage drops below 3 days at practical rate" is a decision made in advance, not in a panic.
Field note
The best water rationing tactic isn't reducing drinking — dehydration is dangerous and cumulative. It's reducing cooking water. Switching from boiled pasta to pre-soaked lentils or dehydrated meals cut water consumption by 30–40% in cooking alone. Lentils soaked 8–12 hours before cooking need only 10–15 minutes on the stove versus 90 minutes without soaking. That saves water and fuel simultaneously.
Chapter 4 checklist
- Water source confirmed: primary, secondary, and emergency fallback documented in writing
- Purification method matched to source threat type — biological, viral, or chemical
- Daily production rate verified: system can produce household daily need (people × 2 gal / 7.6 L)
- Calcium hypochlorite procured and stored safely (away from fuel, organics, flammables)
- Three-container rotation cycle established: all containers labeled with fill date and rotation schedule
- First-flush diverter installed or at minimum a collection point identified for next rain event
- Greywater collection established: dedicated basin, separate from potable system, use path defined
- Rationing triggers defined: what conditions move the household to survival mode
Chapter 5: Food Systems for Sustained Operations
Water is secured and sustainable. Food is the next system to build out — not to survive, but to operate. The distinction matters: in survival mode, food is calories. In sustained operation, food is energy management, morale maintenance, cooking fuel discipline, and nutritional health across 30 days. Households that treat food as a logistics system fare dramatically better than households that eat reactively. The difference shows up around Day 10 and is unmistakable by Day 20.
This chapter builds your operational food system: the drawdown sequence, the caloric math, the cooking method hierarchy, the fuel plan, and the nutritional gaps you need to close before they become problems.

The Food Failure Everyone Makes in Week One
Before discussing any system, understand the mistake that depletes food reserves faster than any other: eating in the wrong order.
The correct drawdown sequence is perishables first, canned goods second, dry goods last. Your refrigerator contains the most calorie-dense, most familiar, most morale-sustaining food you have — and it will all be worthless within 48–72 hours of a power outage without active cold management. Your pantry canned goods last two to five years. Your bulk dry goods last decades in proper storage. Most people, under stress, reach for the familiar thing, which is usually something from the pantry — while the refrigerator is dying quietly.
The first thing to do after addressing water is a full perishable inventory. Open the refrigerator and categorize everything by time to spoilage:
- Immediate (24 hours): Opened dairy, leftovers, cut produce, eggs after the third day
- Short (2–4 days): Whole dairy, raw poultry and fish, deli meats, soft cheeses
- Medium (4–7 days): Hard cheeses, whole raw meats, root vegetables already refrigerated
- Stable (no power required): Condiments, whole fruits and vegetables, uncut onions, potatoes, squash
Build your meal plan around clearing the immediate and short-term items first, then the medium-term, then transitioning to canned and dry goods. This sequence keeps you eating well for the first week while protecting your long-term reserves.
Freezer contents complicate the math. A full, undisturbed freezer holds temperature safely for 48 hours; a half-full freezer for 24 hours. If you can keep it closed, treat the freezer as cold storage on a clock. When the clock runs out, cook everything in bulk or use salt-curing and smoking as preservation methods if the volume warrants it. See Smoking and Salting for preservation options under those conditions.
Caloric Math You Cannot Skip
The single biggest food planning failure is not running out of food — it's running out of the right food. A food store that delivers adequate bulk calories but insufficient fat, protein, or micronutrients will produce real cognitive and physical decline within two to three weeks, on a timeline most people don't recognize until it's already happening.
Work through the caloric math now, before you start drawing down reserves.
Baseline daily caloric targets by household member:
| Profile | Daily calories |
|---|---|
| Sedentary adult | 1,800–2,000 kcal |
| Moderately active adult | 2,000–2,400 kcal |
| Active labor (hauling water, splitting wood) | 2,800–3,500 kcal |
| Adolescent (13–18) | 2,000–3,000 kcal |
| Child 6–12 | 1,400–2,000 kcal |
| Child under 6 | 1,000–1,400 kcal |
Precision method — Harris-Benedict BMR: For individual caloric planning, the Roza-Shizgal (1984) revision of the Harris-Benedict equation gives a more accurate baseline than generic tables. Male BMR = 88.362 + (13.397 × weight in kg) + (4.799 × height in cm) − (5.677 × age in years). Multiply by an activity factor: sedentary 1.2, light activity 1.375, moderate labor 1.55, heavy labor 1.725. A 180 lb (82 kg), 5'10" (178 cm), 35-year-old man doing moderate physical labor needs approximately 2,864 kcal/day — not the generic 2,200 kcal baseline. See Nutritional Math for the full formula with female equation and worked examples.
Critical adjustment: In a grid-down scenario with active physical work — hauling water, managing a heating system, chopping and stacking wood, doing any kind of manual labor the household normally delegates to powered tools — an adult's daily caloric requirement rises by 500–1,000 kcal above baseline. A person doing 8 hours of moderate manual labor burns approximately 2,800–3,500 kcal per day. Plan for the higher number if labor is likely.
Worked example — family of four (2 adults, children age 8 and 12): - Two moderately active adults: 2,200 kcal each = 4,400 kcal - Child age 12: 1,800 kcal - Child age 8: 1,600 kcal - Total daily: 7,800 kcal - Total over 30 days: 234,000 kcal
Cross that number against the calorie density of your pantry. White rice delivers approximately 1,640 kcal per pound (3,615 kcal/kg). Rolled oats deliver 1,720 kcal per pound (3,790 kcal/kg). Dried lentils deliver 1,590 kcal per pound (3,505 kcal/kg). Ten pounds (4.5 kg) of white rice per person per month — the Layer 2 pantry baseline from the Pantry Building foundation page — provides roughly 16,400 kcal, which covers about 7 days of a moderately active adult's caloric need. Not a month. A family of four needs significantly more depth than most people realize when they run the actual numbers.
For detailed per-person monthly staple quantities and calorie accounting, see Pantry Building.
The Fat Gap
After total calories, fat is the most commonly underweighted macronutrient in stored-food plans. Grain-dominant stores are carbohydrate-heavy — rice, beans, pasta, and oats provide mostly carbohydrate with moderate protein and very little fat. A person eating adequate carbohydrate calories but insufficient fat will feel perpetually hungry, have impaired cognition, and develop hormonal disruption within weeks.
The target is 25–35% of daily calories from fat. At 2,200 kcal per day for an active adult, that means 55–86 grams of fat daily. One tablespoon of cooking oil per meal (14g fat, 120 kcal) plus two tablespoons of peanut butter as a snack (16g fat, 190 kcal) takes you most of the way there, which is why both items appear at the top of every practical pantry list.
Explicit fat sources to have on hand: - Cooking oil (olive, vegetable, coconut): 3,960 kcal per pound (8,730 kcal/kg); seal after opening and use within the rated shelf life - Peanut butter: 2,600 kcal per pound (5,730 kcal/kg); rotate within 1–2 years - Ghee (clarified butter): 3,500 kcal per pound; sealed shelf life 12+ months at room temperature - Canned sardines or salmon: complete protein plus omega-3 fatty acids; one of the few stored sources of the fats that are hardest to get from plant-dominant stores
Check your current pantry against these categories. If you cannot identify a clear fat source for each day's meals, that gap needs to be filled now.
For the full macronutrient and micronutrient analysis of stored-food diets, see Nutritional Math.
The Micronutrient Timeline
The micronutrient failures in a stored-food diet follow a predictable timeline. None of them are catastrophic in the first two weeks; all of them are a genuine health threat by Week 4–6.
Vitamin C (scurvy): Symptoms appear within 4–6 weeks of near-zero intake. Early field signs: unusual fatigue, bleeding gums, corkscrew-shaped body hair, and wounds that reopen or refuse to heal. Stored grains, legumes, and canned goods contain almost no Vitamin C. Canned tomatoes contribute roughly 20 mg per cup (well below the 65–90 mg daily reference intake). Solutions: freeze-dried bell peppers, canned citrus juice, and a 500–1,000 mg daily supplement that costs pennies per tablet. Stock a 90-day supply now.
Vitamin D: Indoor or limited-sun scenarios eliminate the primary acquisition pathway (UV skin synthesis). Deficiency is slow but cumulative — impaired immunity, mood degradation, eventual bone density loss. Supplement at 1,000–2,000 IU daily.
Iodine: Non-iodized salt (sea salt, kosher salt) provides zero iodine. If your stored salt is not iodized, add iodine supplementation. Thyroid dysfunction from iodine deficiency develops over months, not days — but it begins quietly.
Niacin (pellagra): Corn-dominant diets without nixtamalization (lime processing) are the classic trigger. The "4 D's" — dermatitis (symmetric sun-exposed rash), diarrhea, dementia, and death — develop over weeks. If your stored-food plan is corn-heavy, add dried beans or peanuts daily; both are rich niacin sources.
Thiamine (beriberi): Polished white rice as a dietary staple without thiamine supplementation produces either wet beriberi (cardiac — edema, rapid heart rate) or dry beriberi (neurological — numbness, difficulty walking) within 1–3 months. Adding parboiled rice, whole grains, or dried legumes to the rotation prevents this entirely.
Zinc and iron: Wound healing, immune function, and energy metabolism all depend on them. Canned legumes, lentils, and canned seafood are your practical dietary sources. If those aren't daily staples, supplement zinc at 15–30 mg per day.
The solution is inexpensive and fits in a small bag: a multivitamin plus separate Vitamin C and Vitamin D supplements. A 90-day supply per person is an affordable purchase that closes the most dangerous gaps in any stored-food diet.
For sprouting as a source of fresh Vitamin C from stored seeds (lentils sprout to 14 mg Vitamin C per 100g in 3–4 days), see Nutritional Math.
Your Cooking System Hierarchy
Off-grid cooking reliability comes from having multiple methods, not one perfect one. The model is a three-layer system where each layer serves a specific operational role.
Primary: A butane tabletop cooker is the correct choice for urban apartments. It is quieter than a propane camp stove, the canisters are inexpensive and available at Asian grocery stores (not just camping stores), and it doesn't draw the attention a propane setup does. A single butane canister (220g) runs approximately 60–90 minutes on medium heat. At two hot meals per day for two adults, budget for 8–12 canisters per week. Butane canisters store compactly — a case of 12 fits in a shoebox. Fuel storage limit: most building codes prohibit storing more than two or three propane cylinders indoors; butane canisters in sealed packages are a lower-risk alternative in quantity.
Secondary: A portable folding camp stove with small-diameter wood or biomass pellets for outdoor use (courtyard, parking area, rooftop if accessible). Noise and smoke are the constraints — open fires in dense urban areas attract attention and create conflicts.
Tertiary: For solar cooking, any south-facing outdoor surface during clear-day windows. A box-style solar cooker concentrates sunlight to 250–350°F (121–177°C) — sufficient for rice, beans, or pasteurizing water at 150°F (65°C) for 6 minutes. No fuel required; works year-round where direct sunlight is available for 4–6 hours.
Primary: A two-burner propane camp stove with one or two 20 lb (9 kg) propane cylinders. A 20 lb (9 kg) cylinder provides roughly 20–25 hours of cooking time — at two meals per day for a family of four, that's approximately 10–12 days of primary cooking fuel per cylinder. Two cylinders covers 20–24 days. Cooking on medium heat with a lid on every pot extends that significantly.
Secondary: A rocket stove positioned in the backyard or on the driveway. Small-diameter wood — sticks 1–3 inches (2.5–7.6 cm) in diameter — burns at approximately 85–90% efficiency compared to 20–30% for an open campfire. The same fuel that runs an open fire for one meal runs a rocket stove for three. If local ordinances permit an outdoor fire, this is your best fuel-extending cooking upgrade.
Tertiary: Solar oven during weather windows for batch cooking — beans, rice, and casseroles that can slow-cook for 3–4 hours without fuel.
Primary: Wood stove or rocket stove with your own wood supply. The key tension for rural households is heat vs. cooking demand on the same fuel source — every cord you burn for cooking is a cord you're not burning for warmth. Separate your cooking fuel supply (small-diameter sticks; rocket stove or cook-top wood stove) from your heating fuel (larger splits; primary heating stove). This distinction prevents the common mistake of burning through heating firewood in the first two weeks on cooking.
Secondary: Propane camp stove as a speed cooking option for water treatment and quick meals. Even with ample wood, propane is useful for tasks where you need controlled heat fast.
Tertiary: Solar oven for fuel-free batch cooking during clear weather.
The Haybox Method: 40–50% Fuel Reduction
Haybox (retained-heat) cooking is the most fuel-efficient technique available regardless of your primary cooking method. It works with any slow-cook food — rice, beans, lentils, stews, oatmeal — and requires only an insulated container and a tight-fitting lid.
The procedure:
- Bring food to a full, active boil for 2 minutes.
- Move the sealed pot into your insulated container immediately. A sleeping bag, heavy blankets, or a foam-lined box all work. The goal is to surround the pot with dead air that retains heat.
- Leave undisturbed for the retained-heat cooking period:
- White rice: 45–60 minutes
- Rolled oats: 30–45 minutes
- Dried lentils (pre-soaked): 60–90 minutes
- Dried beans (pre-soaked): 4–6 hours
- Stews: 2–4 hours
The food continues cooking from its own stored heat. No additional fuel is consumed. Over a week of cooking two hot meals per day, haybox cooking reduces fuel consumption by 40–50% compared to cooking everything at full boil.
Pre-soaking legumes multiplies this effect. Soaking dried beans and lentils for 8–12 hours before cooking cuts boil time from 90 minutes to 25–30 minutes before transfer to the haybox. That combination — pre-soak plus haybox — takes beans from a 90-minute fuel commitment to under 5 minutes of active cooking time, then a 4-hour passive hold in the insulated box.
Field note
Batch cooking doubles the efficiency of any cooking session. A pot of rice that feeds tonight and tomorrow morning uses one fuel load instead of two. A pot of beans made double-size today doesn't cost twice the fuel — it costs 30% more fuel for twice the food. Build batch cooking into your routine from Day 4 forward; it's the single easiest fuel conservation habit to maintain and the one with the most direct supply-extending effect.
Cooking Safety — The Non-Negotiable
Every cooking method in this chapter involves combustion. CO poisoning from cooking indoors without ventilation kills more people in grid-down scenarios than most other causes. The rule is absolute: any fuel-burning stove, propane setup, charcoal, or wood fire in an enclosed space requires either outdoor use or mechanical ventilation.
"Cracking a window" is not adequate ventilation for a propane stove or charcoal setup indoors. CO builds faster than it disperses through a cracked window in most residential settings.
The CO detector is required. Battery-powered. Positioned within 10 feet (3 m) of any indoor cooking area where combustion ever occurs, even temporarily. If you don't have one already, this is a purchase to make today.
Keep a 2.5 lb (1.1 kg) ABC dry-chemical fire extinguisher within reach of every cooking station. Unfamiliar cooking methods — especially rocket stoves and open fire for people who haven't used them — produce more fire incidents than familiar ones. Establish a 3-foot (0.9 m) no-child zone around any hot cooking surface and mark it physically.
The Fuel Math You Need to Know
Work through this calculation before you believe your fuel supply is adequate.
For a propane camp stove: - A 20 lb (9 kg) propane cylinder provides approximately 20–25 hours of cooking time on a two-burner stove at medium heat. - Two hot meals per day for a family of four: approximately 1.5–2 hours of active stove time per day (including water boiling, if you're boiling water for purification separately). - At 2 hours per day: one 20 lb (9 kg) cylinder lasts roughly 10–12 days. - For 30 days: you need approximately three 20 lb (9 kg) cylinders as cooking fuel (not counting heating).
For wood fuel via rocket stove: - Dry hardwood delivers approximately 8,000 BTU per pound (18,600 kJ/kg) at 85–90% efficiency in a rocket stove. - Cooking two meals per day for a family of four: roughly 1–2 lbs (0.45–0.9 kg) of dry small-diameter wood per meal, or 2–4 lbs (0.9–1.8 kg) per day. - Over 30 days: 60–120 lbs (27–54 kg) of small-diameter dry wood for cooking alone, not heating.
Remember that water treatment by boiling adds approximately 24 oz (680 g) of wood per day just for the family's drinking water if you're using wood as your treatment fuel. At 30 days, that's another 45 lbs (20 kg) on top of cooking fuel. The case for switching to chemical treatment for water and reserving wood for cooking and heat becomes very clear when you run these numbers.
Rationing Protocol
You don't start rationing on Day 1. Rationing before it's necessary creates psychological stress, reduces performance, and doesn't actually save meaningful quantities. The trigger is supply depth, not anxiety.
Monitor: Track consumption against inventory at least weekly. A rough daily tally — how many meals came from stored food, approximately what quantities — gives you a running picture of supply depth.
Tighten when: Your stored supply falls below a 3-week reserve at current consumption rate.
How to tighten: Reduce meal size, not meal frequency. Three smaller meals of high-nutritional-value food is better for physical and psychological function than two regular meals. Cutting meal frequency creates hunger stress that impairs decision-making; reducing portion size is more tolerable and sustainable. Add filling, high-fiber foods (oatmeal, beans, lentils) to extend satiety from smaller portions.
Chapter 5 checklist
- Complete perishable inventory: all items categorized by time-to-spoilage, consumption sequence set
- Calculate household daily caloric need and verify stored supply depth (days at current consumption)
- Confirm fat sources in pantry cover 25–35% of daily calories
- Cooking system tested: primary method confirmed operational, fuel quantity calculated for 30 days
- Run fuel math: propane or wood supply in days at household cooking volume
- Practice haybox cooking once — confirm insulation holds temperature for minimum 45 minutes
- Supplement supply confirmed: multivitamin, Vitamin C, Vitamin D on hand for each household member
Chapter 6: Energy Management — What You Have and What You Need
Water and food systems are running. Energy determines how long they can continue and what quality of life looks like across 30 days. More specifically: energy determines whether your medical devices keep functioning, whether you can communicate reliably, whether your food storage stays cold, and whether you have light, information, and the means to recharge anything that requires recharging. Most households vastly underestimate their energy requirements and overestimate how long their fuel will last.
This chapter builds your energy budget: a clear accounting of what you have, what actually needs power, and how to make your supply last. The principle that governs all of it comes first.

Demand Reduction Before Generation
The cheapest kilowatt-hour is the one you never use. Every preparedness discussion about energy eventually centers on generation — solar panels, generators, battery banks — but the most cost-effective first step is always reducing what you need to generate.
Before sizing any generation system, conduct a phantom load sweep. Every appliance or device plugged in and drawing standby power contributes to your daily load whether you use it or not. A typical home has 20–40 devices drawing standby power simultaneously: televisions, cable boxes, phone chargers, gaming consoles, smart speakers, and appliances with displays all draw 1–15 watts continuously. The average home loses 5–10% of its total electricity consumption to phantom loads.
During a grid-down event, phantom loads matter even more because they drain battery systems and shorten generator runtimes for zero benefit. Walk through your space and unplug every non-essential device. Kill every circuit that doesn't serve a critical load. The label-every-breaker practice from Chapter 3 pays off here — you can kill non-essential circuits at the panel with confidence that you know what each one actually powers.
LED lighting reduces lighting load by 75–85% compared to incandescent equivalents. Four LED fixtures running 6 hours per day consume 40 watts total — roughly 240 watt-hours per day. The equivalent incandescent lighting setup would consume 1,600 Wh per day. That difference alone can determine whether your battery bank lasts 48 hours or 8 hours.
The Critical Load Audit
Work through this audit before you plan any generation. Write it down.
Step 1 — List every device that needs to stay operational during the 30-day scenario. For each, record the wattage and expected daily operating hours:
| Device | Watts | Hours/day | Wh/day |
|---|---|---|---|
| CPAP machine | 30–60 W | 8 h | 240–480 Wh |
| LED lighting (4 fixtures) | 40 W | 6 h | 240 Wh |
| Phone charging (household) | 30 W | 3 h | 90 Wh |
| Weather/AM-FM radio | 5–10 W | 4 h | 20–40 Wh |
| Refrigerator (Energy Star) | 60 W avg | 24 h | 1,440 Wh |
| Well pump (1/2 HP) | 1,000 W | 0.5 h | 500 Wh |
Step 2 — Tier by necessity: - Non-negotiable: Medical devices. Any device that someone in the household depends on for health or life — CPAP, nebulizer, refrigerated insulin, oxygen concentrator, powered wheelchair — sits at the top of the priority list. If your household has a medical device dependency, the energy plan is built around that load first, and everything else accommodates it. - Important: Communications and lighting. Phone charging, radio reception, and enough light to operate safely at night are daily necessities, not luxuries. - Deferrable: Food preservation and power tools. Keeping a refrigerator or freezer running is important but not the highest priority. If you've eaten through perishables in the first 72 hours (Chapter 5), the refrigerator load drops significantly or disappears. - Suspend entirely: Electric water heater, electric range, clothes dryer, central air conditioning, and all entertainment electronics not serving a communications function.
Step 3 — Calculate your actual daily critical load. The difference between including food cold storage and excluding it is often the difference between needing a 500 Wh battery system and needing a 3,000 Wh battery system. That's not a marginal decision.
Setting-Specific Energy Scenarios
The urban energy situation has a fundamental constraint: generators are not an option. CO exhaust in a building, noise at any reasonable hour, and fuel storage restrictions in apartment buildings all eliminate portable generators. The urban energy plan is built on conservation and stored energy.
A portable power station in the 500–1,000 Wh range handles the realistic critical load for an urban household without medical devices: phone and communication charging (90 Wh/day), LED lighting (240 Wh/day), and a battery-powered radio (20–40 Wh/day). At 350–370 Wh per day for those combined loads, a 500 Wh station provides roughly 36 hours of operation before needing recharge. Add a folding 100W solar panel and that station recharges fully in one good weather day — a 100W panel in 4 peak sun hours produces 400 Wh, enough to top off the station and cover the day's load.
If the household has a CPAP dependency, the math changes: a CPAP running 8 hours per night at 40 W draws 320 Wh. Add lighting and communications, and the daily load is 650–700 Wh. That requires a 1,000 Wh station minimum, or a 500 Wh station recharged daily by solar. A CPAP also produces half its power draw with the humidifier disabled — a common field adjustment that halves the energy requirement.
The most important urban energy investment before any generator or solar: a quality LED headlamp per person, extra alkaline batteries, and a battery-powered weather radio. These three items cover 90% of the actual daily need for most urban households at minimal cost.
The suburban energy situation has more options, more surface area for solar, and typically the ability to operate a generator safely at a distance from the building.
Generator strategy: A 3,500–5,000W inverter generator can power the critical loads of a typical suburban household — refrigerator, well pump (in cycles), CPAP, communications, and lighting — for an 8-hour daily operating window. The fuel math is not generous: at half load, a 3,500W generator consumes approximately 0.5 gallons (1.9 L) of stabilized gasoline per hour. At 8 hours per day, that's 4 gallons (15 L) per day. Over 30 days: 120 gallons (454 L). Most households cannot safely store that volume, which means a generator-only strategy for 30 days requires a reliable resupply plan or a compressed operating schedule.
Load management extends fuel dramatically. Rather than running the generator continuously, run it in 2–3-hour cycles at high load: charge a battery bank to full, cycle the well pump, run the refrigerator to temperature, charge all communications devices. Then shut the generator down and let the battery bank handle ongoing loads (lighting, communications) during the off-cycle. At 4 hours of generator operation per day instead of 8, fuel consumption drops to 60 gallons (227 L) over 30 days — within reasonable storage capacity for a suburban garage.
For a complete load management and generator pairing strategy, see Generators.
The rural energy situation combines the most options with the most thermal energy demand. Wood heat is typically the primary thermal system; electrical load is concentrated on well pump, communications, refrigeration, and medical devices if applicable.
Wood heat is your largest energy system. A properly installed EPA-certified wood stove heats 1,000–2,000 sq ft (93–186 m²) at 70–83% efficiency. For a 1,500 sq ft (139 m²) home in a moderate climate, plan for 2–3 full cords of seasoned hardwood per heating season. The firewood quantity math matters: a face cord (one-third of a full cord) is not a full cord, and many firewood sellers use the two terms interchangeably. A full cord is 4 ft × 4 ft × 8 ft (1.2 m × 1.2 m × 2.4 m), totaling 128 cubic feet (3.6 m³) stacked.
Generator for electrical loads: The same load management principles apply. Run the generator to charge batteries and cycle the well pump, then suspend operation while the battery bank handles smaller loads. The fuel savings from cycling versus continuous operation are significant.
Small solar for critical loads: A 200–400W solar array with a 2–4 kWh LiFePO4 battery bank covers communications, lighting, and CPAP independently of the generator — freeing generator runtime for higher-load tasks like the well pump and occasional power tool use. The solar system doesn't disappear when you run out of gasoline. For the full system design approach, see Solar Basics and Batteries.
Generator Fuel Math — Running the Numbers
The most common energy planning mistake is calculating runtime from generator wattage instead of fuel consumption. Wattage tells you what a generator can power. Fuel consumption tells you how long it can run.
A conventional 3,500W generator at half load (1,750W) burns approximately 0.4–0.5 gallons (1.5–1.9 L) of gasoline per hour. An inverter generator of the same rated output burns 20–40% less at partial load due to automatic engine throttling — and produces clean power (total harmonic distortion below 3%) that is safe for sensitive electronics, CPAP machines, and battery chargers. Conventional generators produce 15–25% THD, which can damage microprocessors and variable-speed motors. Use these figures:
- 3,500W conventional generator, half load: 0.5 gal (1.9 L)/hour
- 3,500W inverter generator, half load: 0.3–0.4 gal (1.1–1.5 L)/hour
- 8 hours/day operation: 2.4–4 gallons (9–15 L)/day depending on type
- 30 days at 8 hours/day: 72–120 gallons (273–454 L) of treated gasoline
Gasoline treated with a stabilizer like Sta-Bil stores safely for up to 2 years versus 3–6 months untreated. If you're planning generator operation beyond the immediate emergency window, treat all stored fuel on purchase.
The propane alternative: Propane stores indefinitely in sealed cylinders. A propane-capable generator reduces the fuel rotation burden to near zero — you fill the cylinder once and it's ready when needed. Propane conversion kits are available for most portable generators at an affordable price. The tradeoff is a 5–10% reduction in peak power output compared to gasoline on the same engine.
Connecting a generator to your home wiring safely requires a transfer switch or interlock device. Never use a "male-to-male" backfeed cord — plugging a generator into a wall outlet backfeeds power onto the grid, creating electrocution risk for utility workers and has killed people. The three compliant options: an interlock kit (a mechanical plate on your existing panel; affordable to moderate investment, the lowest-cost option) blocks the main breaker and generator input from energizing simultaneously; a manual transfer switch (a separate subpanel; affordable to moderate investment, requires a licensed electrician) covers pre-selected circuits; an automatic transfer switch (moderate to significant investment) is required for standby generators and handles transfer without human intervention. For the full installation decision and wiring specifics, see Generators.
Solar and Battery Math
If you have any solar capacity — even a single 100W panel — understand what it can and cannot realistically produce.
A 100W panel rated under STC conditions (1,000 W/m² irradiance, 77°F / 25°C, perfect conditions) produces 100W only under those lab conditions. Real-world output accounts for temperature losses (10–15%), soiling (2–5%), wiring losses (2–3%), and controller losses (3–5%). A realistic derating factor is 0.75–0.85. A 100W panel under real conditions produces 75–85W at peak.
Apply peak sun hours for your region to get daily output. In the Mid-Atlantic or Midwest, average daily peak sun hours are 4.0–4.5 — but in December, that number may drop to 2.0–2.5. A 100W panel in 4 peak sun hours produces: - 400 Wh per day at the average - 200 Wh per day in a winter-minimum scenario
That 400 Wh daily budget is enough for: phone charging (90 Wh), LED lighting (240 Wh), and radio (30–40 Wh) — but not a refrigerator (1,440 Wh/day for a standard model). A single 100W panel cannot run a refrigerator. You need approximately four 100W panels to cover a refrigerator's daily load at a favorable sun location, and more in winter conditions.
Battery sizing for the modest scenario (no refrigerator, medical device present):
Starting from the load audit: CPAP at 320 Wh/night, lighting at 240 Wh/day, communications at 90 Wh/day = 650 Wh per day. For 48-hour autonomy (a 2-cloudy-day safety buffer):
- 650 Wh × 2 days = 1,300 Wh raw capacity
- Divide by 0.90 (LiFePO4 usable DoD): 1,444 Wh
- Add 15% inverter/aging buffer: 1,660 Wh capacity required
A pair of 24V 50Ah LiFePO4 batteries in series (48V 50Ah = 2,400 Wh) covers this load comfortably, with 30% reserve. At current chemistry costs, this is a moderate investment that provides 3,000–6,000 cycles — 8–16 years of daily service.
For the complete sizing method including cable gauge selection, see Batteries.
Wood Heat: Firewood Quantity and Quality
For any household relying on wood heat for primary warmth — and this is most rural households and many suburban ones with a wood stove — the firewood system is your largest single energy asset.
The key variables are species BTU output, moisture content, and quantity.
BTU by species (per full cord, air-dried to approximately 20% moisture): - Osage orange / hedge apple: 29–32 million BTU — highest output, but sparks heavily; best in enclosed stoves only - White oak / red oak: 24–29 million BTU — the benchmark heating hardwood - Hickory: 24–27 million BTU — dense, long-lasting coals - Ash: 23–25 million BTU — excellent heating fuel and the most forgiving species to work with; splits easily even when green, seasons in 6–12 months
White pine at 14–17 million BTU per cord delivers roughly half the heat of quality hardwood. It lights easily and burns fast — useful for fire-starting, not for sustained heating.
Moisture content is more important than species. Green wood (freshly cut, 50–60% moisture content) burns at 30–50% reduced efficiency compared to seasoned wood at 20% moisture. It smolders, produces dramatically more smoke, and deposits creosote in the flue at a much higher rate. The two-season rule: have this year's wood dry and stacked, and next year's wood actively seasoning. At minimum, any wood you're burning now should have been split and stacked for at least 6 months; 12–18 months for dense hardwoods.
Annual quantity targets:
| Climate | Home size | Cords per season |
|---|---|---|
| Cold (Minnesota, Maine, Montana) | 1,500 sq ft (139 m²) | 4–6 cords |
| Moderate-cold (Ohio, Colorado, Oregon inland) | 1,500 sq ft (139 m²) | 2.5–4 cords |
| Mild (Mid-Atlantic, Pacific NW coast) | 1,500 sq ft (139 m²) | 1.5–2.5 cords |
Add a 25% buffer to any estimate. Running short of firewood in February is not recoverable; surplus wood carries into next season at zero cost.
For detailed species comparison, splitting technique, and covered storage geometry, see Firewood and Wood Heat.
Creosote: The Fire Inside the Chimney
If you are running a wood stove through this scenario, creosote is the hazard that most people only think about after it's already dangerous.
Creosote forms when flue gases cool before exiting the chimney, condensing combustion byproducts on cooler flue surfaces. It progresses in three stages: Stage I is dusty soot that brushes out; Stage II is crunchy tar flakes that require heavy equipment to remove; Stage III is glazed tar coating that will not brush off and ignites at relatively low temperatures, sustaining chimney fires that reach 2,000°F (1,093°C) — hot enough to crack flue tiles and ignite adjacent framing.
The primary cause of Stage II and III creosote is burning green wood or damping down the stove with fresh wood for long overnight burns. The prevention is straightforward:
- Burn only seasoned wood at below 20% moisture content
- Warm the flue with a small kindling fire for 10–15 minutes before loading a full charge
- Operate the stove at or above manufacturer minimum temperature during startup — don't smolder through the warm-up period
- Do not close air controls on fresh wood loads to achieve an overnight burn; use dense, seasoned hardwood only for extended burns
Annual chimney inspection by a CSIA-certified sweep before every heating season is the baseline. In a sustained scenario, inspect every 2 cords burned if possible.
For the full startup and shutdown procedure, and the complete creosote prevention protocol, see Wood Heat.
CO Safety: One More Time
Every energy source in this chapter — generators, wood stoves, propane for cooking, kerosene lanterns — produces carbon monoxide during combustion. CO is odorless, colorless, and accumulates silently until the concentration is lethal. The statistics are not abstract: the CDC attributes more than 400 non-fire CO deaths per year to portable generators alone. During extended outages, that number rises.
The requirements are not optional:
- Generator: 20 feet (6 m) minimum from all doors, windows, and vents; exhaust oriented away from the building
- Wood stove: Verify damper opens fully; no draft obstruction in flue before lighting
- Propane cooking: Outdoors or fully ventilated space; never in a closed garage or tent
- CO detectors: Battery-powered, on every level, within 10 feet (3 m) of each sleeping area, tested before the scenario begins
If a CO detector alarms, treat it as real. Exit immediately, account for all household members, and do not re-enter until the source is identified and the space has been ventilated. Headache and dizziness while cooking or near a generator are CO poisoning symptoms — do not wait for the detector to confirm it.
Chapter 6 checklist
- Critical load audit completed: every device listed, wattage and daily hours documented
- Medical device power backup confirmed — this is the non-negotiable first line
- Phantom loads eliminated: all non-critical devices unplugged, non-essential circuits off at the panel
- Generator fuel requirement calculated for 30 days at planned runtime; fuel in storage treated with stabilizer
- Solar and battery assessed if applicable: daily production vs. critical load verified
- Firewood quantity and quality assessed: is it seasoned (below 20% moisture)? How many cords?
- Wood stove startup procedure confirmed: damper open, flue warm before loading
- CO detectors confirmed operational on every level of the occupied space
Chapter 7: Security Posture — the First Two Weeks
Water, food, and energy systems are stabilizing. You've established the supply chains that keep the household running. Now you address what can undo all of that in a single night: the security posture that protects your systems, and the information discipline that keeps you from advertising what you've built.
This chapter is not about militarizing your home. It is about understanding the predictable pattern of how social dynamics shift during extended disruptions, and positioning yourself correctly before each stage arrives.
The Security Arc
The security arc in extended emergencies follows a documented pattern that disaster researchers have observed across events from Hurricane Katrina to multi-day ice storms to longer grid failures.
Days 1-3 — Heroic solidarity. People are helpful, cooperative, and generous. Neighbors check on each other. Strangers share resources. The social contract holds and often strengthens. Security is not a pressing concern.
Days 4-10 — Information spreads. Rumors circulate about how long the event will last, what resources are available, and who has what. Some people's initial supplies are running low. The cooperative atmosphere begins to fray at the edges. This is when information discipline first matters: households that have been openly broadcasting their supply depth become known quantities.
Days 11-20 — Resource competition increases. Households without adequate preparation have exhausted their buffers and are actively searching for solutions. The social calculus shifts. Requests become more urgent. Opportunistic behavior, while still rare, is no longer nonexistent.
Days 21-30 — First incidents in most documented scenarios. Property crimes increase. Social pressure on visibly prepared households intensifies. This does not mean your neighborhood becomes dangerous — most don't. It means you should already have your posture established well before this window.
The implication is clear: your security posture should be set by Day 4, not Day 14. And it should be set quietly.

The Cooper Color Code as an Operational Framework
The Cooper Color Code, developed by Colonel Jeff Cooper, gives you a simple mental model for calibrating your awareness state. In a household context, it defines your operating posture — not just personal alertness, but the collective stance you and your household maintain.
Condition White — unaware and unprepared. Appropriate inside your secured home when you control the environment and trust everyone in it. Not appropriate when interacting with people outside your household after Day 3.
Condition Yellow — relaxed, general alertness. Your default baseline in any interaction outside the household. Sustainable indefinitely without fatigue. You are not scanning for threats; you are simply observant enough to catch changes in your environment.
Condition Orange — specific alertness. Something has broken the pattern and requires focused attention. A neighbor asking unusually probing questions about your supplies. An unfamiliar vehicle moving slowly through the neighborhood. You begin developing contingencies — not acting, but thinking ahead.
Condition Red — action. A pre-decided response is executed. The key insight: decisions made under calm Orange conditions execute faster and more accurately than decisions improvised under adrenaline. You cannot think fast in the moment if you haven't thought at all beforehand.
Move to Yellow as your household's default external posture starting on Day 1. That single shift costs nothing and provides most of the protection you need in the early phase. For complete grounding in situational awareness mechanics, including pre-attack indicators and baseline calibration, see the Situational Awareness page.
OPSEC Discipline: Days 1-5
The most common security mistake in the first five days is not a physical failure — it is an information failure. People who are stressed and want connection naturally share their situation with whoever is nearby. This is human and understandable. It is also expensive.
Specific behaviors to stop:
Social media posting. "Grid down at our house — we're fine, have two weeks of food and water and the generator is running" is not reassurance for your friends. It is a public broadcast of your supply depth to everyone who can see that post, including people you haven't thought about in years. If phones are working, they're working for everyone. Post nothing about your actual situation or resources.
Candid conversations with casual neighbors. "We've been preparing for this for a while, we should be okay for a month" closes a conversation with one neighbor and opens a file in a hundred mental databases. You don't know who that neighbor talks to, how desperate their situation is at Day 10, or what they remember when their family is hungry.
Visible signals of abundance. A generator running 12 hours a day signals electrical capacity. A chest freezer on the back porch signals cold-storage capability. Large supply deliveries left visible on a porch signal that a resupply occurred. These are OPSEC failures that no amount of verbal discretion fixes. The fix is physical: bring deliveries inside immediately, keep generator operation quiet by reducing run hours, store equipment where it isn't visible from the street or neighboring properties.
The grey man principle applies here: look like you're in the same situation as everyone around you. Not deceptive — just not distinctive. When a neighbor asks how you're holding up, the answer that closes the conversation is: "It's tough, we've got some camping gear and a few days of groceries, we're managing." That answer is consistent with what most households have, raises no interest, and invites no follow-up. It is also entirely consistent with maintaining your family's safety.
For the complete five-step OPSEC framework and digital footprint management, see OPSEC for Prepared Households.
Perimeter Hardening: The High-Return Quick Wins
Perimeter security operates on three layers, each buying time for the next: detection, delay, and response.
You don't need to build a fortress. You need to be harder, louder, and more visible than the house next door. Opportunistic crime follows the path of least resistance — research on convicted burglars consistently shows target selection based on visible vulnerability, not based on what's actually inside.
These improvements take one to two hours and are inexpensive to moderate in cost:
3-inch screws in strike plates — the single highest-return 15-minute security upgrade. Standard door strike plates are installed with 3/4-inch (19 mm) screws that penetrate only the door frame, not the framing stud behind it. A single kick can separate this. Replace with 3-inch (76 mm) screws that anchor into the structural stud. This is inexpensive, takes a screwdriver, and turns a kick-in-once-door into a kick-in-several-times door. That additional time and noise may be the entire deterrent needed.
Motion-activated lighting on all four sides — darkness is an intruder's operating environment. Eliminating it is the highest-return investment per dollar in perimeter security. Look for fixtures in the 1,500 to 2,500 lumen range. Mount at 8 to 10 feet (2.4 to 3 m) height for maximum coverage. Cover all four sides — the common mistake is lighting the front well and leaving the back and sides in shadow. Walk your property at night, from outside, to check for dark approach lanes. Every gap you find is one to close. Solar-powered backup lights on primary approach routes maintain coverage during grid-down conditions.
Door bar or secondary deadbolt on the primary entry — a door reinforced with a properly installed bar or police bar cannot be kicked in. This is a complement to your strike plate upgrade, not a replacement.
Entry point awareness log — a simple list on paper of every door and window in your shelter, its current lock status, and any vulnerability noted in your initial security walk. Keep this updated. A door you know is weak is manageable. A door you forgot about is an ambush.
Security in an apartment is primarily behavioral and relational, not hardware-based. Your advantages are real: you are one unit among dozens or hundreds, which means you are not obviously targeted. Your vulnerabilities are also real: limited exit options in a building that may become chaotic, and hallways and common areas you cannot control.
Key posture adjustments for the apartment context:
- Know your floor neighbors by name and current situation. In an extended event, the people 20 feet from your door are your perimeter. If you don't know them at all, introductions at Day 3 are still better than introductions at Day 15 when everyone is stressed.
- A door bar or security bar under the apartment door handle is inexpensive and adds substantial resistance to forced entry without requiring any installation.
- Identify the stairwell exits and their current state. Elevators should be assumed non-functional in any grid-down scenario.
- Establish a physical rally point: a specific floor or building entrance where your mutual aid contacts know to find you if communications are down.
- Building management and other residents observing your comings and goings are not your adversaries, but they are part of the information environment. Discretion applies.
The suburban context gives you more options and more surface area to manage. A standard suburban house has 3-5 entry doors, 10-20 windows, a driveway approach, and side yards that may provide concealed approaches.
Priority actions for the first two weeks:
- Complete the entry reinforcement sequence: strike plate screws on every exterior door, then secondary lock or bar on the primary entry.
- Install motion lighting on all four exposures, confirming coverage overlaps at the corners.
- Establish noise discipline: the neighborhood dynamic shifts around Day 7 as people begin to understand the duration. Running a generator at full volume is a daily announcement of electrical capacity. Consider reduced-hour operation during off-peak windows.
- Develop a simple watch schedule for your household: who is aware of the exterior and when. This doesn't require standing watches — it means someone glances out a window every 30-60 minutes during daylight, and exterior lighting covers overnight.
Rural properties face a different challenge: perimeter is much larger, law enforcement response times are much longer (measured in hours, not minutes), and the low population density means fewer witnesses in either direction.
The rural security posture is a layered observation system rather than a hardware fence:
- Driveway alarms are the outermost layer. Passive infrared (PIR) sensors with wireless receivers covering the driveway entrance and a mid-point 200 feet (61 m) in give you approximate travel time for any approach. Better-quality residential units have detection ranges of 35 to 100 feet (10.7 to 30.5 m) with wireless receiver range up to 1,320 feet (402 m).
- Dogs are effective noise generators and early warning systems for any approach that doesn't use the driveway.
- Natural barriers (thorny plantings at fence lines and natural approach routes) slow movement and make noise at night.
- The watch schedule matters more here than in suburban settings. Someone should be aware of the exterior at all times during hours of concern, or at minimum have a reliable early-warning layer doing that work.
- Know your neighbors' situations even if they're a mile away. A single trusted contact with their own communications gear and situational awareness is a significant force multiplier.
Household Watch Protocol
A watch protocol doesn't mean military sentries. It means establishing who is responsible for exterior awareness, at what times, and what the escalation path looks like when something changes.
Write this down before Day 4. A verbal understanding evaporates under fatigue. A written schedule assigns clear ownership.
Minimum elements: - Who monitors exterior awareness during daylight (can be integrated with other tasks — someone who's already near a window periodically) - What conditions prompt an Orange response (unfamiliar approach, unusual noise, aggressive behavior from anyone) - What the verbal signal is within the household when Orange is reached - Where everyone goes and what they do when the signal is called - Who is the designated contact point for any interactions with people outside the household
Situational information gathering is the positive complement to the defensive posture. Monitoring battery-powered AM/FM radio for news, National Oceanic and Atmospheric Administration (NOAA) weather radio for conditions, and periodic check-ins with trusted neighbors constitutes your intelligence operation. You cannot calibrate your threat environment without information. Gather it.
For the complete three-layer perimeter hardening framework including fencing, natural barriers, gates, and lighting specifications, see the Perimeter Security page.

Field note
The most common security mistake in extended disruptions is not a hardware failure — it is the household that has been openly generous with information for 10 days and then suddenly becomes guarded. That pattern is noticed. Establish quiet, consistent OPSEC from Day 1 so there is never a visible shift that signals something has changed.
Chapter 7 checklist
- Install 3-inch (76 mm) screws in all exterior door strike plates — 15 minutes per door
- Confirm motion-activated lighting covers all four exposures; identify and close any dark approach lanes
- Establish OPSEC discipline: brief every household member on the grey man standard and the no-share list
- Review social media accounts for any posts disclosing supply levels, equipment, or generator operation
- Write the household watch protocol on paper: who, when, signal, and escalation path
- Set up situational monitoring: battery-powered AM/FM and NOAA receiver on a daily check schedule
- Know your nearest neighbors' situations — conduct at least two check-ins by Day 7
- Define your escalation threshold in writing: at what trigger point does your posture change?
Chapter 8: Medical Readiness and Hygiene Operations
Physical security is addressed. Now you turn to something that ends grid-down scenarios faster than any supply failure: the operational health of the household. In documented disaster events, more people require medical care from poor sanitation and dehydration than from the event itself. A gastroenteritis outbreak in a four-person household can dehydrate multiple members within 48 hours, consume your entire medical inventory, and reduce your labor capacity to zero — all from a single hygiene failure that costs nothing to prevent.
This chapter covers the hygiene hierarchy that prevents most illness, the five medical scenarios most likely to occur in your first 30 days, and the sanitation infrastructure that keeps waste from contaminating water, food, and surfaces.
The Hygiene Hierarchy
Not all hygiene actions are equally valuable. Priority them in this order, and implement them at this tier of reliability before moving to the next:
Tier 1: Safe water handling. All water consumed or used for wound care must be treated. No exceptions, no shortcuts under pressure. A single compromised water intake can start a chain of gastrointestinal illness that spreads household-wide. This is your absolute non-negotiable.
Tier 2: Hand hygiene at the six critical moments. Hands carry pathogens between surfaces and into bodies. Clean them at: 1. After toilet use 2. Before food preparation 3. Before eating 4. Before any wound care 5. After handling waste, diapers, animals, or vomit 6. After caring for a sick person
Soap and water remain the default. Alcohol-based sanitizer is a useful supplement for moments when water is unavailable, but it is not effective on visibly dirty hands — it requires clean hands to be meaningful. Stage a dedicated handwashing station near your toilet with a gravity-feed container that has a spigot (a 5-gallon / 19-liter container with a spigot valve is inexpensive), liquid soap, and a drying method. Bar soap in communal settings becomes a contamination vector — use liquid.
Tier 3: Human waste control. See the sanitation section below. The principle is: waste goes in a defined location, away from food prep and sleeping areas, with cover material applied after every use.
Tier 4: Food surface cleanliness. Two cutting surfaces, one for protein and one for produce. A simple chlorine rinse solution — 1 tablespoon (15 ml) of unscented household bleach per gallon (3.8 liters) of water — sanitizes food prep surfaces effectively. Apply, let stand 30 seconds, air dry.
Tier 5: Laundry rotation. This sounds secondary until Day 10. Clean feet and dry socks prevent an outsized amount of foot problems, rashes, and skin breakdown. Changed underwear prevents urinary infections, particularly in women under physical labor stress. In heat, skin breakdown from constantly damp clothing creates wound infection pathways. Prioritize socks, underwear, and infant or sick-person laundry above other items.
Tier 6: Sick room separation. When illness appears, designate a specific sleeping and waste area for the sick person, limit shared cups and towels, increase ventilation, and increase handwashing frequency for all household members. Assign one designated caregiver if possible. Track symptom onset, temperature if available, fluid intake, and urination frequency in writing — this record helps you catch deteriorating trends before they become emergencies.
For full coverage of sanitation under limited utilities, handwashing station setup, and cleaning priorities, see the Hygiene and Sanitation page.

Sanitation Infrastructure
Toilet function is the first question to answer after the grid fails, and most households never think about it until the water stops flowing.
Assessment first: Most municipal plumbing relies on gravity for the drain side — the toilet can often still flush using stored water, just not from the tank. Pour 2 to 3 gallons (7.5 to 11 liters) directly into the bowl quickly to trigger a flush. This works as long as your sewage line is intact and the municipal sewer system is functioning. If the grid failure has also disrupted the sewer system — common in flooding or infrastructure collapse scenarios — do not flush, as sewage may back up.
Most urban apartments can flush by gravity as long as building water pressure or stored water is available. Your immediate backup if both fail is the sawdust bucket toilet: a 5-gallon (19-liter) food-grade bucket with a toilet seat riser (inexpensive), cover material after every use (sawdust, wood shavings, or peat moss — approximately 1 cup / 240 ml per use), and a tight-fitting lid. This system requires no construction, can be operational in 15 minutes, and eliminates odor effectively if cover material is applied every single time.
Startup cost is inexpensive to moderate. The critical supply is the cover material — stock at least 2 gallons (7.5 liters) per person per week. A bag of cedar chips or pine sawdust from a hardware store or local sawmill keeps for years and provides good odor control.
Waste from the bucket must go to a designated compost pile or be bagged for later disposal — not poured into floor drains or building plumbing under grid-down conditions.
A suburban property with yard space can deploy a sawdust bucket system immediately and transition to a longer-term composting toilet if the disruption extends. If property size and regulations allow, an outhouse becomes the best longer-term sanitation solution.
Site any outhouse or composting pit at least 100 feet (30 m) from any water source, including wells, rain collection surfaces, and any surface water. This is the EPA/CDC minimum separation standard. In sandy soils or high water table conditions, increase this distance significantly.
For full composting toilet construction specifications including C:N ratios, temperature requirements, and chamber rotation, and for detailed outhouse siting rules, see the Sanitation Systems page.
Rural properties likely have the most complete sanitation options: existing outhouse infrastructure, space for composting systems, and no city sewage dependency. However, the well pump electrical dependency may affect both water supply and sanitation — see Chapter 4 on the water system chain.
Outhouse siting requires 100 feet (30 m) minimum from all water sources including wells. Apply hydrated lime (calcium hydroxide, not quicklime) to the pit at approximately 1 pound (0.45 kg) per month for a family of four — this raises pit pH above 12, killing pathogens and controlling odor.
Greywater from kitchen and washing operations can be hand-distributed over landscaping at least 50 feet (15 m) from any water source using plant-safe soap. This extends effective water use and keeps greywater away from food production areas.
The Five Medical Scenarios
These five scenarios account for the substantial majority of medical problems in the first 30 days of grid-down operation. They are predictable, recognizable, and manageable if caught early. The pattern that kills is late recognition followed by delayed intervention.
Scenario 1: Dehydration
The most common medical problem in any disruption involving heat, physical labor, or gastrointestinal illness. People systematically underestimate their fluid loss from physical work.
Recognize it early: thirst, dry mouth, dark yellow urine, fatigue, and headache are the early warning signs. If you're waiting for confusion or rapid pulse, you're already in moderate-to-severe territory.
The intervention is oral rehydration — not just water, because heavy sweating and diarrhea deplete electrolytes that water alone cannot replace.
Oral Rehydration Solution (WHO standard)
Mix per 1 liter (1 quart) of treated water: - 6 level teaspoons (25 g) sugar - ½ level teaspoon (2.5 g) salt
Give frequent small amounts rather than large boluses. Continue until urine output normalizes and urine color returns to pale yellow. Plain water alone is insufficient after heavy sweat loss or gastrointestinal illness.
High-risk household members: children, elderly adults, anyone with a fever, anyone doing physical labor in heat above 85°F (29°C). Monitor these individuals actively.
Escalation indicators: persistent vomiting that prevents fluid intake, altered mental status, collapse, or minimal urine output over four or more hours.
For the complete dehydration recognition and treatment protocol, see the Dehydration page.
Scenario 2: Gastrointestinal Illness
Waterborne or food hygiene failure is the source of most GI illness in grid-down settings. One person sick with gastrointestinal illness who then handles food or water without proper hygiene can infect the entire household within 24 to 48 hours.
The management is straightforward: isolation of the sick person, oral rehydration solution to replace fluid and electrolyte losses, and strict hygiene enforcement for everyone else.
Escalation: GI illness that prevents any fluid intake, produces blood in stool, persists beyond 72 hours without improvement, or is accompanied by high fever requires higher-level care if it can be reached.
The most important intervention is not treatment — it is prevention. The Tier 1 and Tier 2 hygiene measures above (treated water, hand hygiene) eliminate the most common transmission pathways.
Scenario 3: Wound Infection
Physical labor in a grid-down household dramatically increases the number of cuts, abrasions, and puncture wounds from tools, rough materials, and unfamiliar work. Under normal conditions, most of these are minor. Under grid-down conditions, even a small wound that goes without proper care can progress to a serious infection within 48 to 72 hours.
The infection progression pattern you need to recognize: initially minor wound → increasing redness → warmth → swelling → red streaking away from the wound → fever and chills. Red streaking (lymphangitis — bacteria entering the lymphatic vessels and moving toward the bloodstream) is an emergency, not a "watch and wait" situation. Start oral antibiotics immediately if not already given, mark both ends of the streak with a marker and timestamp it, and accelerate any evacuation plan — the patient can progress to bacteremia within hours. Also watch for qSOFA signs of sepsis: confusion or altered mental status, respiratory rate at or above 22 breaths per minute, or systolic blood pressure ≤100 mmHg (signs without a cuff: rapid weak pulse, pale skin, delayed capillary refill) — two of these three = probable sepsis requiring immediate evacuation.
Wound care procedure: control bleeding first, then wash hands and use gloves if available, then irrigate thoroughly with clean water — more than you think is necessary. Most households under-irrigate. Use at least 200–500 mL of clean water delivered under pressure (a 35–60 mL syringe with a narrow tip held 1–2 inches from the wound achieves the 35–70 psi needed to clear bacteria without driving debris deeper). Do not close puncture wounds, bite wounds, wounds more than 8–12 hours old, or any wound showing infection signs — leave these open and pack with clean gauze. Remove visible surface debris. Apply a clean dressing. Inspect the wound every day until it is clearly improving, not just stable.
Warning signs that warrant escalation: pain increasing rather than decreasing, redness expanding beyond the wound margins, warmth or swelling worsening, any red streaking, fever developing.
For the complete wound care sequence and infection recognition, see the Wound Care page and Infection page.
Scenario 4: Burns
Burns become significantly more common when households shift to unfamiliar cooking methods — open fires, rocket stoves, Dutch ovens, and camp stoves all require different handling than electric ranges. The risk is highest in the first week before these methods become familiar.
Initial management: remove from heat source, cool with clean cool water at 59–68°F (15–20°C) for 20 minutes — do not use ice or very cold water, which vasoconstricts and deepens the burn. Remove any constricting items like rings or watchbands before swelling progresses, cover with a clean non-adherent dressing.
What not to do: no butter, oils, toothpaste, or any household remedy. These all increase infection risk or continue the burn process. No ice or ice packs — cold below 50°F (10°C) deepens the burn.
Escalation: burns to the face, hands, feet, or genitals; burns larger than the patient's palm (roughly 1% of body surface); any suspected inhalation injury (burns occurred in an enclosed space); chemical or electrical burns. These require professional care regardless of availability constraints.
For the complete burn assessment and treatment protocol, see the Burns page.
Scenario 5: Musculoskeletal Injury from Unaccustomed Work
Back injuries, ankle sprains, knee problems, and overuse strains are among the most debilitating issues in a grid-down operation because they reduce the household's labor capacity at exactly the moment when that capacity is most critical. A back injury that puts one adult out of commission for three to five days affects every other system.
Prevention is the operative word here. Before the heavy work begins: - Wear proper footwear for the task — ankle support for uneven terrain, closed-toe shoes for wood chopping and tool work - Use lifting mechanics (hip hinge, not back rounding) for any load above 30 pounds (14 kg) - Do not push through joint pain — fatigue pain is different from injury pain, and the distinction matters - Work in shifts rather than one exhaustion-level effort; the injury rate spikes in the last hour before someone stops
If a musculoskeletal injury occurs, the management is rest, elevation if applicable, and temporary load redistribution across other household members. The injured member is not out of commission — they can be repositioned to tasks that don't load the injured area. Maintain their operational role while protecting the injury.
Medication Supply Assessment
Conduct a medication inventory by Day 4 and document it.
Prescription medications: Anyone in the household taking daily medication — blood pressure, thyroid, diabetes management, psychiatric, cardiac — needs a supply assessment immediately. Most insurance allows 90-day fills. If your supply is less than 30 days, this is an active problem to solve. Contact your pharmacy by any available means as early as possible; prescription availability narrows quickly after Day 3 in an extended disruption.
Over-the-counter medications that matter most: - Ibuprofen and acetaminophen — pain, fever, inflammation management - Antibiotic ointment — wound care; prevents surface infection in minor cuts - Antidiarrheal medication (loperamide) — manages gastrointestinal illness; slows fluid loss - Oral antihistamine (diphenhydramine) — mild allergic reactions (hives, itching), sleep support under stress. If any household member has a known severe allergy, epinephrine auto-injectors (EpiPen 0.3 mg adult / EpiPen Jr 0.15 mg for children under 30 kg) are the essential prescription item — antihistamines alone do not treat anaphylaxis. See the Allergic Reactions page. - oral rehydration solution (ORS) packets or the ingredient materials (sugar, salt) — fluid replacement - Thermometer — early fever detection; a temperature above 103°F (39.4°C) in an adult or any fever in an infant under three months is a priority concern
For the complete three-capability medical framework and home kit assembly, see the Medical foundation index.
Medicinal herbs as a supplement to your kit. If you have access to a yard or containers, a small selection of medicinal herbs — chamomile for digestive upset and sleep, peppermint for nausea, plantain for wound poultices — can extend your medical supplies for minor ailments when OTC stocks run low. See Medicinal herbs for preparedness for plant profiles, growing conditions, and safe preparation methods.
Field note
The hygiene tier that gets skipped most often is Tier 5 — laundry rotation. By Day 8, three or four people in the same clothing for a week creates a slow-burn skin and foot problem that is completely preventable. Stage your laundry supplies — a wash basin, camp soap, and a drying line — on Day 1, not Day 10.
Chapter 8 checklist
- Set up a dedicated handwashing station: gravity-feed container with spigot, liquid soap, drying method — staged near every toilet
- Assess toilet function: can it flush with stored water? If not, deploy the sawdust bucket system immediately
- Stock cover material for sanitation backup: 2 gallons (7.5 liters) per person per week minimum
- Confirm ORS ingredients: sugar, salt, and treated water — or pre-packaged ORS packets
- Audit wound care supplies: irrigation capability (syringe or container for directed flow), non-stick dressings, antibiotic ointment, tape
- Complete prescription medication inventory: how many days does each household member have?
- Establish sick room protocol: which room, what supplies stay in it, who manages care
- Brief household on the 6 handwashing moments — verbal confirmation from each adult
- Stage two cutting surfaces for food prep and chlorine rinse solution for surface sanitation
- Check footwear and work gloves before heavy labor begins — prevent musculoskeletal injury before it happens
Chapter 9: Community and Communications
Household systems are running. Water is secured, food is rationed, energy is managed, and your security posture is set. The next multiplier is connecting to a larger network. A single household, however well-prepared, hits a hard capability ceiling. The neighbor with medical training, the house two blocks over with a generator, the retired engineer who knows how to fix a pressure tank — these are resources no amount of individual stockpiling can substitute for.
Every documented disaster shows the same finding: households with established community relationships before the event performed dramatically better than isolated households. The difference was not primarily about material resources. It was about information, labor, and the psychological support of not facing the event alone.
This chapter is about building that network during Days 5-14, while the window for natural, low-pressure relationship-building is still open.
The Communications Hierarchy When Phones Fail
Cell phone service fails in a predictable cascade during regional events. Towers remain physically functional but become congested within minutes as everyone attempts to communicate simultaneously. Text messages succeed more often than voice calls when towers are congested, because they require less bandwidth. By 12 to 24 hours into a widespread event, many towers have also run out of generator fuel for backup power and begin failing completely.
Your communications hierarchy should be built on this predictable failure pattern:
Days 1-3: Cellular (degraded) and direct-contact. Phones may work intermittently. Text if you can't call. If the situation is developing rapidly, use cell function while it lasts to reach your most important contacts and confirm their status. After that, plan for cellular to be unavailable.
Days 4-7: Establish a neighborhood check-in net. If you and at least two neighboring households have General Mobile Radio Service (GMRS) or FRS radios, this is when the neighborhood net activates. Define a fixed channel, a fixed check-in time (morning and evening, same time each day), and a brief standard format: "[Name], status, any needs or capabilities to share." The check-in should take less than 90 seconds per household and provides early warning of deteriorating situations in your network.
Days 8-14: HAM radio advantages become visible. If anyone in your network holds an amateur radio license, their capability becomes significant in an extended event. HAM VHF/UHF handhelds connect to repeater networks that can cover entire cities or counties. HAM HF can reach hundreds of miles when local infrastructure is down. If you don't have this capability yourself, knowing which neighbor does is an important piece of your network map.
Days 14+: Low-tech fallbacks maintain connection. Physical signals — a specific item in a window (a white cloth means "we're okay"), a chalk mark on a mailbox, a flag at a specific location — communicate status without any power. Establish your signals with your closest neighbors before you need them. For longer-distance signaling, a signal mirror reaches 10 miles (16 km) or more in clear conditions — far beyond any radio handheld operating simplex. The universal distress convention is three of any repeating signal (three whistle blasts, three fires in a triangle, three flashes) — a single long blast or steady light means all-clear. See Signaling Methods for range data by method and the six-step mirror-aiming technique.
Urban GMRS operation faces a specific challenge: reinforced concrete and steel construction attenuates radio signals significantly. A handheld that reaches 1 mile (1.6 km) in an open suburban environment may reach 300 feet (90 m) through several concrete floors.
Mitigations: - Conduct check-ins from a window or exterior space whenever possible — the attenuation difference between a center-apartment position and a window position can be significant - Establish a physical rally point with your network: a specific building entrance or courtyard that serves as the face-to-face check-in location when radio contact is unreliable - If your building has a rooftop accessible to residents, this is a significant radio advantage and a logical base for antenna positioning - Know your building's residents in the immediate floors and units around yours. In a high-rise, your "neighborhood" is vertical as much as horizontal.
Suburban GMRS performance is generally good. Handheld-to-handheld direct range in typical suburban conditions is 1 to 2 miles (1.6 to 3.2 km) — enough to maintain contact with most near-neighbors without a repeater.
Building a suburban neighborhood net: - A minimum viable net is three households with paired GMRS radios programmed to the same primary channel. This creates an actual network — information can be relayed from one end to the other through the middle node. - A base station or mobile radio with an outdoor antenna at one home serves as the net anchor and extends range to 3 to 5 miles (5 to 8 km) for a small additional investment. - Program a shared primary channel, a backup channel, and any available local GMRS repeater channel. Get this done before Day 4, not during.
Rural communications require greater range than GMRS simplex can reliably deliver. The upgrade paths are:
- GMRS repeater access: many rural counties have privately maintained community GMRS repeaters. If one exists in your area and you can access it, a well-placed repeater can cover a town or multiple rural communities. Research this before you need it — test the repeater from your property at home, from your vehicle, and from any likely rally points.
- HAM radio (Technician license): the Technician exam is the next realistic step for any rural household that expects communications to be a sustained challenge. The exam requires a few weeks of study but gives access to the extensive HAM repeater network, emergency communication nets, and — at the General license level — HF long-distance capability.
- Satellite communicator: for truly remote properties, a satellite communicator provides two-way text messaging and SOS capability without any local infrastructure — the only communication method with zero dependency on local infrastructure. This is a moderate investment. Coverage varies by network: Iridium (Garmin inReach) uses 66 LEO satellites with true global coverage; Globalstar (SPOT devices) uses 24 LEO satellites and coverage weakens above ±70° latitude. Both require a clear sky view — 20° minimum elevation above the horizon, 40°+ ideal. In cold weather, expect 20–30% battery capacity loss at 32°F (0°C) and up to 50% at 0°F (-18°C); carry the device close to your body and keep a spare battery warm. See Satellite Communicators for device comparison and message length capabilities.
For complete GMRS licensing, range planning, repeater access, and neighborhood net setup, see the GMRS Radio page. For understanding HAM radio's capabilities and licensing path, see the HAM Radio page.

Building Your Mutual Aid Circle: Days 5-10
This is the optimal window. The heroic phase is still partially in effect — people are still cooperative and not yet deeply stressed by supply concerns. Natural opportunities for contact arise from the shared situation. A conversation about how things are going flows more naturally than the same conversation in normal times.
The goal is establishing standing agreements with three to five households within walking distance or very short travel distance. Not a formal organization, not a contract — a clear, mutual understanding: "We check on each other. We share specific resources when we can. We coordinate on security. We communicate by [specific method] at [specific times]."
The skills inventory conversation. The most valuable first step is knowing what your network can do collectively. This conversation is not intrusive if framed correctly: "With everything that's happening, I'm trying to get a sense of what resources we have in the neighborhood. Is there anything you're good at, or things you need, that we should know about each other?" This surfaces capabilities you wouldn't otherwise discover — the retired paramedic, the auto mechanic, the person with a year's worth of seeds, the household with a well and a hand pump — and builds rapport simultaneously.
A simple skills map of your nearest 10 households, on paper, answering: name, household size, known capabilities, known vulnerabilities, preferred contact method. This document is not shared publicly — it is your network intelligence for resource coordination. The Skills Inventory page includes a six-domain assessment template covering Medical, Communications, Mechanical, Agricultural, Trades, and Childcare — a structured starting point for your first neighborhood conversation. One critical planning principle: for any skill your group depends on critically (medical care, comms operation, water system maintenance), at least two people should be capable of performing it. Single-person dependencies become operational failures if that person is unavailable or injured.
What to share and what not to share. The mutual aid relationship is built on specific commitments, not open-ended obligation. Be explicit about what you can offer ("I have medical training and a well-stocked first aid kit. I can help with wound care if someone needs it.") and equally explicit about what your limits are. Full supply depth disclosure is not required and not advisable — even with trusted neighbors. What you can share is relevant capability and specific available resources, not a complete inventory of everything you have.
This parallels the bartering principle: trade surplus, not survival floor. Mutual aid functions on the same logic.
The mutual aid agreement format. Write it down, even if it's on a single piece of paper. It should answer: who is in the circle, what support we commit to, how we communicate, and what boundaries protect everyone involved. The Mutual Aid page includes a one-page template that covers these elements.
Before any event: establish the contact infrastructure. A printed neighbor contact card — name, address, landline or cell, known medical needs, and out-of-area contact — is something you can exchange with trusted neighbors now, in normal times, at zero cost. The Neighbors page has a printable card template and a check-in calendar: a spring visit to refresh contact info, an October pre-winter check, and a post-event welfare check protocol. These habits built before a crisis are what activate naturally when one occurs — the neighbor you've checked in with twice a year will answer the door in week two.
Barter: The Day 10-14 Threshold
Barter typically begins activating around Days 10 to 14 in a regional disruption. Households that exhausted certain categories early — lighter fuel, batteries, medications — begin seeking trades. Households with surplus in those categories have leverage. This is not exploitation; it is how informal markets have functioned in every documented disaster.
Being positioned to trade means two things:
Having identifiable surplus in at least one category. High-demand early-disruption items include: medications (especially OTC: antidiarrheal, pain relief, antihistamine), lighter fuel and matches, batteries in common sizes, reading glasses, feminine hygiene products, coffee and tobacco, and manual tools. A modest inexpensive investment in extra units of two or three of these categories before Day 1 creates trade options that can be exchanged for items you need.
Knowing what your network needs. This is where the skills inventory and relationship-building of Days 5-10 pays direct material dividends. You already know the household that ran out of a specific medication. You already know the person with mechanical skills who needs a specific tool. Pre-existing relationships enable specific, efficient trades. Cold-approach trades with strangers carry both OPSEC risk and information leakage risk.
The operational security principle applies to barter: bring only what you intend to trade, not your full inventory. Meet in visible locations for trades with any household you don't know well. The Bartering page covers the complete trade valuation framework and network design.
Information Quality and Rumor Management
In an extended event, information is a resource that degrades fast. The rumor cycle in a neighborhood without verified news can drive decisions that are worse than no information — including premature evacuation when shelter-in-place is safer, security escalation based on unverified threat reports, and resource sharing decisions based on false scarcity claims.
Your information sources, in order of reliability:
- NOAA Weather Radio — broadcasts continuously on seven VHF frequencies: 162.400, 162.425, 162.450, 162.475, 162.500, 162.525, and 162.550 MHz. No internet or cell service required; runs on batteries; activates automatically on emergency alerts. Find your local transmitter frequency before Day 1 and write it in your communications plan. Your phone's Wireless Emergency Alert (WEA) system also pushes geotargeted alerts without an app — keep Imminent Threat Alerts enabled, but treat WEA as a first-notification layer only, because cell networks overload or lose power in regional events.
- County and municipal emergency alert systems — Nixle (text your zip code to 888777) and CodeRED (county website registration) push evacuation orders, active incidents, and shelter-in-place notifications directly to your phone at no cost. Register before the event.
- Battery-powered AM/FM radio — local news stations, emergency broadcasts, official announcements
- Broadcastify scanner feeds — Broadcastify.com aggregates live public-safety radio from police, fire, and EMS. During a local incident, scanner traffic gives you situational awareness 15–30 minutes ahead of social media. Use it as an early-warning signal, not a primary source; scanner traffic is raw and uses agency-specific codes.
- Ham radio monitoring — if you or a neighbor has a VHF/UHF radio, monitor 146.520 MHz FM, the national 2-meter simplex calling frequency, for ARES emergency coordination and relayed reports from county emergency management.
- Direct contact with emergency services — when reachable, the most accurate picture of local response status
- Your own direct observation — what you can see and verify yourself
- Second-hand reports from trusted contacts — useful signal, but tag it as unverified
- General neighborhood rumor — treat as noise until corroborated by at least one other independent source
The Rule of Two: never act on a single source, especially social media. Require two independent, unrelated sources before acting on any significant report. For high-stakes decisions — evacuation, shelter-in-place, changing your security posture — require at least one of those sources to be official (NOAA, emergency management, or law enforcement).
Build the habit of sourcing your information before acting on it. Before making a significant decision based on a report — changing your security posture, expending supplies, evacuating — ask: where did this come from, and what else confirms it?
Your community network is also your information network. A group that shares verified observations (road status, store availability, utility company communications) makes better collective decisions than a group relying on individual assessment. This is one of the highest-value outputs of the mutual aid relationship and requires no special resources — only the communication infrastructure and the discipline to distinguish what you've verified from what you've heard.
Field note
The check-in net serves a function beyond welfare status. The daily exchange of verified observations — "the main road is clear," "the gas station at Fifth has lines," "the utility company posted a repair estimate this morning" — creates a shared picture of conditions that no individual household can build alone. Structure your check-in format to include a brief information share, not just a status report.
For the full framework on mutual aid circle structure, skill pooling, and resource distribution, see the Mutual Aid page. For the community preparedness overview, see the Community foundation index.
Chapter 9 checklist
- Identify three trusted households and confirm a non-cellular contact method with each
- Establish a daily check-in protocol: fixed time, fixed channel or location, brief standard format
- Map your nearest 10 households on paper: name, household size, known capabilities, known vulnerabilities
- Complete a skills inventory conversation with at least two neighbors by Day 7
- Propose a mutual aid agreement to at least two trusted neighbors by Day 10
- Program all radios in your network to the same primary, backup, and repeater channels if applicable
- Test GMRS range from your actual location — walk the test, map the reliable coverage
- Document everything on paper: phone numbers, radio frequencies, addresses, channel settings, agreements
- Establish an information discipline standard: source before acting, tag unverified reports
- Set up NOAA weather radio and battery AM/FM as your primary verified information sources

Phase 3: Adapt (Days 15–30)
You've survived the first two weeks. The immediate triage is behind you and the systems are running — imperfectly, but running. Phase 3 is about stabilizing into a rhythm, extending your supply chain, building the first production capabilities, and managing the psychological arc that peaks and threatens group cohesion in the third and fourth weeks.
Chapter 10: Food Production Begins
Systems are running. Week 2 brought fatigue and reality — water is secured, cooking fuel is rationed, the pantry is being drawn down in an order that makes sense. Phase 3 asks the harder question: can you move from consuming stored resources to producing fresh ones?
The honest answer on Day 15 is: not enough to matter yet. But that is the wrong frame. Production does not begin because you can replace what you consume — it begins because every step you take in Days 15–30 positions you to produce in Days 45–90. A seed planted today, soil amended today, a foraging route walked today — these are investments in the food system that sustains you past the 30-day line. Start them now.
The Production Reality Check
A single 4×8 ft (1.2×2.4 m) raised bed managed well produces 50–100 lbs (23–45 kg) of food per season. That is per season — not per month. On Day 15, a newly planted bed produces nothing. This is the first thing to understand: the purpose of starting food production in Phase 3 is not to replace your stored food within 30 days. It is to build systems that work by Day 45, 60, and 90.
What can actually produce food within the 30-day window is a narrower list:
- Sprouting: Lentils, mung beans, and alfalfa sprouts in a jar, ready in 3–5 days from any stored dry goods you already have. This is the one production action that pays off before the guide ends.
- Radishes: 22–30 days from seed to harvest — plant today, harvest before Day 45.
- Leaf lettuce: 28–45 days; cut-and-come-again varieties produce indefinitely after first harvest.
- Spinach: 40–50 days, but only viable in cool weather; bolts and becomes bitter above 75°F (24°C).
- Green onions (scallions): 60–70 days, but start them now for a harvest in weeks 8–10.
Foraging and hunting begin producing immediately. The constraint is knowledge and effort, not time.

Starting Sprouts: Three Days to Fresh Food
Sprouting is the single highest-return production action you can take right now. It requires no outdoor space, no soil, no special equipment, and produces fresh food in 72–120 hours from dry goods you already own.
The mechanism: when a dormant seed is soaked in water and kept moist, it germinates and begins converting stored starches into bioavailable nutrients. Lentil sprouts that started as nutritionally plain dry lentils become a genuine fresh-food source with Vitamin C levels rising from near zero to roughly 14 mg per 100g over four days of sprouting. That vitamin C matters: after two to four weeks on a stored-food diet heavy in grains and canned goods, the micronutrient gaps start opening.
Sprouting procedure (quart jar method):
- Measure 2–3 tablespoons (30–45 ml) of lentils, mung beans, or alfalfa seeds into a clean quart (1-liter) mason jar.
- Cover with three times the volume of clean water. Soak 8–12 hours.
- Drain, rinse with clean water, drain completely. Tilt the jar at a 45-degree angle to allow airflow. Cheesecloth, a mesh lid, or a rubber-banded piece of muslin works as the cover.
- Rinse and drain twice daily. Keep away from direct sunlight.
- Harvest when sprouts are 1–2 inches (2.5–5 cm) long — typically Day 3–5. Refrigerate if possible; otherwise consume same day.
One jar produces enough fresh greens for a salad supplement or a meal garnish every few days at minimal water cost. Three jars running in rotation produces a steady daily supply.
Field note
Alfalfa sprouts are the most delicate and most nutritious. Lentil and mung bean sprouts are more forgiving of imperfect rinsing and temperature swings. If conditions are not clean enough to trust delicate seeds, start with lentils — they tolerate rough handling and still produce. In a grid-down context, start with what you have.
Setting-Specific Production Paths
Your production landscape: You likely have a south-facing windowsill or small balcony, no garden bed, and limited outdoor soil access. The good news is that several of the most productive food sources per square foot are indoor-capable.
Sprouting is your highest-yield action: no outdoor space, water cost under 1 cup (237 ml) per day per jar, food yield within 72 hours. Start three jar rotations today.
Container gardening: A 5-gallon (19-liter) bucket with drainage holes grows one tomato plant, one pepper plant, or multiple lettuce plants per container. A south-facing window or balcony provides 4–6 hours of direct light in summer — marginal for tomatoes but adequate for lettuce, spinach, and herbs. Kale and Swiss chard tolerate indirect light better than most fruiting crops.
Fill containers with commercial potting mix — do not use outdoor soil in containers, which becomes compacted and does not drain properly. One 2 cubic foot (0.057 m³) bag of quality potting mix fills two 5-gallon buckets and costs an inexpensive amount at any hardware or garden store.
Microgreens in a tray: A shallow 10×20 in (25×51 cm) tray (standard seedling tray) planted densely with radish, sunflower, or pea seeds produces harvestable microgreens in 7–14 days. Cut with scissors at 1–2 in (2.5–5 cm) height. Nutrient density is very high per square inch — this is the closest thing to a garden that works at windowsill scale.
Foraging in urban environments: An urban park with dandelions is a legitimate food source. Dandelion leaves are abundant in almost every North American city from March through November. A local park, vacant lot, or green strip can yield meaningful supplemental greens. Apply full identification protocols and avoid areas near heavy vehicle traffic or industrial sites where soil contamination is likely.
For complete guidance on container-specific crop selection, planting density, and soil management, see the Container Gardening page in the Food foundation.
Your production landscape: You have outdoor soil access, likely some yard space, and potentially gutters and a patio or deck. This is enough to start a meaningful production operation in the next two weeks.
Install a raised bed: A 4×8 ft (1.2×2.4 m) raised bed is your first priority if you don't already have one. Orient it east-west so the long axis receives sun all day. Build it 10–12 in (25–30 cm) deep. Fill with Mel's Mix (one-third blended compost, one-third peat moss or coir, one-third coarse vermiculite) — this soil never needs tilling and performs significantly better than amended native soil for production density.
In Days 15–20, plant the bed with the fastest-maturing crops available to you: radishes along the edges (30-day harvest), leaf lettuce in the center (28–45 days, cut-and-come-again), spinach in any cool-shaded corner. Transplant any existing seedlings from indoors. In the same bed, plant green onion sets or seeds that will produce in 8–10 weeks — they will be ready when your stored food is running thin.
Containers on deck: Add five to ten 5-gallon (19-liter) buckets on any south-facing deck or patio. Each bucket = one plant slot. Prioritize herbs that produce continuously (basil, chives, parsley) and fast-growing leafy greens.
Succession planting: As soon as one crop is harvested, replant that space immediately. The goal is zero idle bed days. The 4×8 bed that produces one lettuce crop, then gets replanted with spinach, then radishes, produces three times the food of a bed that sits empty between cycles.
For complete detail on raised bed construction, Mel's Mix ratios, and succession planting schedules, see the Gardening page in the Food foundation.
Your production landscape: You likely have existing garden space, possibly soil from previous seasons, and broader foraging and hunting access than urban or suburban settings. The task at this stage is expansion and systematization, not starting from zero.
Assess what's already in the ground: Walk the property. What was planted this season? What's actively growing? What perennials are producing or will produce — fruit trees, berry bushes, asparagus beds, herb patches? Document it. These are production assets that cost no additional effort if you manage them consistently.
Expand bed count: A second or third 4×8 ft (1.2×2.4 m) raised bed planted now in fast-maturing crops expands your harvest window and distributes the risk of any single failure. Three beds succession-planted represent a significant ongoing food contribution by Day 45.
Seed saving and inventory: If you have seeds from this or previous seasons, inventory them against the Days-to-Harvest table now. Anything with a 30–50-day maturity that can be planted in your current growing window should go in the ground this week.
Consider chickens if you have them or can acquire them: Two hens at laying age produce roughly 10–14 eggs per week — a meaningful protein and fat contribution that requires only daily feed and water management. If you already have chickens, they are a production asset already in service. If you're considering acquiring them, the lead time for pullets (young hens) to begin laying is typically 18–22 weeks, making this a Days 45+ consideration rather than Days 15–30.
For complete detail on seed inventory, succession planting by growing zone, and garden expansion planning, see the Gardening and Seeds pages in the Food foundation.
Foraging as a Real Supplement
Foraging will not feed your household on Day 15. But it can provide genuine supplemental nutrition, Vitamin C specifically, and morale value that outweighs its caloric contribution. A handful of fresh dandelion greens in a meal after two weeks of canned and dried food has psychological weight beyond its nutritional math.
The rule before eating anything wild is the same rule it has always been: three independent identifying characteristics before you eat it. Not one. Not two. Three. For anyone new to foraging, start with these five species — they have the lowest confusion risk of any edible wild plants in North America:
1. Dandelion (Taraxacum officinale): All parts edible — leaves, flowers, roots. Toothed leaves in a basal rosette (no stem, leaves grow directly from ground). Hollow single stem per flower. The lookalike — cat's ear — is also edible, making this the safest possible beginner species. Available in almost every lawn, park, and roadside in North America.
2. Cattail (Typha latifolia): Growing in standing or slow-moving water, 4–8 ft (1.2–2.4 m) tall with an unmistakable brown sausage-shaped seed head. In spring, the white inner shoot (called Cossack asparagus) is edible raw or cooked. The starchy root, processable in fall and winter, is one of the most calorie-dense wild foods in North America. The lookalike — iris — has no seed head, and its swordlike leaves are distinctly different.
3. Blackberry/Raspberry (Rubus spp.): Berry shape (aggregate drupelets on a hollow core) is so recognizable that no dangerous lookalike exists at the ripe-berry stage. Red and black berries on thorny canes. Harvest when fully ripe (fall from the plant easily with gentle pressure). Unripe berries cause gastric distress.
4. Wood sorrel (Oxalis spp.): Distinctive heart-shaped leaves in groups of three, with a sour clover flavor from oxalic acid. Common in shaded areas, lawns, and garden edges. Edible raw or cooked; the sourness makes it a useful flavor addition in small amounts. Do not confuse with true clover (round leaves with no heart shape, no sour taste) — both are edible.
5. Chicken-of-the-woods mushroom (Laetiporus spp.): Bright orange-yellow shelf fungus growing on trees. No dangerous lookalike when correctly identified. Cook thoroughly before eating — raw forms cause gastric distress in some people. The bright color and bracket shape make misidentification extremely unlikely once you've seen one.
Foraging safety — non-negotiable
These five species are selected because their identification characteristics are distinctive and no deadly lookalikes exist at the harvest stage. Moving beyond these five species without a field guide and direct instruction from an experienced forager is not a preparedness activity — it is a risk that can result in fatal liver failure within 24–72 hours. The Amanita mushrooms (death cap, destroying angel) are responsible for the majority of fatal foraging cases in North America. They have no distinctive smell, look edible, and kill reliably. Do not experiment beyond confirmed identifications.
For the Universal Edibility Test procedure and a full seasonal foraging calendar, see the Foraging Wild Food page in the Food foundation.
Hunting and Fishing as Protein Sources
Hunting and fishing are not emergency backup systems you can activate under pressure if you haven't practiced them. They require licensing, gear, and foundational skill that cannot be learned in a crisis. If you have those prerequisites, here is how to prioritize them in Phase 3.
Licensing: Most states require valid licenses even in emergency conditions. Some states have provisions for subsistence hunting when regular supply chains are disrupted, but the licensing baseline remains. If you do not have a current license, check state wildlife agency emergency provisions — many waive fees or simplify licensing during declared disasters. Compliance matters both legally and practically: game wardens still operate in most emergency scenarios.
Small game priority: For a beginning hunter, small game is the correct target. Squirrels yield 4–6 oz (113–170 g) of meat per animal and are abundant in hardwood forests near oak and hickory. Cottontail rabbits yield 12–16 oz (340–454 g) per animal and are found in brushy edges and fence rows throughout North America. A .22 LR rifle or 20-gauge shotgun handles both species. One morning's successful squirrel hunt can supplement the household's protein for a day at minimal calorie cost compared to large game pursuit.
Fishing as a daily practice: A simple rod, 15 lb (6.8 kg) monofilament, and a box of assorted hooks and split-shot weights is all the infrastructure needed to fish while other systems run. Set a line and let it work. Check it every 30 minutes. Fishing is a low-effort, steady-yield activity that pairs well with the Phase 3 rhythm of maintaining multiple parallel systems.
For firearm safety rules, licensing requirements, shot placement, and a full deer field dressing procedure, see the Hunting for Food page in the Food foundation.
Preservation as Production Extension
Whatever you harvest — from the garden, foraging, hunting, or fishing — needs a preservation plan. In a grid-down scenario, cold storage is unreliable or absent. Meat that cannot be refrigerated needs to be processed within hours of harvest, not days.
Smoking is the most accessible grid-down preservation method for protein. A properly smoked and dried product can remain safe at room temperature for days to weeks without refrigeration. Hot smoking (225–275°F / 107–135°C) both cooks and preserves through desiccation and antimicrobial smoke compounds. Fish smoked to an internal temperature of 145°F (63°C) and dried to a leathery texture can be kept three to five days without refrigeration in cool weather. Jerky from any protein source — squirrel, rabbit, deer, fish — extends shelf life dramatically.
Dehydrating extends vegetables, herbs, and foraged greens. The USDA minimum safe temperature for dehydrating is 130°F (54°C) for vegetables and 160°F (71°C) for jerky. Without a powered dehydrator, you can use a charcoal fire banked to low heat, a solar dehydrator built from window screen and a dark box, or an oven at its lowest setting if power is available.
For complete hot and cold smoking procedures, wood species selection, and safe internal temperatures, see the Smoking page. For USDA temperature targets, equipment options, and long-term storage methods, see the Dehydrating page. Both are in the Food foundation.
Field note
Start a compost pile now from every food scrap, coffee ground, and plant trimming. You will not have compost in 30 days — compost takes 6–12 weeks at minimum. But the pile you start on Day 15 is ready by Day 75. It costs nothing, requires almost no effort after the initial setup, and directly feeds the garden expansion that sustains you past the 30-day line. Dig a 3×3 ft (0.9×0.9 m) square to 12 in (30 cm) depth, alternate layers of carbon material (dried leaves, cardboard) and nitrogen material (food scraps, fresh plant material), and keep moist. That is the entire setup.
Chapter 10 checklist
- Start a sprouting operation: lentils or mung beans in a quart jar, Day 1 of 3-5 day cycle
- Plant at least one fast-maturing crop: radish or leaf lettuce in any available container or bed
- Identify three wild forageable species within walking distance using three traits each
- Assess hunting and fishing: current license status, available gear, target species
- Inventory preservation capability: method available for any harvested protein (smoke, dehydrate, salt)
- Build seed inventory: document seeds on hand, days-to-harvest, what can be planted this window
- Start a compost pile: any scrap material separated and layered, location chosen
Chapter 11: Mental Resilience and Household Dynamics
Logistics are stable. Water is running, food is rationed, energy is managed. The overlooked system — the psychological one — is about to get tested in the ways that end otherwise well-supplied households. This chapter covers what happens in the mind and in the group from Days 15 through 30, and the specific interventions that determine whether a household holds together or fractures.
The 30-Day Psychological Arc
Extended emergencies have a predictable psychological timeline. The research on Antarctic winter-over personnel, submarine crews, COVID-19 quarantine studies, and documented disaster response data consistently shows the same pattern. Understanding it does not prevent it, but it allows you to recognize where you are and respond with an intervention rather than with confusion.
Days 1–3 — The Heroic Phase: Adrenaline and cortisol mobilize energy and sharpen focus. The threat is clear, the purpose is clear, people are at their most decisive. Morale is paradoxically high. Physical performance is often better than normal. The danger in this phase is over-commitment — exhausting resources of energy, supplies, or goodwill at a pace that cannot be sustained.
Days 4–7 — Fatigue: The first exhaustion arrives. The adrenaline has worn off but the demands have not. First system failures appear — a filter that clogs, a fuel source that runs lower than expected, a medical need that wasn't planned for. First interpersonal friction surfaces: a snapped response over an irrelevant trigger, a disagreement about priorities that is really a disagreement about fear. This phase passes if the household has basic routine in place and roles are clear.
Days 8–14 — Reality: The situation is clearly longer than "a few days." Supply math has become concrete and possibly alarming. Some household members begin showing behavioral stress signals: repeating tasks without completing them, snapping at minor provocations, making decisions without executing them. The household's ability to sustain this phase depends heavily on whether Phase 1 and 2 built functional systems or whether the household is still managing by improvisation.
Days 15–21 — The Tipping Point: This is the threshold that separates households that stabilize from those that fracture. Households with a functioning routine and clear role assignments find that operations become more automatic, less draining. The psychological cost of daily decisions decreases as habits form. Households without this structure begin to exhaust their emotional reserves. Two or more adults under chronic stress without clear roles and predictable schedules begin to process each other as threats rather than partners.
Days 22–30 — The Third Quarter: Antarctic research named this pattern the third-quarter phenomenon. Roughly midway through a bounded isolation period — when the end is visible but still distant — mood drops sharply, irritability spikes, and interpersonal tension escalates not because conditions have worsened but because the mind has calculated how much time remains and finds the number exhausting. In a 30-day scenario, this peaks around Days 22–25. It affects even well-managed households. Recognizing it as a predictable phase reduces its damage significantly.

The Six-Anchor Daily Schedule
The single most effective psychological intervention in all extended-isolation research is structured routine. Not productivity, not positivity, not even comfort — structure. Research on COVID-19 quarantine found that people with as few as four daily anchors reported significantly better psychological outcomes than those with unstructured days, even when objective conditions were identical.
You are not scheduling every hour. You are creating six fixed points that give everything else a structure to hang from. Write this on paper and post it where everyone can see it.
| Anchor | Time | Contents |
|---|---|---|
| Morning check | 30 min after wake | Inventory, weather, comms check, day's three priorities |
| Work block | Mid-morning | 2–3 hours maintenance, repair, or primary production task |
| Midday reset | Around noon | Shared meal; brief status share; redistribute tasks |
| Afternoon task | Early afternoon | Physical work, outdoor time, secondary tasks |
| Skills/recreation | Late afternoon | 60–90 min of skill practice, games, or free time |
| Evening review | 1 hour before sleep | Tomorrow's priorities; any unresolved tensions named |
The exact times are less important than consistency. A household that eats, sleeps, and does its morning check at roughly the same times every day will show measurably better psychological stability on Day 22 than one that operates reactively.
Field note
The most important single anchor is fixed wake time. Cortisol follows a predictable daily curve when wake time is consistent — the cortisol awakening response peaks about 30 minutes after waking and provides morning alertness and motivation. Variable wake times flatten this curve. Keep wake time within a 30-minute window every day of the disruption, regardless of how the previous night went. This is not a discipline issue. It is a neurochemistry issue.
Role Assignments: The Blank-Slate Problem
Unclear responsibilities under stress produce two failure modes: duplication (everyone does the same task, competing or redoing each other's work) and neglect (everyone assumes someone else handled it). Both erode trust and increase friction. Role clarity prevents both.
A minimum role structure for any household with two or more adults:
- Supply track: Morning inventory counts, ration management, rotation scheduling, consumption rate tracking.
- Technical track: Equipment status, repair queue, fuel management, power monitoring, water system checks.
- Communications track: Monitoring incoming information (NOAA radio, neighbor check-ins), managing outgoing contact with your mutual aid network.
- Medical and wellbeing track: Health status of all household members, medication schedule, stress level monitoring, hygiene compliance.
Roles can rotate weekly to prevent burnout and ensure backup competency. But at any given moment, one named person owns each domain. This eliminates the "who was supposed to check the water?" argument that becomes a proxy for accumulated stress by Day 8.
Assign roles in writing and review them in the evening review anchor. When a task falls through the cracks — and one will — the conversation is "the supply track missed this, let's adjust the morning check" rather than "who dropped the ball and why."
The Stress Cascade: Plain Language
What looks like a personality problem in a stressed household is usually a physiological one. Understanding the mechanism does not excuse the behavior, but it prevents the feedback loop where one person's cortisol overload triggers another's, and the household burns through goodwill at the exact time they most need it.
The body's stress response runs through the HPA axis (hypothalamic-pituitary-adrenal axis). Under acute threat, cortisol and adrenaline mobilize energy and sharpen focus. This system was designed for short bursts followed by resolution and recovery. In an extended emergency — weeks of supply pressure, physical labor, disrupted sleep, social isolation — the activation never fully resolves. The HPA axis begins to show what stress researchers call allostatic load: cumulative wear from sustained cortisol activation.
The visible results: impaired immune function, disrupted sleep architecture, degraded emotional regulation, and — critically — distorted interpersonal perception. A person under high allostatic load interprets neutral statements as criticism. They re-argue resolved decisions. They snap at minor provocations. They cannot hold more than one priority at a time. These are not character flaws. They are cortisol side effects.
The 90-second physiological interrupt: When stress spikes acutely — after a difficult decision, a frustrating failure, or a heated argument — the prefrontal cortex cannot reason its way out of a high-cortisol state. A physiological interrupt is necessary first.
- Full exhale through the mouth — empty the lungs completely.
- Double inhale through the nose: a brief inhale, a brief hold, then a second inhale to fully expand.
- Long slow exhale through the mouth — longer than the inhale.
- Repeat four cycles. Total time: approximately 90 seconds.
This is the cyclic sigh protocol, validated in a 2023 Cell Press study as the fastest available reduction in acute anxiety. The extended exhale activates the vagus nerve, triggering parasympathetic nervous system dominance and reducing adrenaline-driven activation. After 90 seconds, state the immediate priority in one sentence and assign one action.
Teach this to every adult in the household before Day 15. Practice it during low-stress periods so it becomes automatic when needed.
Stress signals that require intervention
When two or more of these signals appear in any household member — repeating tasks without completing them, snap reactions to neutral comments, difficulty holding more than one priority, appetite loss or unusual overeating, early morning waking, withdrawal from group communication — the stress load has passed a threshold where unassisted self-management is failing. The response is workload check and rest enforcement, not a performance conversation. Check whether they have eaten in the last four hours and had water in the last two hours. A significant fraction of interpersonal conflicts in prolonged disruptions have a nutritional or hydration component that looks exactly like a personality conflict.
For complete detail on the stress cascade physiology, HPA dysregulation, and evidence-based management techniques, see the Stress Management page in the Mindset foundation.
Children by Age Band: What Each Stage Needs
Children experience emergencies through the emotional state of the adults around them first, and through logistics second. SAMHSA's disaster behavioral health research consistently finds that parental calm is the single strongest predictor of child psychological outcomes — more than the severity of the event itself. Your own regulation is not a soft skill. It is the most protective intervention available to your child.
Toddlers (ages 1–3): They cannot process explanations of power grids or supply shortages. They detect adult emotional tone with high accuracy. What they need: physical proximity to a calm adult, familiar objects (the specific blanket, the specific cup), and consistent feeding and sleep timing. Disrupted meal and sleep rhythm is the emergency, from a toddler's perspective. Protect those two anchors above everything else.
Stress signals in this age group: increased clinginess, regression to earlier behaviors (thumb-sucking, toilet accidents after being dry), night waking, unusual food refusal. These are normal stress responses in an immature nervous system, not developmental problems.
Preschoolers (ages 4–5): Literal explanations work; vague reassurances increase anxiety. "A storm knocked out the power. The lights don't work right now, and we have enough food and water" is helpful. "Everything is fine" is not — preschoolers can see that everything is not fine. Keep sentences short. Be true. Avoid "I don't know" without a follow-up that restores a sense of agency: "I don't know exactly when the power comes back, and right now we have candles and food and you are safe."
Give them a small, real job: carry their backpack, hand items to an adult during packing, check under a bed during a room clearance. Participation matters at this age more than contribution.
School-age children (ages 6–11): They can handle more information and need to be given genuine roles, not performed inclusion. Tell them what is happening at a level appropriate to their understanding. Assign them a real responsibility — morale kit manager, water station assistant, morning inventory helper — and tell them the household needs them to do it. Children in this age range who have a defined role show significantly lower anxiety than those who are bystanders in their own household's emergency. They are watching the adults for evidence that the adults have a plan. Show them the plan.
Teens (ages 12–17): They need honest information and genuine roles, not treatment as either small children or small adults. A 15-year-old who understands the supply math and is assigned a real functional responsibility — communications track, fuel management, food rotation — has something concrete to engage with. Teens who are excluded from real information and real responsibility become the most destabilizing members of a household under stress, not because they are difficult, but because they are bored, uninformed, and underestimated.
For age-specific communication scripts, stress signal identification, and separation protocols, see the Children in Emergencies page in the Mindset foundation.
The Morale Kit: Why It Is Operational Equipment
The morale kit is not a luxury. In Antarctic winter-over research and COVID-19 quarantine studies, structured recreational time and access to engagement tools — cards, books, music, games — showed measurable impact on group cohesion, interpersonal conflict rates, and individual anxiety. Build the kit before you need it. By Day 22, you cannot improvise it.
Core components, no electricity required:
- Playing cards and dice: A standard deck enables dozens of games for any group size and any number of players. Dice add further options. Combined weight: under 6 oz (170 g). Games that can be played with cards and dice should be documented on a reference card stored with the deck.
- Books: Physical books that people will actually read — not aspirational titles no one wants to open. One novel per adult, one children's book per child, one practical skills reference. A household that has read all their books by Day 10 is in worse shape than one that has three unread paperbacks left.
- Journals and writing supplies: Blank composition notebooks and pens. Structured journaling is associated with reduced anxiety and improved emotional processing. More importantly, it gives individuals private mental space in a household where privacy is otherwise gone.
- A physical game appropriate for household ages: Chess or checkers for an adult-heavy household; a family board game for mixed ages. Something that takes 30–90 minutes per session and requires enough engagement to prevent passive rumination.
- Music without internet: A battery-operated or hand-crank radio loaded with downloaded music, or a musical instrument if anyone in the household plays. Background music demonstrably improves group mood over silent confinement.
Assemble the morale kit with input from the people who will use it. A teenager who selected their own three books is more likely to read them on Day 22 than a teenager who was handed three books someone else chose.
The recreational block is a non-negotiable scheduled event, not free time to fill if work is done. Work is never done in an extended disruption. The recreational block happens at its scheduled time regardless of remaining tasks. It is maintenance on the system that runs everything else.
Grief, Loss, and What to Do About It
In a 30-day scenario there may be losses — property damage, animals lost, news of people you care about. There may be smaller losses that still carry weight: the comfortable routines gone, the ordinary pleasures unavailable, the uncertain future. These need to be acknowledged, not suppressed and not ruminated.
The difference between healthy grief and stuck grief is motion. Healthy grief is functional — the person can be present, can perform tasks, can connect with others, and the emotional pain is real but not totalizing. Stuck grief occupies every hour and blocks access to present-moment function.
Hold a space in the evening review anchor for naming difficult things. "This is hard and we are also managing it" is the correct frame — not toxic positivity ("everything will be fine") and not catastrophizing ("we are not going to survive this"). The facts are: the situation is genuinely difficult, and the household has specific capabilities and resources, and the next step is concrete. Return to the next step.
If a household member shows signs of acute stress disorder — intrusive recollections of the triggering event, avoidance of anything associated with it, persistent high arousal and difficulty sleeping over more than two weeks — that is beyond the scope of household management. It requires professional support when infrastructure allows.
For the full research framework on resilient trajectories and the five predictors of resilience during active emergencies, see the Building Resilience page. For the complete six-anchor schedule and role assignment framework, see the Routine in Chaos page. Both are in the Mindset foundation.
Chapter 11 checklist
- Write the six-anchor daily schedule on paper and post it where all household members can see it
- Assign household roles by functional track — every person has a named responsibility
- Build or locate the morale kit: at least 3 no-power engagement options per household member
- Establish the 60-minute recreational block at a fixed daily time — not optional, not moveable
- If children are present: confirm age-appropriate role, communication script, sleep-anchor item
- Teach the 90-second stress protocol to every adult in the household — practice it once today
- Schedule the check-in with your mutual aid network this week — social contact is maintenance
- Recognize the threshold: two stress signals in any household member = workload check and enforced rest
Chapter 12: Building Beyond 30 Days — What Comes Next
Psychological resilience is addressed. Your household has a schedule, assigned roles, a morale kit, and language for managing stress before it fractures the group. Now turn to the last question this guide can answer: what does Day 31 look like, and what do you build next? Thirty days is the horizon this guide was built for. What happens at Day 31 is the question this chapter answers honestly.
You are not done. The guide is done. There is a difference, and it matters.
Thirty days of managed disruption builds real capability: you understand your water system in a way you didn't before, you've made actual food with limited fuel, you've navigated household stress with some degree of method rather than pure reaction. These are genuine gains. They are also a foundation, not a destination. This chapter shows you the gap between where you are at Day 30 and where you need to be if this extends further — and what to build next.
The Honest Day 30 Audit
Before you plan what comes next, assess what you have. Four systems, evaluated at the end of 30 days:
Water: Is your water system sustainable or high-maintenance? If you're still collecting, hauling, and purifying every day, that's a working system — but it demands daily labor and has no redundancy. A 30-day system that depends on consistent personal effort is one illness, one injury, or one logistical failure away from a crisis. The next upgrade is a system that stores more and requires less daily intervention: a cistern, a permanent rainwater collection setup, or a hand-pumped well.
Food: How much of your stored supply remains? A household of four at the practical 2,000-calorie-per-person level consumes roughly 240,000–280,000 calories in 30 days — approximately 10 months of a typical rice-and-bean pantry if you started with 10 months stored, or a serious depletion if you started with less. What does your remaining supply depth look like in days? The production capability started in Chapter 10 begins contributing meaningfully around Day 45–60. The gap between your stored food running out and your garden producing substantially is the most dangerous interval of any extended disruption.
Energy: Generator fuel is almost certainly your largest constraint. A 3,500W generator run four hours per day at half load burns roughly 16 gallons (61 L) per week. Thirty days at that rate consumes 70–80 gallons (265–303 L). Very few households stored that volume. The next energy upgrade is solar for critical loads — not to replace the generator, but to free it for surge use and extend its fuel supply dramatically.
Community: The mutual aid relationships built in Phase 2 are the most undervalued asset on this list. A neighbor who has medical training, a neighbor who has a generator and extra fuel, a neighbor who has seeds and gardening skill — these assets don't require you to acquire and store them yourself. The question at Day 30 is whether those relationships are formalized enough to be relied on, or whether they're still the informal "we'd probably help each other" kind.

The Three Highest-Return Next Investments
The goal is not to build everything at once. It is to identify the single most fragile point in your current system and address it first. After that, the next fragile point. Use this framework to sequence your effort.
Water — highest priority for most urban residents: An apartment's water storage ceiling is lower than any other setting, and the city water system that normally handles this for you is the single point of failure in almost every urban emergency. The next investments are:
- Expand stored volume: Add 5-gallon (19-liter) stackable water jugs in every underused space: under beds, in closets, in corner spaces. A studio apartment can store 50–100 gallons (189–378 L) in existing spaces with some reorganization. That's 25–50 days for one person at the survival minimum.
- WaterBOB or bathtub bladder as surge storage: A WaterBOB fills a standard bathtub with up to 100 gallons (378 L) in 20 minutes from any running tap. Stored flat until needed, it is inexpensive and represents the fastest surge storage available in an apartment.
- Rainwater collection from your building: If you have a rooftop terrace, balcony, or any outdoor surface, even a small tarp (8×10 ft / 2.4×3 m) in a rainstorm produces meaningful water that can be purified. Check your building's policies and local regulations before installing any permanent collection setup.
- Investigate your building's water storage: Many large apartment buildings have rooftop tanks with several days of water. Know where yours is, how much it holds, and who controls it.
Food — container garden expansion: You are not going to feed yourself from a windowsill garden. You are going to supplement, reduce your consumption rate from stored goods, and build skills that matter at a larger scale when you have access to them. The expansion path:
- Add grow lights (a simple LED grow light on a timer costs an affordable amount and draws 40–60W) to extend the growing season and expand to a north-facing window or interior shelf space.
- Double your sprout rotation: three jars instead of one, cycling in three-day rotations, produces daily fresh food that adds genuine variety and Vitamin C to a canned-food diet.
- If your building has any rooftop or courtyard garden space, coordinate with building management. A group of residents managing a shared container garden is both a food production asset and a community-building activity.
Community formalization — your most important asset in urban settings: In an apartment building, your mutual aid network is literally your building. You are sharing infrastructure — water supply, gas lines, corridors, exit routes — with people you may barely know. A building with organized communication between residents is fundamentally different from one where each unit operates independently.
Specific actions to formalize your building's mutual aid:
- Propose a building-wide check-in protocol: a floor captain structure where one resident per floor takes responsibility for knowing whether all households on that floor are okay. This requires no special authority and creates no legal liability — it is simply neighborly structure.
- Create a building contacts list: name, unit number, phone (for normal times), radio or knock-code (for grid-down). This list should live on paper somewhere accessible.
- Identify building residents with specific skills: nurse, EMT, plumber, electrician, HAM radio operator. You don't need to know everyone's resume. You need to know who has which skill when you need it.
For complete detail on building community structures in apartment contexts, see the Mutual Aid page in the Community foundation.
Water — permanent collection and storage: The Day 30 upgrade for a suburban household with gutters is a proper rainwater collection system tied to meaningful storage. This is the difference between hauling water from a neighbor's pool and having a 275-gallon (1,040-liter) IBC tote filling itself in every rainstorm.
IBC tote installation is the standard next step. A 275-gallon (1,040-liter) intermediate bulk container with a 2-inch (5 cm) ball valve costs an affordable amount new, or is often available inexpensively from food distributors who sell them once-used. Connect one downspout to a first-flush diverter — a 15-minute PVC installation that diverts the first dirty flush of rain before filling the tank — and then to the IBC tote via standard 2-inch (5 cm) pipe. In a modest rainfall climate (20 in / 508 mm annually), a 1,000 sq ft (93 m²) roof fills a 275-gallon tank roughly twice per season.
Treat stored rainwater with the same two-method approach as Chapter 4: filtration plus chemical disinfection. Rainwater is microbiologically cleaner than surface water but is not potable without treatment.
Energy — small solar for critical loads: A generator that runs four hours per day consumes roughly 70 gallons (265 L) of fuel per month. The next upgrade is removing the lowest-watt critical loads from the generator and putting them on solar:
- A 200W panel with a 40Ah LiFePO4 battery and a 20A maximum power point tracking (MPPT) charge controller (a moderate investment as a package) handles phone charging, LED lighting, and a small communications radio indefinitely with 4+ peak sun hours per day.
- This frees generator fuel for the high-draw loads that cannot run on small solar: well pump, refrigerator, power tools.
- The sizing decision is described in full detail in the Solar Basics page in the Energy foundation. Do the load audit first before purchasing panels.
Food — expand garden and consider small livestock: Three 4×8 ft (1.2×2.4 m) raised beds succession-planted represent roughly 150–300 lbs (68–136 kg) of produce per season — a genuine food contribution, not a supplement. Two hens at laying age produce 10–14 eggs per week, providing a continuous protein and fat source with minimal daily effort. A backyard composting system turns kitchen scraps and garden waste into soil amendment that feeds the beds without external input. These three systems — beds, chickens, compost — form a closed loop that becomes more productive each season.
Water — permanent infrastructure: The high-maintenance water system of Days 1–30 — daily collection, purification, and storage management — needs to transition to a low-intervention system that produces consistently without daily labor. The three permanent upgrades in priority order:
- Hand pump on any existing well: If your well pump is electrically dependent, a hand pump installed alongside (many well casings accept a dual-pump arrangement) provides gravity-independent water access. This is a significant investment but eliminates the most critical vulnerability in rural water systems.
- Cistern with gravity feed: A 1,500-gallon (5,678-liter) or larger buried cistern fed by rainwater collection and gravity-fed to the house eliminates the need for daily water management. Rainwater collection math from your roof area, annual rainfall, and the formula in Chapter 4 tells you how quickly it refills.
- Spring development: If you have a spring on the property, a properly developed spring box with overflow piping and a covered collection structure provides a continuous gravity-fed source that requires minimal maintenance.
Energy — off-grid solar system sizing: The next energy investment for a rural property is a properly sized off-grid solar system that covers your critical loads without generator dependency. This is a significant investment — panel array, LiFePO4 battery bank, MPPT charge controller, inverter — but it eliminates the most persistent constraint of the 30-day scenario (fuel). The sizing method: total your critical load in watt-hours per day, divide by your daily peak sun hours, add 25% for inefficiency — that is your required panel array wattage. See the Solar Basics and Solar Off-Grid pages in the Energy foundation for the complete sizing calculation.
Food — perennial plantings and seed saving: Annual vegetable gardens feed you when they're producing. Perennial food systems feed you year after year with declining maintenance. Fruit trees, berry bushes, asparagus beds, and perennial herbs planted this season begin producing in seasons 2–5. Seed saving from this season's best performers builds a locally adapted seed stock that performs better than commercial seed in your specific microclimate over time. Both are Day 30+ investments with compounding returns.
The Relocation Decision Framework
At Day 30, some readers will be assessing whether to stay where they are or move. This is a high-stakes decision that deserves a systematic framework rather than a stress-driven reaction.
Stay when: - Your location has a reliable water source (well, spring, or substantial collection surface with storage) - Your location can produce food (garden-capable land or demonstrated container production capacity) - Your location has a defensible perimeter that your household can manage - Your mutual aid network is local — your community resources are here, not somewhere else
Leave when: - Your water source is contaminated, compromised, or drought-depleted and no alternative exists on the property - Security threats exceed your household's defensive capacity and cannot be addressed through community cooperation - A medical need cannot be managed without infrastructure that your location doesn't have - The physical structure cannot be made safe through the winter or your local climate cycle
The wrong decision in either direction is recoverable when made early. The right decision made late is often catastrophic. If you are genuinely uncertain at Day 30, set a 72-hour decision window: gather the specific information needed (is the water source actually compromised, or is it still viable with treatment? is the security threat credible or rumored?), make the decision at the end of that window, and execute it immediately. Do not let uncertainty become indefinite delay.
For the complete stay-or-go framework, supply depth thresholds, and home hardening criteria, see the Bug-in Planning page in the Mobility foundation.
Formalizing Your Long-Term Plan
Write it down. A plan that exists only in your head is the plan that doesn't fit the reality it was made for when you need it.
A one-page long-term plan contains four items:
- Water source: Primary source, treatment method, daily yield, storage capacity, and the next upgrade and its trigger condition.
- Food production plan: Current beds and container count, succession planting schedule, harvest windows, and the gap between current production and household caloric needs.
- Energy system: Current fuel depth in days, critical loads, solar or storage upgrade decision, and timeline.
- Community agreements: Names, contact methods, specific agreements ("John provides medical assessments; we provide fuel sharing for generator"), and check-in schedule.
Assign a review date — two weeks from today. The plan that isn't reviewed becomes the plan that no longer fits the situation.
This guide's job is done. The reader who has completed 30 days with functioning water, food, energy, and community systems is positioned for the next phase. That next phase is covered in the Homestead Blueprint guide — which addresses permanent water infrastructure, expanded food production, livestock, and whole-home energy systems — and the Food Independence guide, which covers garden design for caloric self-sufficiency, seed saving, and food preservation at scale.
Chapter 12 checklist
- Complete the Day 30 system audit: rate Water, Food, Energy, Community on three levels each
- Identify the single most fragile point in your current system — this is the next priority
- Write the three highest-return next investments for your specific setting
- Assess relocation vs. entrenchment: reliable water source? producible food? defensible position?
- Formalize mutual aid agreements: document names, resources, agreements, check-in schedule
- Write your one-page long-term plan with a review date two weeks from today
- Identify the next guide: Homestead Blueprint or Food Independence, depending on your gaps
Appendix A: Master Checklist — All 30 Days
Print this page. Use it as your daily operational reference after reading the guide. Check items as completed — not as known.
Phase 1 — Triage (Days 1–3)
Chapter 1: The Stay-or-Go Decision - [ ] Complete 30-min household assessment: water, heat, food, security, comms - [ ] Document leave triggers on paper — post where all household members can see - [ ] Brief every member: roles, rally point inside, rally point outside - [ ] Identify the most vulnerable household member and their specific needs - [ ] Fill all available containers from any running municipal or stored supply - [ ] Locate and test all communications devices — check battery levels - [ ] Confirm 72 hours of water and food for every person before moving on
Chapter 2: Water in the First 72 Hours - [ ] Fill every food-grade container from running municipal supply now - [ ] Drain water heater tank into clean containers if municipal supply is suspect - [ ] Identify Day 4–30 primary water source and the foot route to it - [ ] Test primary purification method — confirm it works, flow rate meets demand - [ ] Calculate household daily water need: people × 2 gal (7.6 L) = daily target - [ ] Establish a water use log starting Day 1 - [ ] Source a greywater reuse container for dishwashing and hygiene runoff
Chapter 3: Shelter and Warmth - [ ] Designate the warm room; move sleeping there if temperature is dropping - [ ] Seal warm room windows with plastic film, blankets, or cardboard - [ ] Confirm CO detector working for any combustion heat source - [ ] Test primary heat source: startup, function, fuel supply assessment - [ ] Assign one headlamp per person with fresh or charged batteries - [ ] Set up one 300+ lumen area light in the main operating space - [ ] Do a security walk of entry points — note any that need attention
Phase 2 — Stabilize (Days 4–14)
Chapter 4: Building a Sustainable Water System - [ ] Water source confirmed: primary, secondary, emergency fallback documented - [ ] Purification method matched to source threat type - [ ] Daily production verified: system meets household daily need - [ ] 3-container rotation system set up with fill dates on all containers - [ ] Rainwater collection surface and container identified or installed - [ ] Greywater reuse protocol established — destination for wash water defined - [ ] Calcium hypochlorite or sufficient bleach stockpiled for 30+ days
Chapter 5: Food Systems for Sustained Operations - [ ] Perishable inventory complete: consumption order set by time-to-spoilage - [ ] Household daily caloric need calculated; cross-referenced against stored supply - [ ] Fat sources confirmed in pantry: 20–35% of calories from fat target - [ ] Primary cooking method tested: one full meal completed start-to-finish - [ ] Fuel math complete: number of days cooking fuel lasts at household volume - [ ] Haybox cooking practiced once: insulation holds temperature 2+ hours - [ ] Multivitamin and Vitamin C supplements stocked
Chapter 6: Energy Management - [ ] Critical load audit complete: every device listed with wattage and daily hours - [ ] Medical devices identified with confirmed power backup strategy - [ ] Generator fuel requirement calculated for 30 days at critical-load runtime - [ ] Wood heat system assessed: firewood quantity, quality, and stove condition - [ ] Phantom loads eliminated: all non-critical devices unplugged - [ ] Solar or battery system confirmed operational if present - [ ] CO detector verified for every combustion energy source in use
Chapter 7: Security Posture - [ ] Motion-activated lighting installed or confirmed on all exposed sides - [ ] Primary door reinforced: 3-inch (7.6 cm) strike plate screws, deadbolt tested - [ ] OPSEC discipline in place: social media reviewed, household briefed - [ ] Situational monitoring established: battery radio, NOAA receiver, check-in schedule - [ ] Household watch rotation assigned: who is on awareness duty and when - [ ] Three neighbor check-ins completed within first week - [ ] Escalation protocol defined: threshold for changing security posture
Chapter 8: Medical Readiness and Hygiene - [ ] Dedicated handwashing station set up: container, basin, soap, drying method - [ ] Toilet contingency confirmed: flush capacity or backup bucket system - [ ] Medical supply audited: ORS ingredients, wound care supplies, prescription depth - [ ] Sick room protocol established: room, supplies, designated manager - [ ] All household members briefed on the 6 handwashing moments - [ ] Food prep hygiene system: two cutting surfaces, chlorine rinse solution - [ ] Physical readiness assessed: footwear, back support, work gloves in service
Chapter 9: Community and Communications - [ ] Three trusted households identified with non-cellular contact method confirmed - [ ] Daily check-in protocol established: time, channel or physical signal - [ ] Nearest 10 households mapped: name, size, known capabilities or vulnerabilities - [ ] Mutual aid agreement proposed to at least two trusted neighbors - [ ] Skills inventory of immediate network: medical, mechanical, comms, food production - [ ] GMRS or FRS network established if radios available in the circle - [ ] Everything documented on paper: numbers, frequencies, addresses, agreements
Phase 3 — Adapt (Days 15–30)
Chapter 10: Food Production Begins - [ ] Sprouting operation started: lentils or mung beans in a quart jar, Day 1 of cycle - [ ] At least one fast-maturing crop planted: radish or lettuce in any container - [ ] Three wild forageable species identified within walking distance - [ ] Hunting and fishing assessed: license status, gear, target species - [ ] Preservation capability inventoried: method for any harvested protein - [ ] Seed inventory built: days-to-harvest documented, planting window assessed - [ ] Compost pile started from food scraps and yard material
Chapter 11: Mental Resilience - [ ] Six-anchor daily schedule written on paper and posted for all to see - [ ] Household roles assigned by functional track — named responsibility per person - [ ] Morale kit assembled: at least 3 no-power engagement options per person - [ ] 60-minute recreational block scheduled daily at a fixed time - [ ] Age-appropriate child role, communication script, and sleep item confirmed - [ ] 90-second stress protocol taught to every adult in the household - [ ] Mutual aid check-in scheduled this week - [ ] Stress threshold defined and understood: two signals = workload check, not blame
Chapter 12: Building Beyond 30 Days - [ ] Day 30 system audit complete: Water / Food / Energy / Community rated - [ ] Single most fragile point identified — this is next priority - [ ] Three highest-return next investments written down for your setting - [ ] Relocation vs. entrenchment decision made with criteria documented - [ ] Mutual aid agreements formalized: names, resources, schedule on paper - [ ] One-page long-term plan written with two-week review date - [ ] Next guide identified: Homestead Blueprint or Food Independence
Appendix B: Household Needs Calculator
Fill in your household's numbers to replace the guide's worked examples with your own. Complete this on Day 1.
Section 1: Water Needs
| Variable | Formula | Your Numbers |
|---|---|---|
| Number of people in household | — | _____ people |
| Daily water — survival minimum | People × 1 gal (3.8 L) | _____ gal/day |
| Daily water — practical target | People × 2 gal (7.6 L) | _____ gal/day |
| Daily water — active labor | People × 3 gal (11.4 L) | _____ gal/day |
| 3-day emergency supply needed | Daily practical × 3 | _____ gal |
| 14-day target storage | Daily practical × 14 | _____ gal |
| 30-day target storage | Daily practical × 30 | _____ gal |
| Current stored water | Measure your containers | _____ gal |
| Supply in days at practical rate | Current stored ÷ daily practical | _____ days |
Purification method daily yield (fill in after testing):
| Method | Tested flow rate | Hours needed to meet daily need |
|---|---|---|
| Primary filter | _____ gal/hour | _____ hours/day |
| Chemical backup | N/A — batch treatment | — |
| Boiling backup | _____ gal/hour | _____ hours/day |
Section 2: Food and Caloric Needs
| Household member | Activity level | Daily calories needed |
|---|---|---|
| Adult 1 | Sedentary / Light / Active | 1,800 / 2,200 / 3,000+ kcal |
| Adult 2 | Sedentary / Light / Active | 1,800 / 2,200 / 3,000+ kcal |
| Child (age ___) | — | 1,400–1,800 kcal |
| Child (age ___) | — | 1,400–1,800 kcal |
| Additional member | — | _____ kcal |
| Household daily total | — | _____ kcal/day |
Pantry depth calculation:
| Variable | Formula | Your Numbers |
|---|---|---|
| Household daily caloric need | From table above | _____ kcal/day |
| Current stored calories | Inventory count | _____ kcal total |
| Supply depth in days | Stored ÷ daily need | _____ days |
| Target: 30-day supply | Daily need × 30 | _____ kcal needed |
| Gap to 30-day target | Target − current | _____ kcal to add |
Macronutrient check (roughly 20–35% of calories should come from fat):
| Fat target | Formula | Your Numbers |
|---|---|---|
| Daily fat calories needed (25%) | Daily kcal × 0.25 | _____ kcal from fat |
| Grams of fat per day | Fat kcal ÷ 9 | _____ grams fat/day |
| Fat sources in pantry | Count cooking oil, nuts, nut butter | _ lbs / ___ days supply |
Section 3: Energy Audit
List every device that needs power during a grid-down scenario:
| Device | Watts (from label) | Hours/day in use | Wh/day |
|---|---|---|---|
| CPAP / medical device | _____ W | _____ h | _____ Wh |
| Phone charging (1 phone) | 10–18 W | _____ h | _____ Wh |
| GMRS / ham radio | 5–15 W | _____ h | _____ Wh |
| LED lighting (per fixture) | 8–12 W | _____ h | _____ Wh |
| Refrigerator (if generator) | 60–150 W avg | 24 h | 1,440–3,600 Wh |
| Well pump (if generator) | 500–1,500 W | _____ h | _____ Wh |
| Other: __ | _____ W | _____ h | _____ Wh |
| Total critical load | — | — | _____ Wh/day |
Generator fuel planning:
| Variable | Formula | Your Numbers |
|---|---|---|
| Generator rated watts | From nameplate | _____ W |
| Typical load (50% of rated) | Rated × 0.5 | _____ W actual draw |
| Fuel consumption at 50% load | ~0.5 gal/hr for 3,500W | _____ gal/hr |
| Daily runtime (hours) | From use pattern | _____ hr/day |
| Daily fuel consumption | Gal/hr × daily runtime | _____ gal/day |
| 30-day fuel requirement | Daily × 30 | _____ gal total |
| Current fuel stored | Measure | _____ gal |
| Generator supply in days | Current ÷ daily consumption | _____ days |
Appendix C: Quick-Reference Water Treatment Guide
Print this card. Keep it with your water treatment supplies. Review it before each treatment batch.
| Method | What it kills | Dose / Procedure | Contact time | Limits and notes |
|---|---|---|---|---|
| Boiling | Bacteria, viruses, protozoa (all biological pathogens) | Bring to a rolling boil; maintain 1 full minute | 1 min at sea level; 3 min above 6,500 ft / 2,000 m | Does not remove chemicals, heavy metals, or radiological contamination. Requires fuel. |
| Liquid bleach (unscented, 6–8.25% sodium hypochlorite) | Bacteria, viruses | Clear water: 8 drops per gallon (1.4 ml / 3.8 L). Turbid water: 16 drops per gallon. Stir; let stand. | 30 min clear water; 60 min cold or turbid water | Does not reliably kill Cryptosporidium. 6-month shelf life after opening. Loses potency over time. |
| Calcium hypochlorite (pool shock, 68–78% concentration) | Bacteria, viruses | Stock solution: dissolve 1 heaping teaspoon (6g) in 2 gal (7.6 L) water. Use 1 part stock to 100 parts water (about 1 cup / 237 ml per 10 gal / 38 L). | 30 min clear water; 60 min cold or turbid water | 1 lb (454 g) treats approximately 10,000 gal (37,850 L). 5–10-year shelf life sealed. Correct concentration critical — test with pool test strips. |
| Hollow-fiber filter (Sawyer Squeeze or equivalent) | Bacteria, protozoa (0.1-micron absolute) | Pump or gravity-feed through filter | Instantaneous — purified on exit | Does not kill viruses. Requires backflushing after every heavy use. Freezing damages fibers. |
| Gravity filter (Berkey-style with Black elements) | Bacteria, protozoa; reduces viruses and heavy metals | Fill upper chamber; gravity draws through filters | ~1 hour per 2 gal (7.6 L) depending on filter count | Heavy metals require specific filter element — verify before purchasing. Requires priming. |
| UV purifier (SteriPen or equivalent) | Bacteria, viruses, protozoa | Stir in clear water per manufacturer instructions (typically 90 sec per 32 oz / 1 L) | Per device instructions | Requires batteries. Ineffective in turbid water — pre-filter first. Does not remove chemicals. |
| Two-method combination (recommended) | All biological pathogens including viruses | Filter first (removes protozoa and bacteria, improves water clarity), then chemical treatment (kills viruses) | Chemical contact time applies after filtering | Most reliable field method. Filter extends chemical supply by removing biological load. |
Pre-treatment for turbid water (always do this first): 1. Pour water through multiple layers of clean cloth, a bandana, or a coffee filter. 2. Allow to settle undisturbed for 30 minutes if possible; carefully pour off the clearer top portion. 3. Proceed with primary treatment method.
Signs water needs treatment even if it looks clear: - Source is downstream of human habitation or livestock areas - Recent flooding has occurred in the area - Water has an odor or unusual color that settles to the bottom - Source is any urban surface water
Appendix D: 14-Day Pantry Meal Plan
All meals use pantry staples only: dry rice, dry lentils/beans, rolled oats, canned vegetables, canned fish/chicken/meat, cooking oil, salt, dried herbs and spices, nut butter, honey, powdered milk, and pasta. Assumes a wood or propane cooking source.
Target: 2,000–2,200 kcal per person per day. Sprouts appear starting Day 4.
| Day | Breakfast | Lunch | Dinner | Est. kcal/person |
|---|---|---|---|---|
| Day 1 | Oatmeal with oil and salt; coffee or tea | Crackers with nut butter; canned fruit | Rice and canned beans with oil and salt | 2,050 |
| Day 2 | Oatmeal with powdered milk; honey | Canned fish on crackers; hot broth | Pasta with canned tomatoes and olive oil | 2,100 |
| Day 3 | Fried rice from Day 1 leftovers with oil | Bean soup from dried lentils; crackers | Canned chicken with rice; hot tea | 2,000 |
| Day 4 | Oatmeal with honey; start lentil sprouts | Crackers with nut butter; first sprouts if ready | Rice and lentils cooked together (dal); oil | 2,100 |
| Day 5 | Cornmeal porridge or grits with oil and salt | Lentil soup; crackers | Pasta with canned tuna and olive oil | 2,150 |
| Day 6 | Oatmeal; powdered milk | Bean and rice bowl with oil and dried herbs | Canned chicken stew with rice | 2,050 |
| Day 7 | Dutch oven corn bread (cornmeal, salt, oil, water); honey | Corn bread with nut butter; broth | Dutch oven bean pot: beans, dried onion flakes, oil, salt | 2,200 |
| Day 8 | Oatmeal with sprouted lentils mixed in; oil | Rice and sprout bowl with oil and salt | Pasta with canned tomatoes, canned fish, olive oil | 2,100 |
| Day 9 | Fried oat cakes (oats, water, oil, salt, pan-fried) | Nut butter on corn bread or crackers; broth | Canned bean soup with pasta; hot tea | 2,050 |
| Day 10 | Rice porridge (congee) with salt and oil | Crackers with nut butter and honey | Rice and canned chicken with oil and herbs | 2,000 |
| Day 11 | Oatmeal with powdered milk and honey | Lentil soup; sprouts as garnish | Pasta with canned tomatoes and oil | 2,100 |
| Day 12 | Cornmeal porridge; hot tea | Rice bowl with canned beans and oil | Canned fish stew with rice and dried herbs | 2,050 |
| Day 13 | Oatmeal; sprouted lentils | Bean and grain soup with crackers | Rice with canned chicken, oil, dried spices | 2,100 |
| Day 14 | Dutch oven corn bread; honey; powdered milk | Corn bread with nut butter; broth | Dutch oven rice and bean pot with oil, salt, herbs | 2,200 |
Cooking notes:
- Haybox method: Bring lentils, beans, or rice to a boil, boil five minutes, then transfer the covered pot into an insulated box (cooler lined with blankets, or a sleeping bag wrapped around the pot). Most legumes finish cooking in 2–4 hours without additional fuel. This cuts cooking fuel consumption 40–50% for slow-cook meals.
- Fat management: Total cooking oil consumed over 14 days at this plan is approximately 1–1.5 cups (237–355 ml) per person. Track oil consumption separately — it is the most calorie-dense and most easily underestimated item in any pantry.
- Rotation trigger: On Day 7 and Day 14, use the Dutch oven as a morale event as much as a cooking method. A corn bread or bean pot that takes 45 minutes and smells good is a significant psychological lift after a week of simpler meals.
- Caloric adjustment for physical labor: If household members are doing sustained heavy labor (hauling water, chopping wood, construction), add one additional tablespoon (15 ml) of oil per major meal to increase caloric density without additional bulk or cooking fuel.
For the complete pantry staples list, layered pantry model, and caloric math by household member type, see the Pantry page in the Food foundation.
Appendix E: Foundation Pages — Where to Go Next
This guide provides operational summaries. Foundation pages provide complete procedures, tables, and decision frameworks. Use this table to find depth on any chapter topic.
| Guide Chapter | Foundation Page | What it adds beyond this guide |
|---|---|---|
| Ch. 1: Stay-or-Go Decision | Bug-in Planning | Complete supply depth tables by duration; full home hardening procedure; daily ops structure for multi-week stays |
| Ch. 1: Stay-or-Go Decision | Bug-Out Planning | Departure trigger framework; destination requirements; route planning and vehicle loading |
| Ch. 1: Stay-or-Go Decision | Situational Awareness | Cooper Color Code; pre-attack indicators; Observe-Orient-Decide-Act (OODA) loop under stress |
| Ch. 2: Water First 72 Hours | Water Containers | Container types; food-grade requirements; full capacity math |
| Ch. 2: Water First 72 Hours | Water Sourcing | Priority source order; urban source identification; natural source assessment |
| Ch. 2: Water First 72 Hours | Water Boiling | Full boiling procedure; fuel cost per day; aeration for taste improvement |
| Ch. 2: Water First 72 Hours | Chemical Treatment | EPA bleach dosing table; calcium hypochlorite stock solution method; contact times by temperature |
| Ch. 3: Shelter and Warmth | Shelter Insulation | R-value basics; warm room setup; window insulation tactics |
| Ch. 3: Shelter and Warmth | Wood Heat | Stove types; startup/shutdown procedure; creosote prevention |
| Ch. 3: Shelter and Warmth | Firewood | BTU by wood species; annual needs calculation; seasoning status assessment |
| Ch. 4: Sustainable Water | Water Filtration | Filter selection by threat type; biosand filter construction; ceramic vs. hollow-fiber comparison |
| Ch. 4: Sustainable Water | Rainwater Harvesting | Collection formula; first-flush diverter installation; cistern options; treatment train |
| Ch. 5: Food Systems | Pantry | Layered pantry model; full 12-staple list; caloric math by household member |
| Ch. 5: Food Systems | Cooking Without Power | Camp stove fuel math; rocket stove setup; haybox procedure; solar oven use |
| Ch. 5: Food Systems | Nutrition | Caloric targets by activity level; the 5 micronutrient gaps; sprouting as fresh nutrition |
| Ch. 6: Energy Management | Solar Basics | Panel type comparison; peak sun hours by region; STC vs. real-world output |
| Ch. 6: Energy Management | Batteries | Chemistry comparison; LiFePO4 vs. lead-acid; sizing method; load audit procedure |
| Ch. 6: Energy Management | Generators | Generator types and sizing; CO safety; transfer switch requirement; fuel math |
| Ch. 7: Security | OPSEC | Five-step OPSEC process; social media discipline; grey man concept in detail |
| Ch. 7: Security | Perimeter Security | Detection layer; delay layer; three-layer framework; lighting placement |
| Ch. 8: Medical and Hygiene | Hygiene | Hygiene hierarchy; six critical handwashing moments; sanitation without utilities |
| Ch. 8: Medical and Hygiene | Shelter Sanitation | Composting toilet; sawdust bucket procedure; outhouse siting rules |
| Ch. 9: Community | GMRS Radio | Licensing; channel plans; repeater access; range by environment |
| Ch. 9: Community | Mutual Aid | Circle structure; skills inventory; mutual aid agreement template |
| Ch. 10: Food Production | Gardening | Raised bed construction; Mel's Mix; days-to-harvest table; succession planting |
| Ch. 10: Food Production | Foraging Wild Food | Universal Edibility Test; complete beginner species profiles; seasonal calendar |
| Ch. 10: Food Production | Hunting for Food | Licensing requirements; firearm safety rules; deer field dressing procedure |
| Ch. 10: Food Production | Smoking | Hot and cold smoking procedures; wood species profiles; safe internal temperatures |
| Ch. 10: Food Production | Dehydrating | USDA temperature targets; moisture content testing; equipment options |
| Ch. 11: Mental Resilience | Building Resilience | Bonanno's trajectory research; five resilience predictors; community resilience model |
| Ch. 11: Mental Resilience | Routine in Chaos | Neuroscience of routine; complete six-anchor schedule; role assignment framework |
| Ch. 11: Mental Resilience | Stress Management | Stress cascade physiology; HPA dysregulation; 90-second protocol; group dynamics |
| Ch. 11: Mental Resilience | Children in Emergencies | Age-band guidance; communication scripts; stress signal identification |
| Ch. 11: Mental Resilience | Boredom in Emergencies | Third-quarter phenomenon; morale kit components; converting idle time to capability |
| Ch. 12: Beyond 30 Days | Bug-in Planning | When to flip the stay decision; location sustainability criteria |
| Ch. 12: Beyond 30 Days | Solar Off-Grid | Full off-grid system sizing; component selection; battery bank design |
| Ch. 12: Beyond 30 Days | Rainwater Harvesting | Permanent cistern options; IBC tote installation; legal status by state |
| Ch. 12: Beyond 30 Days | Seeds | Seed saving procedures; locally adapted seed stock; long-term storage |