Snow Shelters
A properly built snow shelter maintains an interior temperature between 25°F and 32°F (-4°C and 0°C) regardless of outside air temperature. When outside temperatures drop to -40°F (-40°C) — a survivable temperature inside a snow shelter, a fatal one without shelter in minutes — this differential means the difference between living and freezing. Snow is one of the best natural insulating materials available: the air trapped within snowpack gives it an R-value of approximately R-1 per inch (25 mm), comparable to loose-fill cellulose insulation.
This guide covers two types: the quinzhee (built by piling snow and hollowing it out) and the snow cave (dug into an existing snowbank). Both are Tier 1 procedures — you will learn them step-by-step from zero.
Before You Start
Wet clothing kills faster than cold air. Before building any snow shelter, assess your sweat situation. If you are already wet or will be soaked by the physical effort of construction, hypothermia risk is elevated. Build quickly, rest frequently, and replace wet layers if possible. The effort of building a quinzhee will make you sweat even in -20°F (-29°C) conditions — plan for it.

Snow Shelter Comparison
| Feature | Quinzhee | Snow Cave |
|---|---|---|
| Snow required | Any snow depth ≥ 4 ft (1.2 m) or piled | Existing slope/drift, 6–8 ft (1.8–2.4 m) deep minimum |
| Build time | 2–3 hours (includes mandatory 2-hour wait) | 1–2 hours if good snowbank exists |
| Physical effort | Moderate (piling + hollowing) | High (excavating consolidated snow) |
| Structural risk | Lower — piled snow consolidates predictably | Higher — collapse possible if ceiling too thin |
| Temperature inside | 25–32°F (-4 to 0°C) | 25–32°F (-4 to 0°C) |
| Ventilation need | Critical — same as snow cave | Critical — small hole required |
| Skill to build | Beginner — any snow conditions | Moderate — requires good snowbank assessment |
When to choose which: If you are in open terrain with loose snow and no natural banks, build a quinzhee. If you are in mountainous terrain with deep consolidated snow on a slope, a snow cave is faster. Never dig a snow cave into a cornice, a wind-loaded slope, or a slope with obvious avalanche indicators (cracking snow, hollow "whomp" sounds underfoot, recent avalanche debris).
Part 1 — Building a Quinzhee
What You Need
- Enough loose snow to pile into a mound approximately 7–8 ft (2.1–2.4 m) tall and 10–12 ft (3–3.6 m) in diameter
- 15–20 sticks or branches cut to exactly 12 in (30 cm) — these are your wall-thickness probes
- A shovel, a saucepan, a pot lid, or two improvised scooping devices
- 2–3 hours total time (the mandatory sintering wait is not optional)
Step 1 — Choose Your Location
The quinzhee site must meet these conditions:
- Flat or very slightly sloped ground (avoid depressions where cold air pools)
- Accessible loose snow nearby — you will move large quantities
- At least 50 ft (15 m) from running water (under-ice cavities and thin ice are hazards)
- Sheltered from direct wind if possible — wind during construction and sleeping increases heat loss
If the site is exposed, orient the entrance so it faces away from the prevailing wind, or at 90 degrees to wind direction. Never orient the entrance into the wind — it acts as a scoop and pushes cold air directly into your sleeping space.
Step 2 — Pile the Snow Mound
Pile all available loose snow into a mound at least 7 ft (2.1 m) tall and 9–10 ft (2.7–3 m) in diameter. This is larger than it looks — you are trying to create enough wall thickness to retain heat after hollowing.
Piling technique: 1. If you have a pack or duffel bag, fill it and place it at the center of where you want the mound. This bag represents the interior space and tells you when you have enough snow surrounding it. 2. Pile snow from all sides onto the mound. Compress it as you go — stamp it down with your feet or press with your hands. Dense piles sinter faster. 3. Taper the top to a rounded dome shape, not a flat plateau. A dome distributes load and sheds wind. 4. Minimum finished height: 7 ft (2.1 m). Do not shortcut this — the ceiling will be at least 2 ft (60 cm) above your sleeping height, meaning a 7 ft pile gives you roughly 4–5 ft (1.2–1.5 m) of usable interior height.
Step 3 — Insert Depth Probes (Critical Step)
This step is what separates safe quinzhees from collapse hazards.
Before sintering begins, push all your 12-inch (30 cm) sticks horizontally into the outside surface of the mound, spaced 12–18 in (30–45 cm) apart across the entire surface. Push them all the way to the hilt.
These probes mark the wall thickness limit. When you hollow from inside, you stop digging when you touch a probe tip. This ensures uniform 12-inch (30 cm) wall thickness throughout. Walls thinner than 10 in (25 cm) can collapse under their own weight.
Step 4 — Wait 2 Hours (Sintering)
Do not skip this step. Freshly piled loose snow is mechanically weak — individual crystals are not bonded. When you hollow it immediately, the roof can crack and collapse.
During the 2-hour sintering period, a physical process called pressure sintering occurs: snow crystals under the weight of the pile recrystallize at their contact points and bond together. After 2 hours in temperatures between 15°F and 28°F (-9°C and -2°C), the mound becomes significantly stronger — the same structural principle that makes packed snowballs hard.
What to do during the wait: - Build a fire nearby and dry wet clothing (see Fire Starting) - Gather additional insulation for a ground bed - Eat and drink to maintain core temperature - Scout the area for other resources
In very cold conditions (below -10°F / -23°C), sintering takes longer — allow 3 hours. In temperatures near freezing (30–32°F / -1 to 0°C), 90 minutes may suffice.
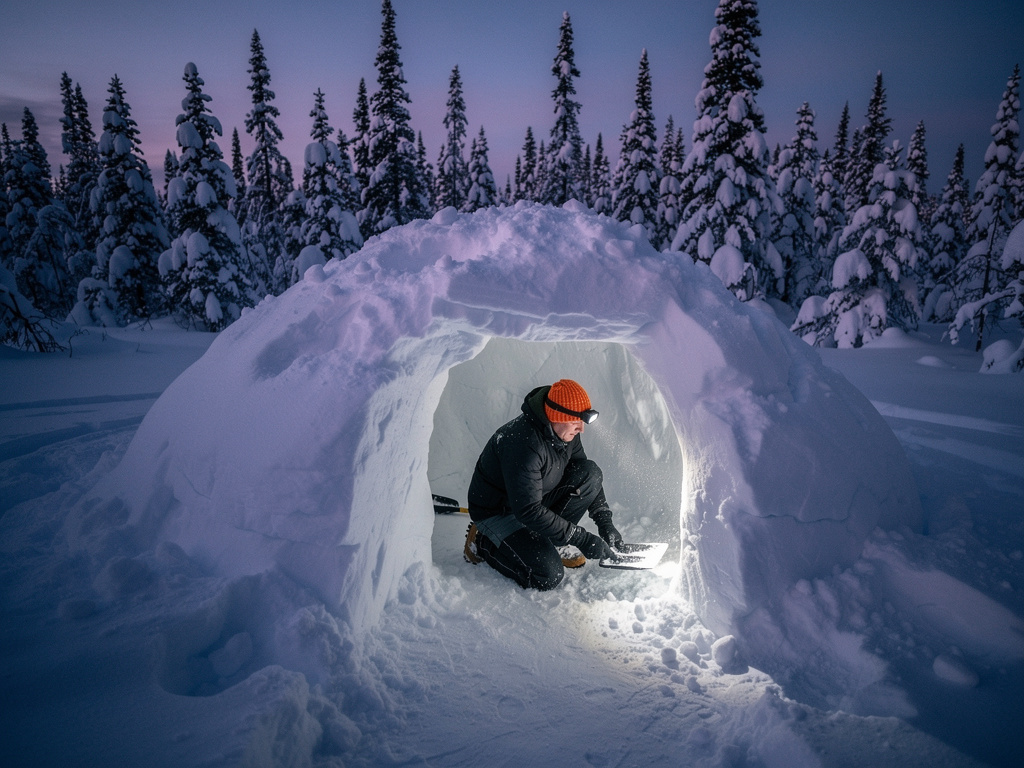
Step 5 — Dig the Entrance Tunnel
After sintering, begin the tunnel from outside. The tunnel design is specific and matters:
- Angle: Dig the entrance angling slightly upward into the mound. The entrance should be lower than the sleeping platform inside. Cold air is denser than warm air and drains out through the lower entrance; warm air from your body heat rises and stays at the sleeping level.
- Width: 24–28 in (60–70 cm) wide — enough to crawl through with a pack.
- Height: 24–30 in (60–75 cm) — low enough to retain heat, high enough to crawl comfortably.
- Length: 3–4 ft (0.9–1.2 m) from the outside wall to the interior chamber.
Step 6 — Hollow the Interior Chamber
Work from inside the tunnel, removing snow toward the center of the mound:
- Enter the tunnel and begin carving the chamber. Work methodically outward from the tunnel entrance in all directions.
- Carve a sleeping platform — a raised shelf 8–12 in (20–30 cm) above the floor of the entrance tunnel. This elevated sleeping position captures warm air rising from your body.
- Dig outward until your fingers touch the first depth probe. Stop there — do not go further. Move to the next section.
- The chamber ceiling should be domed, not flat. A domed ceiling directs melt drips down the walls rather than onto your sleeping area.
- Smooth the interior ceiling surface. Rough bumps create drip points where surface melt accumulates; smooth surfaces channel water to the walls.
Removing excavated snow: Pass buckets, pots, or bags of snow out through the tunnel to a partner, or push it out with your feet as you work. Pack removed snow around the tunnel entrance to reinforce it.
Step 7 — Create a Ventilation Hole
Before sleeping in the quinzhee, use a stick or trekking pole to poke a ventilation hole through the roof at an angle. The hole should be:
- Located near the peak of the dome
- Angled (not straight vertical) to prevent snow from falling through
- Approximately 2 in (5 cm) in diameter
- Kept clear — check it every 2–3 hours during a long sleep
CO₂ and Oxygen Depletion
Two people in a sealed snow shelter produce enough CO₂ to cause headaches and drowsiness within 2–3 hours. One person can survive 6–8 hours before symptoms appear — but in an oxygen-deficient space, impairment happens before you notice it. Keep the ventilation hole clear at all times. If you wake with a headache, immediately push through the ceiling with your fist to open a larger vent before anything else.
Step 8 — Mark Your Shelter Exterior
If snowfall is expected, the quinzhee can become invisible from outside in less than an hour. Before sleeping:
- Mark the entrance with a standing branch, ski pole, or bright-colored gear.
- If buried by snow, the entrance tunnel may require clearing. Leave a tool accessible from inside (the shovel or pot you used to build with).
Part 2 — Building a Snow Cave
A snow cave requires an existing consolidated snowbank at least 6–8 ft (1.8–2.4 m) deep. Ideal locations: the leeward side of a hill, a natural drift against a boulder or forest edge, or a cut bank in deep mountain snowpack.
Slope and Snow Assessment
Before digging, probe the bank:
- Push a trekking pole or branch straight in horizontally. If it goes 5+ ft (1.5+ m) without resistance change, the snowpack is consistent enough to hollow.
- Knock the surface with a fist. Hollow "whumping" sounds indicate unstable wind slab — find a different location. Solid, consistent thump means stable consolidated snow.
- Do not dig into slopes steeper than 35 degrees — avalanche risk is high.
- Avoid cornices — they are overhanging snow formations that collapse without warning.
Digging Procedure
-
Start the horizontal tunnel at the base of the bank. Dig straight in for 3–4 ft (0.9–1.2 m) at a slight upward angle (5–10 degrees above horizontal).
-
Angle upward into the sleeping chamber. After the initial horizontal section, angle your excavation upward. The sleeping platform must be higher than the entrance tunnel — this is the same cold-air-drain principle as the quinzhee.
-
Widen the chamber once you have created enough clearance to turn your body. Carve upward and outward. Target minimum interior dimensions: 7 ft (2.1 m) long × 5 ft (1.5 m) wide × 4 ft (1.2 m) tall at the peak.
-
Dome the ceiling. Same as the quinzhee — smooth dome sheds drips to the walls.
-
Check wall thickness. Use your depth probes or a straight stick. Minimum ceiling thickness: 12 in (30 cm). Check the walls too — any point thinner than 10 in (25 cm) needs to be reinforced by packing more snow from outside onto that section.
-
Punch a ventilation hole through the roof at the peak. 2 in (5 cm) diameter, angled.
-
Block the entrance with a pack, snow block, or stuffed bag. Leave a 3–4 in (7.5–10 cm) gap for air circulation.
Sleeping and Thermal Management
Ground Insulation
The snow floor is 32°F (0°C) or colder. Direct contact with it will chill you through conduction even in a sleeping bag. You must insulate:
- Minimum 3 in (7.5 cm) of compressed insulating material between your body and the snow floor
- Options: sleeping pad, pine boughs (2–3 in / 5–7.5 cm thick), packed clothing, a foam sit pad
- Sleeping bags compress under body weight — their R-value at compressed points drops to near zero. Ground insulation supplements what the bag cannot provide
Candle Use
A single votive candle (burns 10–15 hours, inexpensive (sold in multipacks)) raises the interior temperature of a snow shelter by 3–5°F (1.7–2.8°C) and provides enough light for basic tasks. It also serves as an oxygen indicator — if the flame flickers and yellows or goes out, the CO₂ level is rising and ventilation must be improved immediately. See Lighting for candle lantern options that are safer in enclosed spaces.
Temperature Reality
A solo occupant in a sleeping bag rated to 0°F (-18°C) inside a properly built quinzhee in -30°F (-34°C) outside air will be warm enough for survival. Interior temperature stabilizes between 25°F and 32°F (-4°C and 0°C) from body heat alone. Two occupants raise this to near 32°F (0°C) consistently. This is cold by comfort standards but survivable indefinitely.
Field Note
The interior of a well-built snow shelter "sweats" — the ceiling and walls gradually develop a glaze of ice from your breath's moisture. This is normal and actually strengthens the structure. The ice layer is a good sign. If you see bare unglazed snow with visible crystal structure in the morning, it means temperatures were too cold for glazing — the shelter is structurally stable but the ventilation may have been excessive.
Critical Failure Modes
| Failure | Consequence | Prevention |
|---|---|---|
| No ventilation hole | CO₂ buildup, unconsciousness | Always punch vent hole, check every 2–3 hours |
| Skipped sintering wait | Quinzhee roof collapses | Wait full 2 hours before hollowing |
| Walls too thin | Collapse under weight or wind | Use 12-inch (30 cm) probe sticks, stop when you touch one |
| Sleeping on snow floor | Hypothermia from conduction | Minimum 3 in (7.5 cm) insulation under body |
| Entrance faces wind | Cold air pumps into chamber | Orient entrance perpendicular or away from wind |
| Entry tunnel too high | Warm air escapes through tunnel | Keep entrance lower than sleeping platform |
| No exterior marker | Shelter buried, can't be found | Always mark entrance with visible pole or gear |
After the Emergency
A quinzhee or snow cave is a one-to-three-night solution, not a long-term habitat. Once rescued or once the immediate emergency passes:
- If staying in the area, reinforce the shelter daily — walls compress and can thin over multiple days.
- For longer winter stays, transition to a tarp-over-debris setup in a more sheltered location: see Tarp Shelters and Debris Shelters for complementary techniques.
- For ongoing cold-weather insulation principles, see Insulation.