Flood Protection
Flooding is the most common and costly natural disaster in the United States, causing an average of $8 billion in property damage annually. Unlike a tornado, flooding rarely provides zero warning — but most homeowners do nothing with the advance notice because they don't know what to do, in what order, or at what cost.
This page teaches you the two fundamental strategies (wet-proofing versus dry-proofing), the mechanical systems that support each, and how to install them — step by step — assuming you have never done this before. Before any physical work, you need one key number: your Base Flood Elevation (BFE).
Step 1 — Find Your Base Flood Elevation
The Base Flood Elevation (BFE) is the water surface elevation during a "100-year flood" (1% annual chance) at your location, expressed in feet above sea level. Every flood protection decision depends on knowing how your lowest floor elevation compares to the BFE.
How to find your BFE:
- Go to msc.fema.gov and enter your address. Download your Flood Insurance Rate Map (FIRM) panel.
- Locate your property on the FIRM. If it falls in Zone AE, your BFE is printed on the map. Zone X properties have no stated BFE (minimal flood hazard).
- Call your county floodplain administrator (listed at floodplain.org) if the map is unclear. This call is free and usually takes 10 minutes.
- Find your finished floor elevation. For a slab-on-grade home, measure from the finished floor to grade at the front door sill. For a home with a basement, note the basement floor elevation separately.
- Calculate the difference: BFE minus lowest floor elevation = your flood depth exposure. A negative number (floor below BFE) means water will enter your lowest level in a 100-year flood without active intervention.
Why This Number Matters
If your basement floor is 2 feet (0.6 m) below BFE, even a "modest" flood at BFE depth will fill your basement with 2 feet of water. Dry-proofing a basement to that depth costs significantly more than installing flood vents and accepting that the basement will flood. Knowing your exposure drives the right strategy.
Step 2 — Choose Your Strategy: Wet-Proofing vs Dry-Proofing
These are not competing approaches — they apply to different parts of your home:
Wet-proofing (flood venting): You accept that water will enter the lowest enclosed space (crawl space or unfinished basement) but control the rate of entry and exit so hydrostatic pressure does not collapse the walls. Best for: crawl spaces, unfinished basements, and enclosed areas below BFE.
Dry-proofing (flood barriers and waterproofing): You prevent water from entering at all by sealing the building envelope and using barriers. Best for: main living areas, finished basements that are above BFE by less than 3 feet (0.9 m). Federal Emergency Management Agency (FEMA) does not recommend dry-proofing for enclosed areas more than 3 feet (0.9 m) below BFE because the hydrostatic pressure eventually overwhelms any seal.
Most homes need both: wet-proofing for below-grade enclosed spaces, dry-proofing for above-grade entry points and low windows.
Step 3 — Install Flood Vents (Wet-Proofing)
FEMA requires flood vents in enclosed areas below BFE when a structure is in a Special Flood Hazard Area (SFHA). The sizing standard is 1 square inch (6.45 cm²) of vent net open area per 1 square foot (929 cm²) of enclosed floor area.
A 1,000 sq ft (93 m²) crawl space requires at least 1,000 sq inches (6,452 cm²) of flood vent opening.
Step-by-step flood vent installation:
- Count existing vents and measure the enclosed floor area. Most standard foundation vents provide 50–75 sq in (323–484 cm²) of net free area — far less than the FEMA-required ratio. You will likely need to add vents.
- Calculate the number of vents needed. Divide the floor area (sq ft) by the net free area per vent (sq in). Example: 1,200 sq ft / 75 sq in per vent = 16 vents minimum.
- Lay out vent locations. Vents must be on at least two sides of the enclosed area to allow flood water to flow through (not just in). Space them as evenly as possible.
- Cut the opening. For poured concrete foundations: rent a core drill with a 6-inch (15 cm) diamond bit — approximately $80/day — and drill from outside. For block foundations: knock out one block and mortar in a frame. Wear eye protection; concrete dust is silicogenic.
- Insert the flood vent unit. Smart Vent (ICC-ES-tested) and Aquivent (FEMA-accepted) are the two most common residential products. Cost: $50–$150 per unit. Insert from outside, attach the interior flange with masonry screws, and caulk the exterior perimeter with hydraulic cement.
- Test operation. Smart Vents have a float mechanism that opens automatically when water reaches approximately 6 inches (15 cm) depth — press the test button if available, or pour water over the exterior face to verify the louvers open.
Flood Vents in Basements
If you have a finished basement, adding flood vents is a significant decision — water will enter and damage finishes. Consider whether flood vents plus non-combustible drywall (cement board, not paper-faced gypsum) make more sense than aggressive dry-proofing. Discuss with your insurance agent before deciding — flood vents may lower your flood insurance premium.
Step 4 — Size and Install a Sump Pump
A sump pump is the active mechanical defense against basement flooding. It must be sized correctly — an undersized pump drowns in a serious rain event.
Sump pump sizing:
The relevant rating is gallons per hour (GPH) at a given "head" (vertical lift from the pit to the discharge point). Most residential discharge runs are 8–12 feet (2.4–3.7 m) vertical.
| Basement Risk Level | Recommended Pump Capacity | Horsepower |
|---|---|---|
| Low (occasional seepage) | 1,500–2,000 GPH at 10 ft (3 m) head | 1/3 HP |
| Moderate (spring flooding) | 2,000–3,000 GPH at 10 ft head | 1/2 HP |
| High (seasonal, near water table) | 3,000–5,000 GPH at 10 ft head | 3/4–1 HP |
Reliable brands: Zoeller M53 (1/3 HP, $150–$180), Wayne CDU980E (3/4 HP, $180–$220), Liberty 287 (1/2 HP, $200–$250).
Sump pit and pump installation:
- Locate the lowest point of the basement floor. This is usually near a drain or a wet corner. Mark a circle 18 inches (46 cm) in diameter.
- Dig the pit. Use a rotary hammer drill with a cold chisel bit to break the concrete, then dig the pit 24 inches (61 cm) deep with a post-hole digger. Concrete breaking generates silica dust — wear an N95 respirator.
- Set the sump liner. Lower a perforated plastic sump liner (18-inch / 46 cm diameter, 24-inch / 61 cm deep) into the pit. Fill around it with clean pea gravel to just below the floor level.
- Replace the concrete. Mix a bag of fast-setting concrete (Quikrete 5000) and pour around the liner collar, screed flush with the floor. Allow 24-hour cure before loading.
- Install the pump. Place the pump on the pit floor. Connect 1.5-inch (3.8 cm) PVC discharge pipe from the pump outlet, run it up the wall, and connect to a check valve (to prevent backflow) and then to the exterior discharge point minimum 10 feet (3 m) from the foundation.
- Install the backup pump. A battery-backup pump (Basement Watchdog, Wayne WSB1275, or similar) sits above the primary pump on a float set 2 inches (5 cm) higher than the primary float. When the primary fails or is overwhelmed, the backup activates automatically. An affordable addition that is not optional in flood-prone homes.
- Test the system. Pour 5 gallons (19 L) of water into the pit quickly to confirm the pump activates, the check valve holds, and discharge exits far from the foundation.
Field Note
The most common sump pump failure mode during a flood event is power outage — exactly when you need it most. A battery-backup pump rated for 10,000–15,000 GPH total run capacity will handle most multi-hour outages. For 24-hour or longer protection, consider a water-pressure-operated backup pump (WaterWatch, Basement Watchdog Water-Powered) that runs off municipal water pressure with no electricity at all — at the cost of using 2 gallons (7.6 L) of city water per gallon pumped.
Step 5 — Install a French Drain
A French drain intercepts groundwater and surface water before it reaches the foundation, reducing the load on your sump pump and lowering the risk of wall seepage.
When to install a French drain:
- Water seeps through foundation walls after rain (not through cracks, but through the pores of the concrete or block)
- The yard slopes toward the house
- Downspout water pools within 10 feet (3 m) of the foundation
Perimeter French drain installation (interior or exterior):
Interior drains are less disruptive but do not address the source. Exterior drains are more effective but require significant excavation.
Exterior French drain (step-by-step):
- Excavate a trench 24 inches (61 cm) wide × 24 inches (61 cm) deep along the exterior of the foundation, from one corner to the other on the wet side(s). Call 811 before digging.
- Grade the trench bottom. The trench bottom must slope a minimum of 1/8 inch per linear foot (10 mm per linear meter) toward the outlet — a dry well, daylight outlet, or storm drain. Use a laser level or a line level and string.
- Line the trench with filter fabric. Use nonwoven geotextile fabric (Mirafi 140N or equivalent). Cut strips wide enough to wrap over the top of the finished gravel — approximately 5 feet (1.5 m) wide for a 2-foot (0.6 m) trench. Lay the fabric in the trench, draped up both walls.
- Add 3 inches (7.6 cm) of clean 3/4-inch (19 mm) washed stone on the trench bottom.
- Lay 4-inch (10 cm) perforated PVC pipe (holes facing down) on the stone bed.
- Fill the trench with washed stone to within 6 inches (15 cm) of grade.
- Fold the filter fabric over the top of the stone and overlap the edges.
- Backfill with topsoil and seed or sod over the disturbed area.
Drain cost: A 50-foot (15 m) exterior French drain runs $1,500–$4,000 DIY (labor-intensive) or $3,000–$8,000 contracted.
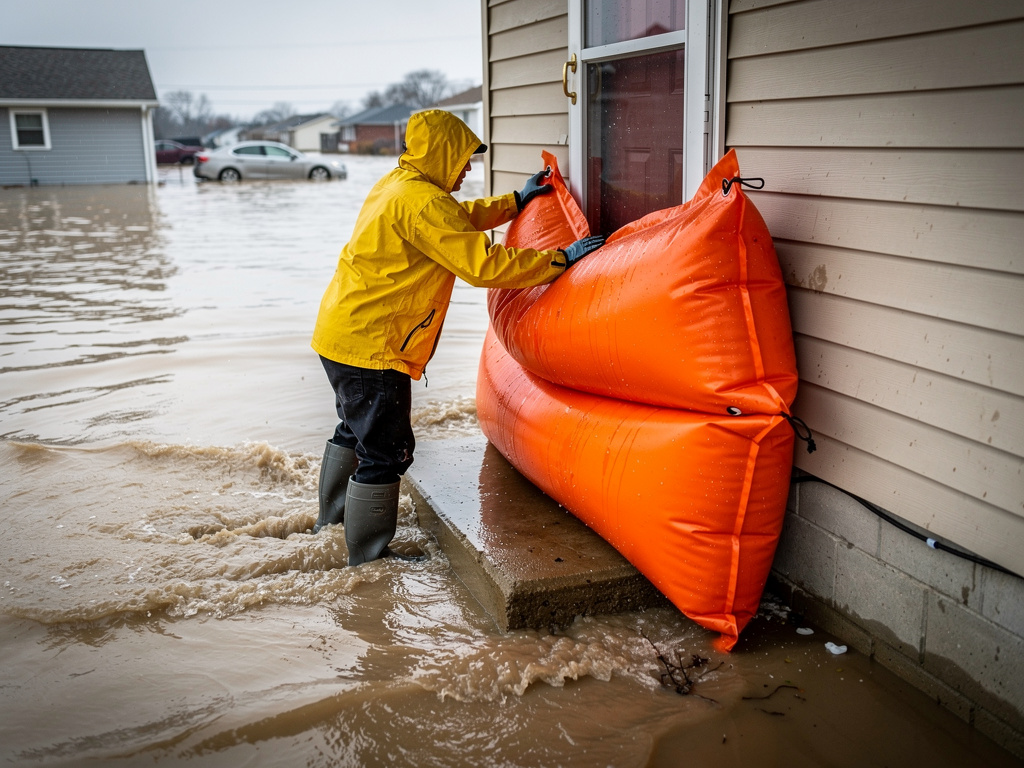
Step 6 — Install Temporary Flood Barriers
For properties where BFE is only slightly above finished floor elevation, temporary barriers can provide last-minute protection during a flood warning.
| Barrier Type | Protection Height | Cost | Notes |
|---|---|---|---|
| AquaDam (water-filled tube) | Up to 3 ft (0.9 m) | $500–$2,000 | Reusable; fills with garden hose |
| NOAQ Boxwall | Up to 27 in (69 cm) | $2,000–$5,000 | Modular; fast assembly |
| Sandbags (standard fill) | Variable | $0.50–$2/bag | Labor-intensive; slow to deploy |
| Door flood shields (Floodstop) | Up to 24 in (61 cm) | $200–$600 per door | Permanent mounting; fast deploy |
| Water-filled bladder berms (HydraBarrier) | Up to 12 in (30 cm) | $100–$400 | Good for vehicle access areas |
Critical deployment principle: Temporary barriers must be deployed before water arrives. Once flowing surface water surrounds your home, deployment is dangerous and often impossible. Monitor National Oceanic and Atmospheric Administration (NOAA) flood watches and begin deployment at the Watch stage, not the Warning stage.
Sandbag technique:
- Fill bags 50% full — overfull bags do not compact well.
- Layer bags with the fold facing the water and the open end tucked under the course below.
- Stagger joints like brick courses for structural integrity.
- Two rows of sandbags, each 2 bags wide, holds approximately 18 inches (46 cm) of water depth.
Step 7 — Seal Above-Grade Penetrations
Even with flood vents and barriers, water enters through utility penetrations that are routinely overlooked.
- Sewer backflow preventer: Install a backflow prevention valve (check valve) on the main sewer line to prevent floodwater from backing up through floor drains and toilets. Installed cost is affordable to moderate. This is one of the most cost-effective flood protection investments available.
- Electrical panel: If your panel is in the basement, move it above BFE. A flooded panel is dangerous and is a significant investment to replace.
- HVAC equipment: Raise water heaters, furnaces, and AC units above BFE on pressure-treated lumber plinths.
- Window well covers: Install clear polycarbonate or metal dome covers over basement window wells. Cost is affordable per well.
Cost Summary
| Upgrade | Low (USD) | High (USD) |
|---|---|---|
| Flood vents (16 vents, installed) | $800 | $2,400 |
| Sump pump + battery backup | $350 | $700 |
| Sump pit excavation and liner | $200 | $500 |
| Exterior French drain (50 ft / 15 m) | $1,500 | $8,000 |
| Sewer backflow valve | $200 | $800 |
| Temporary flood barriers (door shields) | $400 | $1,200 |
| HVAC elevation | $500 | $2,000 |
| Total (basic wet-proofing + sump) | $1,350 | $3,600 |
| Total (full exterior upgrade) | $4,000 | $15,600 |
Related Pages
- Flood Threat — flood types, warning systems, and evacuation decision-making
- Basements & Safe Rooms — structural hardening for the basement space itself
- Weatherproofing — sealing the building envelope against water entry above grade
- Generators — keeping the sump pump running during extended power outages