Fire-Resistant Construction
Homes in wildland-urban interface (WUI) zones are not destroyed by the fire front — they are ignited by embers. Research by the Insurance Institute for Business & Home Safety (IBHS) and Cal Fire consistently shows that 90% of structure losses in WUI fires are caused by embers landing on combustible materials: wood shake roofs, wood decks, open attic vents, and dry mulch against the foundation.
This means fire-resistant construction is largely about closing ember entry points and removing ignitable fuel close to the structure. You do not need to build a fireproof bunker; you need to eliminate the dozen most common ignition pathways. This page walks through every step in order of impact, from the ground up.

Step 1 — Understand the Zone System
The California Department of Forestry and Fire Protection (Cal Fire), NFPA 1144, and the 2021 International Residential Code (IRC) all use a concentric zone model for defensible space. Think of it as three rings around your home:
| Zone | Distance | Goal |
|---|---|---|
| Zone 0 | 0–5 ft (0–1.5 m) | Noncombustible materials only; no ignition pathway to structure |
| Zone 1 | 5–30 ft (1.5–9 m) | Lean, green, and clean; fuel continuity broken |
| Zone 2 | 30–100 ft (9–30 m) | Reduced fuel density; fire travels lower and slower |
Start with Zone 0 — it has the highest impact per dollar and requires no permits in most jurisdictions. Many homes that survived the 2018 Camp Fire and 2021 Dixie Fire had Zone 0 hardening even when neighbors' homes burned.
Step 2 — Establish Zone 0 (0–5 ft / 0–1.5 m)
Zone 0 is everything within 5 feet (1.5 m) of your foundation, walls, deck edges, and fence connections. This zone must be entirely noncombustible or maintained as bare earth.
Remove immediately:
- All wood mulch within 5 ft (1.5 m) of the home. Replace with gravel, decomposed granite, or concrete pavers. River rock (1.5-inch / 3.8 cm diameter minimum) works well.
- Any wood, plastic, or composite deck boards within 5 ft (1.5 m) of the structure. Replace with concrete, porcelain tile, or Trex Transcend (which passed ASTM E-108 fire testing).
- Dead or dry vegetation including grass. Maintain bare soil or low-water noncombustible groundcover.
- Combustible storage: firewood, propane tanks (relocate minimum 30 ft / 9 m from structure), lumber piles.
- Wood fences that connect directly to the home. Metal fences or a 6-inch (15 cm) concrete gap at the house connection breaks the ignition pathway.
Cost: Gravel and pavers in Zone 0 typically run $2–$8 per sq ft ($21–$86 per m²), depending on material. For a 5-foot perimeter around a 2,000 sq ft (186 m²) footprint home, expect $1,500–$5,000 total.
Field Note
Do not substitute "fire-resistant" mulch products for Zone 0 clearance. Products marketed as fire-resistant mulch are merely slower to ignite — when exposed to sustained ember showers, they still ignite. The only safe material within 5 feet (1.5 m) of your home is noncombustible. Gravel is the standard; concrete is ideal.
Step 3 — Clear Zone 1 (5–30 ft / 1.5–9 m)
Zone 1 is not a clear-cut zone — it is a fuel management zone. The goal is to interrupt vertical and horizontal fuel continuity so a fire approaching from Zone 2 cannot climb from ground fuel to shrubs to tree canopy.
Vegetation guidelines for Zone 1:
- Remove all dead vegetation. This is the single most impactful action.
- Cut grass short: maximum 4 inches (10 cm) height during dry season.
- Space shrubs so there is a minimum 4-foot (1.2 m) gap between shrub crowns.
- Remove all ladder fuels — branches within 6 feet (1.8 m) of the ground on any tree within Zone 1. This prevents ground fire from climbing to the canopy.
- Space trees so canopy edges are at least 10 feet (3 m) apart (18 feet / 5.5 m on slopes greater than 20%).
- Remove any tree within 10 feet (3 m) of a structure.
What to plant: Irrigated lawn, succulents, and low-growing, high-moisture-content shrubs (California fescue, Salvia, native bunch grasses) are the most fire-resistant ground covers. Avoid: juniper, arborvitae, ornamental grasses, rosemary, and lavender — all ignite readily.
Step 4 — Upgrade the Roof
The roof is the largest flat surface in your home's "ember catch" profile. A wood shake or cedar shingle roof will ignite from a single ember landing in a dry crevice between shingles.
Class A roofing materials (ASTM E108 Class A rating, highest fire resistance):
- Asphalt composition shingles (Class A): Owens Corning Duration, GAF Timberline HDZ — $2–$5 per sq ft ($21–$54 per m²) installed
- Concrete tile: $4–$8 per sq ft ($43–$86 per m²) installed; heavy (9–12 lbs/sq ft / 44–58 kg/m²) — verify roof framing load capacity before installing
- Metal roofing (standing seam, Class A when tested): $7–$14 per sq ft ($75–$150 per m²) installed; 50-year lifespan typical
- Fiber cement shingles (James Hardie Roofing): Class A; $4–$7 per sq ft ($43–$75 per m²)
What to avoid: Wood shakes and cedar shingles are Class C or unrated. Even fire-retardant-treated (FRT) wood roofing is only Class B and the treatment degrades over 10–15 years.
Roof installation details that matter:
- Install continuous ridge vent with baffled ember-resistant mesh (Brandguard, DCI, or equivalent) — ridge openings are a primary ember entry point into the attic.
- Seal all roof-to-wall intersections with metal flashing, not wood trim boards.
- Replace wood fascia and soffits with fiber cement or aluminum. These are frequent ignition points.
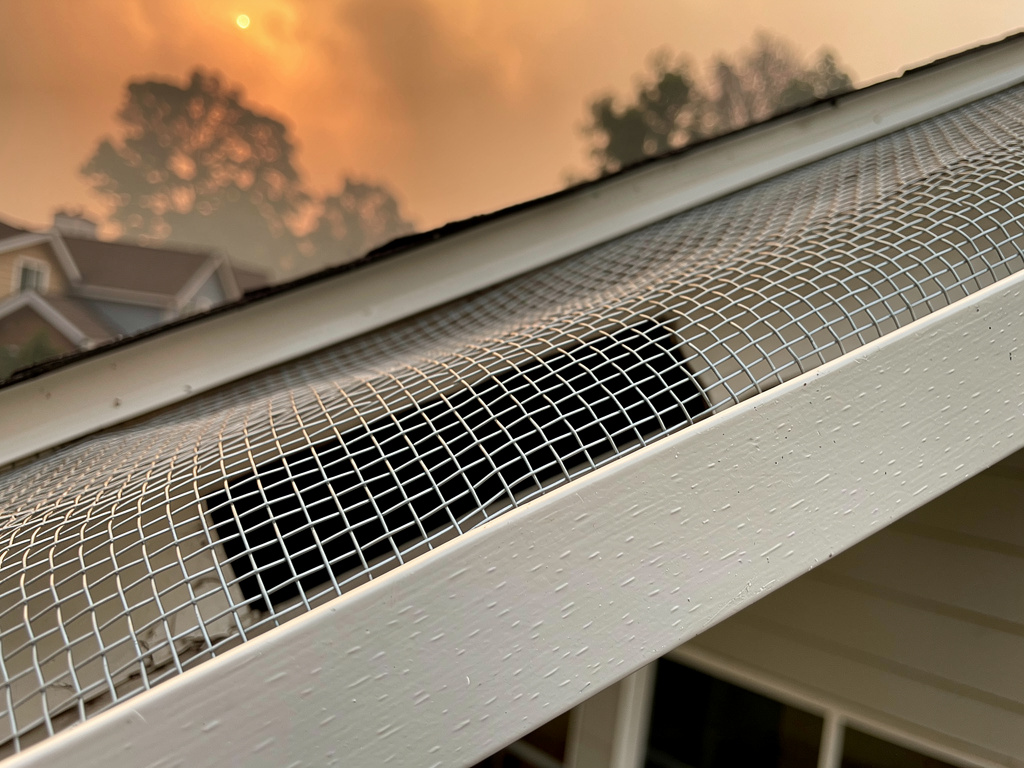
- Install leaf guards or metal screens (1/8-inch / 3 mm mesh maximum) in all gutters, or use solid-cap gutter covers.
Step 5 — Install Ember-Resistant Vents
Attic and foundation vents are the most underestimated entry point for embers. A standard rectangular louvered foundation vent has openings large enough for embers to pass directly into the crawl space, where they can smolder for hours before igniting framing.
The standard: IRC Section R302.2 (2021) requires ember-resistant vent construction for homes in WUI zones. This means 1/8-inch (3 mm) maximum opening size in any vent screen.
Step-by-step vent replacement:
- Inventory all vents. Walk the perimeter and note every foundation, crawl space, and attic vent. Count them and measure the rough opening size.
- Purchase replacement vents. Brandguard Vent (model BVG-1/8), O'Hagin Vent (all models), or Vulcan Vent (tested per ASTM E2886) are IBHS-tested products. Cost is inexpensive to affordable per vent depending on size.
- Remove the old vent by unscrewing the flange screws and pulling the vent unit out.
- Clean the opening. Remove any accumulated debris, old caulk, or insulation blocking the rough opening.
- Insert the new vent. For stucco walls, use a stucco-flange vent and caulk all four edges with elastomeric sealant rated for exterior use.
- Test airflow. Hold a tissue near the vent interior on a breezy day. You should still feel air movement — ember-resistant vents restrict airflow by 10–30% versus open vents, which is acceptable.
Do not screen over existing vents. Layering standard window screen over a louvered vent reduces airflow to the point of moisture problems in crawl spaces. Replace, do not cover.
Step 6 — Replace Combustible Siding
Vinyl siding melts and pools burning at approximately 280°F (138°C) — it fails early in fire exposure, exposing the wall sheathing. Wood lap siding ignites. Fiber cement is the standard replacement material for WUI construction.
Siding comparison:
| Material | Fire Rating | Cost Installed (per sq ft / m²) | Notes |
|---|---|---|---|
| Fiber cement (James Hardie HardiePlank) | Class A | $5–$10 / $54–$108 | IRC 2021 compliant; most common replacement |
| Stucco (traditional 3-coat) | Class A | $8–$15 / $86–$161 | Excellent fire resistance; labor-intensive |
| Brick or stone veneer | Class A | $12–$30 / $129–$323 | Best performance; high cost |
| Fire-rated OSB (Huber Zip-R) | Class A sheathing | $3–$5 / $32–$54 | Used as sheathing layer under other materials |
| Vinyl siding | Class D (no rating) | $3–$7 / $32–$75 | Avoid in WUI zones |
Fiber cement installation steps:
- Remove old siding down to the wall sheathing. Inspect sheathing for moisture damage — replace any soft or discolored panels.
- Install housewrap (Tyvek HomeWrap or equivalent) over sheathing with 6-inch (15 cm) horizontal overlaps, lapped shingle-style (upper course overlaps lower) to shed water.
- Install starter strip — a 1.25-inch (3.2 cm) wide strip of fiber cement at the bottom course to maintain the correct reveal angle.
- Install planks from the bottom up using 1.5-inch (3.8 cm) hot-dipped galvanized or stainless steel siding nails. Face-nail 1 inch (2.5 cm) from the bottom edge of each plank at each stud location — do not miss studs.
- Caulk all butt joints with a fiber cement compatible sealant (paintable, flexible). Do not leave unsealed joints — this is where water and embers enter.
- Prime and paint within 180 days of installation (James Hardie's warranty requires it). Use an elastomeric exterior paint — two coats minimum.
Total siding upgrade cost for a 1,500 sq ft (139 m²) single-story home exterior: $7,500–$15,000 for fiber cement installed, $12,000–$45,000 for brick veneer.
Step 7 — Upgrade Decks and Openings Under Elevated Structures
Elevated decks act as fuel platforms — burning debris collects under them, and the open space below traps heat and allows fire to attack the floor framing.
- Enclose the underside of the deck with 1/8-inch (3 mm) mesh screening on a metal frame to prevent debris accumulation underneath.
- Replace wood deck boards with composite or metal decking (Trex Transcend, Fiberon Horizon, or aluminum decking).
- Install 1/8-inch mesh along all open joist bays where the deck attaches to the house to prevent ember intrusion at the ledger.
- Replace any wood lattice skirting with metal, masonry, or noncombustible composite.
IRC 2021 Ignition-Resistant Construction (IRC) Summary
The 2021 IRC Section R327 defines Ignition-Resistant Construction (IRC) for WUI zones. Key minimums:
- Roofing: minimum Class A
- Exterior walls: noncombustible or ignition-resistant material on the exterior face
- Vents: 1/8-inch (3 mm) maximum opening dimension
- Decks attached to the home: minimum ignition-resistant decking (ASTM E2632 tested)
- Exterior windows: single pane glass is not permitted in high-fire-risk zones; use dual-pane or tempered glass
Check with your local building department — many counties in California, Colorado, Oregon, and Texas have adopted or exceeded IRC 2021 WUI provisions.
Cost Summary
| Upgrade | Low (USD) | High (USD) |
|---|---|---|
| Zone 0 gravel and noncombustible materials | $1,500 | $5,000 |
| Zone 1 vegetation management (professional) | $500 | $2,000 |
| Class A roof replacement (1,500 sq ft / 139 m²) | $6,000 | $15,000 |
| Ember-resistant vents (20 vents) | $300 | $1,600 |
| Fiber cement siding (1,500 sq ft / 139 m² exterior) | $7,500 | $15,000 |
| Deck upgrade to noncombustible | $2,000 | $8,000 |
| Total (incremental upgrades only) | $5,000 | $15,000 |
| Total (full exterior retrofit) | $17,800 | $46,600 |
Related Pages
- Wildfire Threat — understanding fire behavior, evacuation triggers, and shelter-in-place decisions
- Weatherproofing — sealing the building envelope against water, wind, and air infiltration
- Storm Hardening — complementary roof and wall upgrades for wind and hail
- Basements & Safe Rooms — below-grade refuge during fire evacuation delay