Earthbag Construction
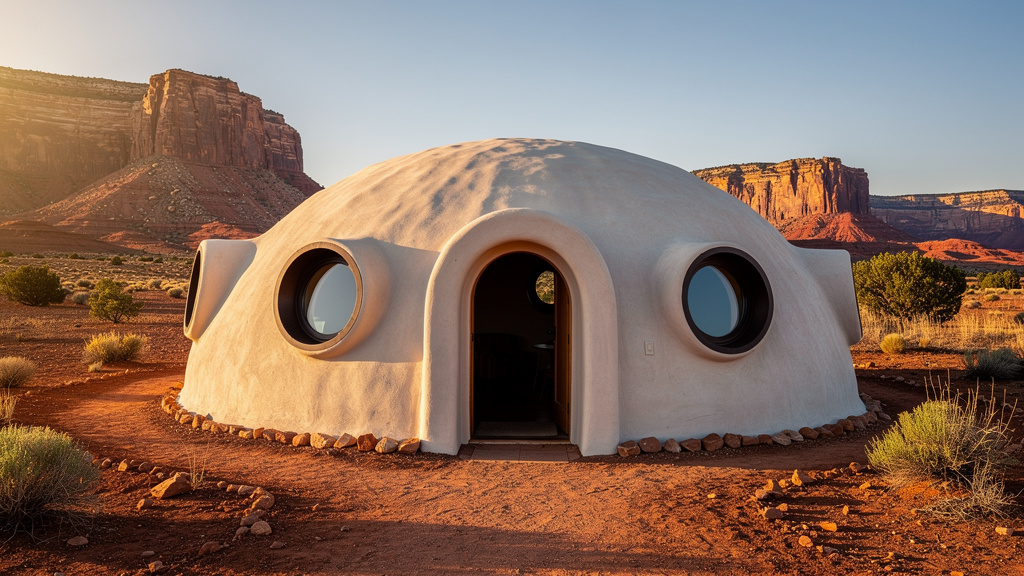
Earthbag construction is one of the most accessible permanent building methods available to an owner-builder with limited cash but available time and labor. You fill woven polypropylene bags with damp subsoil or gravel, stack them in courses like giant bricks, lay two strands of barbed wire between every course for shear resistance, and finish the walls with earthen or cement plaster. A modest owner-built earthbag home can be completed for $10–$25 per square foot ($108–$269/m²) in material costs — a fraction of conventional stick-frame construction at $150–$250/sq ft ($1,615–$2,690/m²). The walls carry their own load, resist fire, resist insects, and provide genuine thermal mass for passive temperature regulation.
This page walks you through the full build sequence from site selection to final plaster. It assumes you have never built with earthbags before.
What You Need to Know Before You Start
How earthbag walls actually work
The structural strength of an earthbag wall comes from three things working together:
- Compacted fill — damp subsoil (ideally 30% clay content) or gravel packed tightly inside the bag creates a dense, heavy unit.
- Friction between courses — each bag locks against its neighbors and against the barbed wire below it.
- Arching geometry — circular and dome plans are inherently self-bracing; rectangular plans require buttresses or pilasters (vertical thickening columns) at corners and beside large openings.
Walls are typically 12–18 inches (30–46 cm) thick, which provides both structural mass and thermal lag. A 12-inch (30 cm) earthbag wall has an R-value of roughly R-3 to R-5 depending on fill material — modest insulation, but the thermal mass delays temperature peaks by 8–12 hours, which matters enormously in climates with wide diurnal swings.
Fill material options
| Fill | Best Use | Notes |
|---|---|---|
| Damp subsoil (30% clay) | Load-bearing walls | Free on most sites; test before using |
| Decomposed granite / gravel | First course, wet climates | Drains well; no clay needed |
| Volcanic pumice | Insulating infill walls | Lighter; lower structural strength |
| Adobe soil | High thermal mass walls | Mix same as cob — see Cob Building |
Tools and materials list
- Woven polypropylene bags (18 × 30 in / 46 × 76 cm or 18 × 36 in / 46 × 91 cm): approximately 8–12 bags per square foot of wall face area
- 4-point barbed wire, 14-gauge or heavier: 2 strands per course, approximately 100 ft (30 m) per 25 linear feet of wall
- Tamper: a 4 × 4 in (10 × 10 cm) post with a steel plate welded to the bottom, or a commercial pneumatic tamper for large projects
- Long carpenter's level (4 ft / 1.2 m minimum), line level, and string line
- Shovels, a soil screener, and a fill funnel or tube
- Barbed wire gloves (leather, not latex)
- Rubble, gravel, and plastic sheeting for drainage layer under first course
- Buck frames: 2 × 6 in (38 × 140 mm) lumber for door and window openings
- Surface finish: earthen plaster (clay, sand, chopped straw) or cement-lime plaster
Step 1 — Site Selection and Drainage Planning
Earthbag buildings fail primarily from water intrusion. Before you dig, solve drainage permanently.
- Choose slightly elevated ground or create a swale to direct surface water away from the footprint. Minimum 2% slope (2 in per 8 ft / 5 cm per 2.4 m) away from all walls.
- Identify your subsoil. Dig a test hole 18 inches (46 cm) deep and squeeze a handful of moist soil. If it holds a ribbon without crumbling, clay content is adequate. A jar test (fill a quart jar halfway with soil and water, shake, let settle overnight) is more precise — the clay layer on top should be 25–40% of total depth.
- Mark the footprint using batter boards and string lines. Leave at least 3 ft (90 cm) clearance from any property line (verify local setbacks).
- Establish final floor level at least 12 inches (30 cm) above exterior grade to protect the base of the wall from splash erosion.
Step 2 — Foundation and Drainage Course
Earthbag walls are heavy. A 10 ft × 10 ft (3 × 3 m) section of 12-inch (30 cm) wall stands roughly 8 ft (2.4 m) tall and weighs 6,000–8,000 lbs (2,700–3,600 kg). The foundation must distribute this load and prevent capillary moisture wicking up into the bags.
Option A — Rubble trench (lowest cost):
- Excavate a trench 24 in (61 cm) wide and 18–24 in (46–61 cm) deep along the full wall perimeter.
- Lay a perforated drain pipe at the bottom, sloped 1/8 in per ft (10 mm/m) toward a daylight exit or dry well.
- Fill the trench with 3/4 in (19 mm) crushed gravel to within 4 in (10 cm) of grade.
- Top with a layer of geotextile fabric, then a first gravel-filled earthbag course.
Option B — Concrete stem wall (for higher seismic/flood risk):
- Pour a continuous concrete footing 18 in (46 cm) wide × 12 in (30 cm) deep.
- Build a CMU (concrete masonry unit) or poured stem wall 12–18 in (30–46 cm) above grade.
- Embed rebar stubs at 24 in (61 cm) centers to tie into the earthbag courses above.
- Install a capillary break (sheet metal flashing, two layers of roofing felt, or liquid DPC) on top of the stem wall before the first earthbag course.
Warning
Never place earthbags directly on bare soil or on a concrete slab without a capillary break. Moisture wicking destroys bags and causes wall settlement within 3–5 years.
Step 3 — First Earthbag Course
The first course is the most critical — misalignment here compounds through every course above.
- Lay out string lines precisely at the outer edge of the first course. Use a plumb bob to transfer corner marks from batter boards.
- Fill bags with gravel (not soil) for the first course, regardless of fill strategy for upper courses. Gravel drains and does not wick.
- Fold the open end of each bag under like a pillow. Do not tie it — folding keeps it flat and allows reshaping during tamping.
- Tamp each bag using a firm overhead strike pattern — 4–6 strikes per square foot of bag surface. The bag should consolidate from roughly 6 in (15 cm) tall to 4–4.5 in (10–11 cm) tall.
- Check level on every bag with a 4 ft (1.2 m) level. Shim low spots with damp soil tamped into a thin layer before placing the next bag.
- Overlap bag joints by half a bag length — same pattern as running-bond brickwork. Never stack two joints directly above each other.
Field Note
On the first course, stretch a taut string line along the outside face of the bags and adjust each bag before tamping. Fixing a wavy first course after tamping requires cutting bags open and refilling — expensive and discouraging. Ten extra minutes of alignment per course saves hours later.
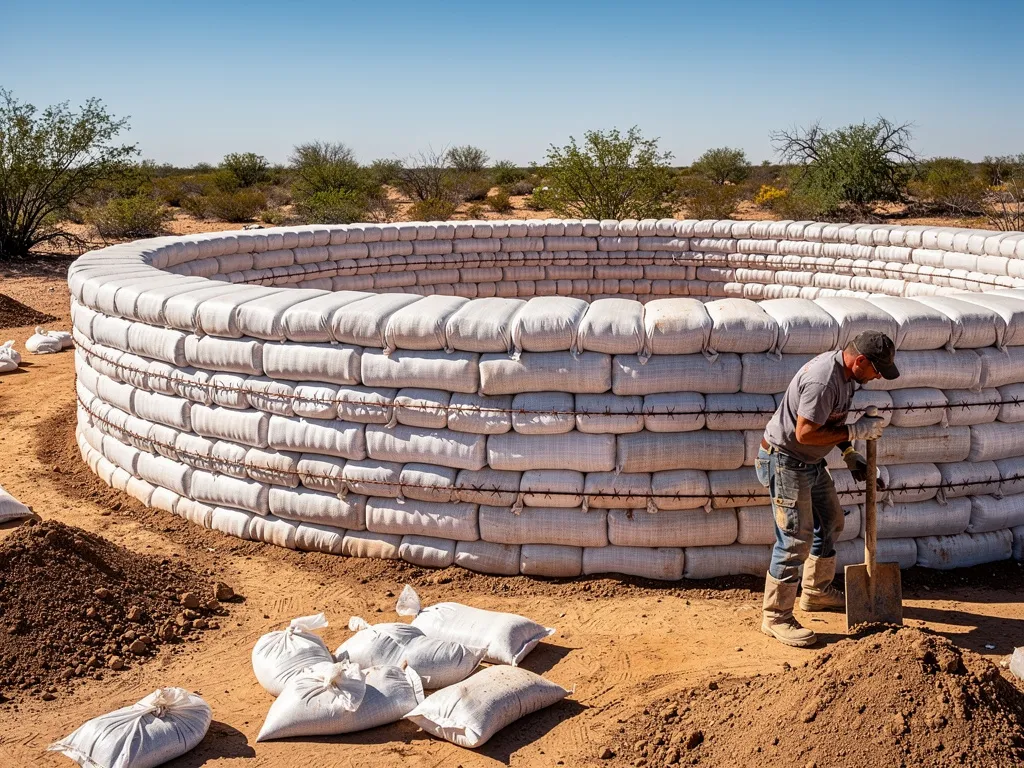
Step 4 — Laying Barbed Wire
After every tamped course (including the first), lay two strands of 4-point 14-gauge barbed wire on top of the bags before placing the next course.
- Unroll wire from a spool set on a stake or bar outside the work area to reduce tangling.
- Lay both strands flat, approximately 3 in (8 cm) from each wall face — one strand near the outer edge, one near the inner edge.
- At corners, overlap wire 12 in (30 cm) minimum. Use pliers to twist a loop in the overlap for a positive mechanical connection.
- At door and window openings, cut wire 6 in (15 cm) past the edge of the buck frame on each side and fold the ends back over the frame.
- Do not step on exposed wire between courses. Use plywood pads as stepping platforms to prevent bag puncture from barb tips.
The barbed wire acts as a horizontal tensile element — it prevents courses from sliding relative to each other under lateral loads (wind, earthquake, soil pressure on bermed walls).
Step 5 — Upper Courses and Wall Building
Continue the fill-tamp-wire cycle up to finished wall height, which is typically 8–10 ft (2.4–3 m) for a single-story structure.
Maintaining plumb and level:
- Use a story pole (a straight board with course heights marked) to verify consistency. Each tamped course should be 4–4.5 in (10–11 cm). At 10 courses, you should be at approximately 40–45 in (100–114 cm).
- Check plumb every 3 courses using a long level or plumb bob. A wall that leans more than 1 in (2.5 cm) over 8 ft (2.4 m) of height requires shimming to correct before proceeding.
Mixing fill batches:
- Target fill moisture content: 15–18% by weight. Grab a handful and squeeze — it should hold shape but not release water when pressed hard.
- Screen fill through 1/2 in (13 mm) hardware cloth to remove rocks that create voids inside bags.
- Mix clay subsoil with sand at a 2:1 ratio (soil:sand) if native soil is heavier than 50% clay to prevent cracking.
Corner construction:
At corners, alternate the direction of bag overlaps by 90° on every course. Think of it as stacking courses of bricks: Course 1 has a bag running north-south bridging the corner; Course 2 has a bag running east-west. This interlocking pattern is what gives earthbag corners their strength.
Step 6 — Framing Doors and Windows
Door and window openings must be pre-planned. You cannot cut an opening in an earthbag wall after the fact without major structural reinforcement.
- Build buck frames from 2 × 6 in (38 × 140 mm) lumber — a complete rectangular frame sized to the rough opening. Brace diagonally so the frame stays square during construction.
- Set the buck frame in position as you build up courses around it. Nail barbed wire ends to the frame sides to anchor it.
- Build an arch or lintel over each opening:
- Bottle arch: Fill a curved row of bags over the opening following an arch form. The thrust from the arch transfers into the wall mass on each side.
- Timber lintel: Use a structural timber (4 × 8 in / 89 × 184 mm minimum for openings to 4 ft / 1.2 m wide) with a minimum 12 in (30 cm) bearing on each side.
- Opening width should not exceed one-third of the wall length between buttresses. For a 12 ft (3.7 m) wall section, maximum single opening is 4 ft (1.2 m).
Step 7 — Bond Beam and Roof Attachment
Earthbag walls cannot accept point loads well. Roof loads must be distributed around the full wall perimeter via a bond beam (also called a top plate or crown beam).
Poured concrete bond beam (most common):
- Build a form along the top of the wall using lumber, 8 in (20 cm) tall.
- Embed rebar (2 runs of #4 / 12.7 mm rebar) horizontally in the form and tie it to any rebar stubs from the foundation.
- Pour concrete, vibrate or rod thoroughly to eliminate voids, and cure for 7 days minimum before loading.
- Embed anchor bolts (1/2 in / 13 mm diameter, 18 in / 46 cm long, J-hook style) at 24 in (61 cm) centers for top plate attachment.
With anchor bolts set, attach a standard 2 × 6 or 2 × 8 (38 × 140 mm or 38 × 184 mm) pressure-treated top plate and build the roof system as you would for any conventional building. See Weatherproofing for roof overhang requirements. Minimum roof overhang is 24 in (61 cm) on all sides to protect the wall surface from rain splash.
Step 8 — Plaster Finish
Bare earthbags are not a finished surface. Exposed polypropylene degrades in UV light within 2–3 years and provides no weather resistance. Plaster is non-negotiable.
Earthen plaster (interior and exterior in dry climates):
- Mix: 1 part clay-rich soil : 2 parts sand : 1/4 part chopped straw (by volume)
- Apply 3 coats: scratch coat (3/8 in / 10 mm), brown coat (3/8 in / 10 mm), finish coat (1/8 in / 3 mm)
- Scratch into first coat with a notched tool before it fully dries to create mechanical key for second coat
- Total system cost: approximately $1.50–$3/sq ft ($16–$32/m²) if using site soil
Cement-lime plaster (exterior in wetter climates):
- Mix: 1 part Portland cement : 1 part hydrated lime : 6 parts clean sand
- Apply over expanded metal lath stapled or tied through the wall
- Cost: approximately $4–$7/sq ft ($43–$75/m²) for materials
Both systems require the wall to be fully dry before final coats are applied. In humid climates, allow 2–4 weeks of drying after wall completion before plastering.
Cost Summary
| Item | Low End | High End |
|---|---|---|
| Bags (1,000 bags) | $80 | $200 |
| Barbed wire (5 rolls) | $60 | $120 |
| Gravel for base course | $200 | $500 |
| Foundation materials | $400 | $2,000 |
| Buck frames (lumber) | $150 | $400 |
| Bond beam (concrete + rebar) | $300 | $800 |
| Plaster materials | $400 | $1,500 |
| Total materials (400 sq ft / 37 m² cottage) | $1,600 | $5,500 |
Labor is not included. Owner-builder labor runs 500–1,200 hours for a 400 sq ft (37 m²) structure.
Common Mistakes and How to Avoid Them
| Mistake | Consequence | Prevention |
|---|---|---|
| Skipping barbed wire on any course | Lateral shear failure in seismic zones | Check off every course before stacking |
| Using topsoil instead of subsoil | Organic decomposition causes settling | Always use subsoil from below the duff layer |
| Rushing the fill moisture | Bags won't compact fully; settlement later | Squeeze test every batch |
| No roof overhang | Plaster erodes in 5–10 years | Minimum 24 in (61 cm) all sides |
| Single-skin walls in wet climate | Moisture infiltration, bag rot | Add exterior drainage mat + waterproof plaster |
Related Pages
- Cob Building — complementary natural building method using clay-sand-straw without bags
- Insulation — adding thermal performance to earthbag walls in cold climates
- Weatherproofing — roof, drainage, and plaster details
- Soil Testing — identify clay content in your native subsoil
- Bunkers — earthbag technique adapts well to bermed and underground structures